目录
- 核心概念简介
- 为什么选择 ASP.NET Core + EF Core?
- ADO.NET vs. Entity Framework Core
- 环境准备
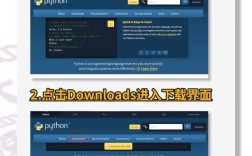
- 安装 Visual Studio
- 安装 SQL Server
- 创建第一个 ASP.NET Core 项目
- 第一步:定义数据模型
- 什么是模型?
- 创建一个简单的
Product模型
- 第二步:配置数据库连接
- 使用
appsettings.json存储连接字符串 - 配置
Program.cs文件
- 使用
- 第三步:创建数据库上下文
- 什么是数据库上下文?
- 创建
ApplicationDbContext类
- 第四步:配置 EF Core 并创建数据库
- 注册
DbContext服务 - 使用 Code First 迁移 创建数据库
- 注册
- 第五步:实现 CRUD (增删改查) 操作
- 创建控制器 和视图
- Read (查询):显示数据列表
- Create (创建):添加新数据
- Update (更新):编辑现有数据
- Delete (删除):删除数据
- 进阶主题
- 数据验证与注解
- 处理关系(一对多、多对多)
- 使用仓储模式
- 学习资源与推荐
核心概念简介
为什么选择 ASP.NET Core + EF Core?
- 跨平台:ASP.NET Core 可以在 Windows, macOS, 和 Linux 上运行。
- 高性能:经过高度优化,性能卓越。
- 现代化:完全支持 .NET 5/6/7/8 等最新版本,遵循现代 Web 开发模式。
- EF Core 优势:
- 开发效率高:您只需操作 C# 对象(模型),EF Core 会自动将其转换为 SQL 语句与数据库交互,无需编写繁琐的 SQL 代码。
- 数据库无关性:可以轻松切换底层数据库(如从 SQL Server 换成 MySQL 或 PostgreSQL),而只需修改少量配置。
- Code First:先定义 C# 模型,再由 EF Core 生成数据库结构,非常适合敏捷开发。
ADO.NET vs. Entity Framework Core
| 特性 | ADO.NET | Entity Framework Core |
|---|---|---|
| 抽象级别 | 底层,直接与数据库通信 | 高层,通过对象与数据库通信 |
| 代码复杂度 | 高,需要手动编写 SQL、管理连接、处理 DataReader | 低,使用 LINQ 查询,操作 C# 对象 |
| 性能 | 极高,无 ORM 开销 | 良好,但有轻微性能损耗(通常可忽略) |
| 控制力 | 完全控制 SQL 和执行计划 | EF Core 生成 SQL,有时可能不是最优解 |
| 适用场景 | 性能要求极端的复杂查询、批量操作 | 绝大多数 Web 应用、业务逻辑开发 |
本教程将重点讲解 EF Core,因为它能极大提升开发效率。

环境准备
安装 Visual Studio
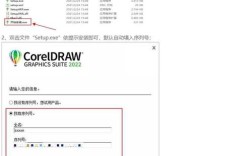
推荐安装 Visual Studio 2025 Community (免费版),在安装程序中,确保勾选以下工作负载:
- ASP.NET 和 Web 开发
- .NET 桌面开发
- 使用 C# 的桌面开发
安装 SQL Server
您可以选择:
- SQL Server Express LocalDB:Visual Studio 安装时会自动包含一个轻量级的 SQL Server 版本,非常适合学习和开发。
- 完整的 SQL Server:如果您需要更强大的功能。
创建第一个 ASP.NET Core 项目
- 打开 Visual Studio。
- 选择 "创建新项目"。
- 搜索并选择 "ASP.NET Core Web 应用",然后点击 "下一步"。
- 为项目命名,
AspNetCoreDbDemo,然后点击 "下一步"。 - 选择框架(推荐 .NET 8.0 或 .NET 7.0),确保身份验证设置为 "无"(因为我们专注于数据库操作),然后点击 "创建"。
第一步:定义数据模型
模型是表示您数据库中数据的 C# 类,我们将创建一个简单的 Product 模型。
- 在
Models文件夹(如果没有,请创建一个)中,创建一个名为Product.cs的文件。 - 添加以下代码:
// Models/Product.cs
using System.ComponentModel.DataAnnotations;
using System.ComponentModel.DataAnnotations.Schema;
namespace AspNetCoreDbDemo.Models
{
    public class Product
    {
        public int Id { get; set; }
        [Required]
        [StringLength(100)]
        public string Name { get; set; }
        [Column(TypeName = "decimal(18, 2)")]
        public decimal Price { get; set; }
        public int Stock { get; set; }
    }
}
代码解释:

Id:主键,EF Core 默认会将其识别为主键。[Required]:数据注解,表示此字段在数据库中不能为空。[StringLength(100)]:限制字符串最大长度为 100。[Column(TypeName = "decimal(18, 2)")]:明确指定数据库中此列的数据类型为decimal,总精度 18,小数位数 2。
第二步:配置数据库连接
我们需要告诉应用程序如何连接到数据库。
- 打开
appsettings.json文件。 - 在
ConnectionStrings节点下添加一个连接字符串,如果您使用的是 LocalDB,可以使用以下配置:
{
  "ConnectionStrings": {
    "DefaultConnection": "Server=(localdb)\\mssqllocaldb;Database=AspNetCoreDbDemoDB;Trusted_Connection=True;MultipleActiveResultSets=true"
  },
  "Logging": {
    "LogLevel": {
      "Default": "Information",
      "Microsoft.AspNetCore": "Warning"
    }
  },
  "AllowedHosts": "*"
}
连接字符串解释:
Server=(localdb)\\mssqllocaldb:指定 LocalDB 实例。Database=AspNetCoreDbDemoDB:指定要使用的数据库名称,如果数据库不存在,EF Core 会帮我们创建。Trusted_Connection=True:使用 Windows 身份验证。
第三步:创建数据库上下文
DbContext 是 EF Core 的核心,它负责与数据库进行交互,并公开 DbSet 属性来表示数据库中的表。
- 在
Models文件夹中,创建一个名为ApplicationDbContext.cs的文件。 - 添加以下代码:
// Models/ApplicationDbContext.cs
using Microsoft.EntityFrameworkCore;
namespace AspNetCoreDbDemo.Models
{
    public class ApplicationDbContext : DbContext
    {
        public ApplicationDbContext(DbContextOptions<ApplicationDbContext> options)
            : base(options)
        {
        }
        // 这将 Products 表映射到我们之前创建的 Product 模型
        public DbSet<Product> Products { get; set; }
    }
}
第四步:配置 EF Core 并创建数据库
现在我们需要将 DbContext 注册到 ASP.NET Core 的依赖注入系统中,并利用 EF Core 的迁移功能来创建数据库。

a. 注册 DbContext
打开 Program.cs 文件,在构建 Web 应用程序之前,添加以下代码来注册 ApplicationDbContext:
// Program.cs
using AspNetCoreDbDemo.Models;
using Microsoft.EntityFrameworkCore;
var builder = WebApplication.CreateBuilder(args);
// 1. 添加服务到容器。
builder.Services.AddControllersWithViews();
// 注册 ApplicationDbContext
// 从 appsettings.json 读取连接字符串
// 使用 Scoped 生命周期(每个 HTTP 请求一个实例)
builder.Services.AddDbContext<ApplicationDbContext>(options =>
    options.UseSqlServer(builder.Configuration.GetConnectionString("DefaultConnection")));
var app = builder.Build();
// ... 其余代码 ...
b. 使用 Code First 迁移创建数据库
迁移是 EF Core 管理数据库架构变更的强大工具。
-
打开“程序包管理器控制台” (Package Manager Console - PMC)
在 Visual Studio 中,点击 "工具" -> "NuGet 包管理器" -> "程序包管理器控制台"。
-
启用迁移
- 在 PMC 中,确保 "默认项目" 下拉框选择了您的
AspNetCoreDbDemo项目。 - 运行以下命令:
Add-Migration InitialCreate
- 解释:此命令会扫描您的
DbContext和模型,发现这是一个全新的项目,因此会创建一个名为InitialCreate的迁移文件,这个文件包含了创建Products表所需的所有 SQL 语句,您可以在Migrations文件夹中找到这个文件。
- 在 PMC 中,确保 "默认项目" 下拉框选择了您的
-
应用迁移
- 在 PMC 中,运行以下命令来将迁移应用到数据库:
Update-Database
- 解释:此命令会执行
InitialCreate迁移中的 SQL 脚本,在您的 SQL Server 中创建AspNetCoreDbDemoDB数据库和Products表。
- 在 PMC 中,运行以下命令来将迁移应用到数据库:
您可以在 SQL Server Object Explorer (VS 侧边栏) 中看到新创建的数据库和表了!
第五步:实现 CRUD (增删改查) 操作
我们将使用 ASP.NET Core MVC 模式来实现。
a. 创建控制器和视图
- 在 "解决方案资源管理器" 中,右键点击项目 -> "添加" -> "新建文件夹",命名为
Controllers。 - 右键点击
Controllers文件夹 -> "添加" -> "控制器..."。 - 选择 "MVC 控制器 - 空",点击 "添加"。
- 将控制器命名为
ProductsController.cs。 - 将以下代码复制到
ProductsController.cs中,这是一个完整的 CRUD 控制器。
// Controllers/ProductsController.cs
using AspNetCoreDbDemo.Models;
using Microsoft.AspNetCore.Mvc;
using Microsoft.EntityFrameworkCore;
namespace AspNetCoreDbDemo.Controllers
{
    public class ProductsController : Controller
    {
        private readonly ApplicationDbContext _context;
        // 通过构造函数注入 DbContext
        public ProductsController(ApplicationDbContext context)
        {
            _context = context;
        }
        // GET: Products
        public async Task<IActionResult> Index()
        {
            var products = await _context.Products.ToListAsync();
            return View(products);
        }
        // GET: Products/Details/5
        public async Task<IActionResult> Details(int? id)
        {
            if (id == null)
            {
                return NotFound();
            }
            var product = await _context.Products
                .FirstOrDefaultAsync(m => m.Id == id);
            if (product == null)
            {
                return NotFound();
            }
            return View(product);
        }
        // GET: Products/Create
        public IActionResult Create()
        {
            return View();
        }
        // POST: Products/Create
        [HttpPost]
        [ValidateAntiForgeryToken]
        public async Task<IActionResult> Create([Bind("Id,Name,Price,Stock")] Product product)
        {
            if (ModelState.IsValid)
            {
                _context.Add(product);
                await _context.SaveChangesAsync();
                return RedirectToAction(nameof(Index));
            }
            return View(product);
        }
        // GET: Products/Edit/5
        public async Task<IActionResult> Edit(int? id)
        {
            if (id == null)
            {
                return NotFound();
            }
            var product = await _context.Products.FindAsync(id);
            if (product == null)
            {
                return NotFound();
            }
            return View(product);
        }
        // POST: Products/Edit/5
        [HttpPost]
        [ValidateAntiForgeryToken]
        public async Task<IActionResult> Edit(int id, [Bind("Id,Name,Price,Stock")] Product product)
        {
            if (id != product.Id)
            {
                return NotFound();
            }
            if (ModelState.IsValid)
            {
                try
                {
                    _context.Update(product);
                    await _context.SaveChangesAsync();
                }
                catch (DbUpdateConcurrencyException)
                {
                    if (!ProductExists(product.Id))
                    {
                        return NotFound();
                    }
                    else
                    {
                        throw;
                    }
                }
                return RedirectToAction(nameof(Index));
            }
            return View(product);
        }
        // GET: Products/Delete/5
        public async Task<IActionResult> Delete(int? id)
        {
            if (id == null)
            {
                return NotFound();
            }
            var product = await _context.Products
                .FirstOrDefaultAsync(m => m.Id == id);
            if (product == null)
            {
                return NotFound();
            }
            return View(product);
        }
        // POST: Products/Delete/5
        [HttpPost, ActionName("Delete")]
        [ValidateAntiForgeryToken]
        public async Task<IActionResult> DeleteConfirmed(int id)
        {
            var product = await _context.Products.FindAsync(id);
            if (product != null)
            {
                _context.Products.Remove(product);
            }
            await _context.SaveChangesAsync();
            return RedirectToAction(nameof(Index));
        }
        private bool ProductExists(int id)
        {
            return _context.Products.Any(e => e.Id == id);
        }
    }
}
b. 创建视图
- 在 "解决方案资源管理器" 中,右键点击项目 -> "添加" -> "新建文件夹",命名为
Views。 - 在
Views文件夹下,再创建一个名为Products的文件夹。 - 右键点击
Views/Products文件夹 -> "添加" -> "视图..."。 - 我们需要为每个 Action 方法创建一个视图,以下是每个视图的 Razor 代码。
Index.cshtml (显示产品列表)
@model IEnumerable<AspNetCoreDbDemo.Models.Product>
@{
    ViewData["Title"] = "Index";
}
<h1>产品列表</h1>
<p>
    <a asp-action="Create">创建新产品</a>
</p>
<table class="table">
    <thead>
        <tr>
            <th>
                @Html.DisplayNameFor(model => model.Name)
            </th>
            <th>
                @Html.DisplayNameFor(model => model.Price)
            </th>
            <th>
                @Html.DisplayNameFor(model => model.Stock)
            </th>
            <th></th>
        </tr>
    </thead>
    <tbody>
        @foreach (var item in Model)
        {
            <tr>
                <td>
                    @Html.DisplayFor(modelItem => item.Name)
                </td>
                <td>
                    @Html.DisplayFor(modelItem => item.Price)
                </td>
                <td>
                    @Html.DisplayFor(modelItem => item.Stock)
                </td>
                <td>
                    <a asp-action="Edit" asp-route-id="@item.Id">编辑</a> |
                    <a asp-action="Details" asp-route-id="@item.Id">详情</a> |
                    <a asp-action="Delete" asp-route-id="@item.Id">删除</a>
                </td>
            </tr>
        }
    </tbody>
</table>
Create.cshtml (创建新产品表单)
@model AspNetCoreDbDemo.Models.Product
@{
    ViewData["Title"] = "Create";
}
<h1>创建</h1>
<h4>产品</h4>
<hr />
<div class="row">
    <div class="col-md-4">
        <form asp-action="Create">
            <div asp-validation-summary="ModelOnly" class="text-danger"></div>
            <div class="form-group">
                <label asp-for="Name" class="control-label"></label>
                <input asp-for="Name" class="form-control" />
                <span asp-validation-for="Name" class="text-danger"></span>
            </div>
            <div class="form-group">
                <label asp-for="Price" class="control-label"></label>
                <input asp-for="Price" class="form-control" />
                <span asp-validation-for="Price" class="text-danger"></span>
            </div>
            <div class="form-group">
                <label asp-for="Stock" class="control-label"></label>
                <input asp-for="Stock" class="form-control" />
                <span asp-validation-for="Stock" class="text-danger"></span>
            </div>
            <div class="form-group">
                <input type="submit" value="创建" class="btn btn-primary" />
            </div>
        </form>
    </div>
</div>
<div>
    <a asp-action="Index">返回列表</a>
</div>
@section Scripts {
    @{await Html.RenderPartialAsync("_ValidationScriptsPartial");}
}
Edit.cshtml (编辑产品表单)
@model AspNetCoreDbDemo.Models.Product
@{
    ViewData["Title"] = "Edit";
}
<h1>编辑</h1>
<h4>产品</h4>
<hr />
<div class="row">
    <div class="col-md-4">
        <form asp-action="Edit">
            <div asp-validation-summary="ModelOnly" class="text-danger"></div>
            <input type="hidden" asp-for="Id" />
            <div class="form-group">
                <label asp-for="Name" class="control-label"></label>
                <input asp-for="Name" class="form-control" />
                <span asp-validation-for="Name" class="text-danger"></span>
            </div>
            <div class="form-group">
                <label asp-for="Price" class="control-label"></label>
                <input asp-for="Price" class="form-control" />
                <span asp-validation-for="Price" class="text-danger"></span>
            </div>
            <div class="form-group">
                <label asp-for="Stock" class="control-label"></label>
                <input asp-for="Stock" class="form-control" />
                <span asp-validation-for="Stock" class="text-danger"></span>
            </div>
            <div class="form-group">
                <input type="submit" value="保存" class="btn btn-primary" />
            </div>
        </form>
    </div>
</div>
<div>
    <a asp-action="Index">返回列表</a>
</div>
@section Scripts {
    @{await Html.RenderPartialAsync("_ValidationScriptsPartial");}
}
Details.cshtml 和 Delete.cshtml
这两个视图的结构与 Edit.cshtml 类似,但它们只显示数据,不包含表单,您可以复制 Edit.cshtml 的内容,然后移除 <form> 标签和所有输入框,只保留 <label> 和 <div> 显示部分。
c. 运行和测试
- 按
F5或点击 "开始调试" 按钮。 - 浏览器会打开默认页面,在地址栏中输入
/Products(https://localhost:7123/Products)。 - 您现在应该能看到一个空的产品列表,以及一个 "创建新产品" 的链接。
- 点击链接,填写表单,创建几个产品,然后测试编辑和删除功能。
进阶主题
数据验证与注解
我们已经在 Product 模型中使用了 [Required] 和 [StringLength],EF Core 会利用这些注解在数据库层面(NOT NULL 约束)和客户端层面(使用 jQuery 验证)进行验证,您还可以使用 [Range], [EmailAddress], [Compare] 等更多注解。
处理关系
假设一个 Category 模型和一个 Product 模型,一个分类下可以有多个产品(一对多关系)。
public class Category
{
    public int Id { get; set; }
    public string Name { get; set; }
    public List<Product> Products { get; set; }
}
public class Product
{
    // ... 其他属性
    public int CategoryId { get; set; } // 外键
    public Category Category { get; set; } // 导航属性
}
EF Core 会自动识别这种关系。
使用仓储模式
对于大型项目,直接在 Controller 中使用 DbContext 会导致代码耦合度高,仓储模式是一种设计模式,它将数据访问逻辑封装在一个单独的“仓储”类中,Controller 只与仓储交互,从而实现更好的解离和可测试性。
学习资源与推荐
- 官方文档 (首选):
- 视频教程:
- Phillip Japikse (Pluralsight):.NET 和 EF Core 领域的顶级专家,他的课程非常系统。
- freeCodeCamp (YouTube):有大量免费的 ASP.NET Core 和 EF Core 入门到实战视频。
- B站:搜索 "ASP.NET Core EF Core",有大量国内UP主制作的优质教程。
- 社区:
- Stack Overflow:遇到问题时,这里是寻找答案的最佳去处。
- GitHub:查看 EF Core 的源码,了解其内部实现。
这份教程为您打下了坚实的基础,祝您学习愉快!