Of course! Here's a comprehensive guide to getting started with the requests library on a Mac, covering installation, verification, a quick example, and common troubleshooting steps.

What is the requests library?
requests is a popular and user-friendly Python library for making HTTP requests. It simplifies the process of sending HTTP/1.1 requests, unlike the built-in urllib library, which can be more complex. You use it to interact with web APIs, download files, scrape websites, and more.
Step 1: Check if Python is Installed
Before installing requests, you need to make sure you have Python. Apple includes a version of Python with macOS, but it's often outdated and managed by the system, so it's best to use a version you install yourself.
Option A: Using a Homebrew Python (Recommended)
If you use Homebrew (the most popular package manager for Mac), you likely have a separate, up-to-date Python version.
-
Check for Homebrew:
 (图片来源网络,侵删)
brew --version
If you don't have it, run the command from the Homebrew website to install it.
-
Check for Homebrew Python:
# This will show the version of Python managed by Homebrew
brew list python
# Or, check the version directly
/usr/local/bin/python3 --version
# For Apple Silicon Macs (M1/M2/M3), the path is /opt/homebrew/bin/python3
/opt/homebrew/bin/python3 --version
Option B: Using Official Python Installer
The most straightforward way to get a modern Python is to download it directly from the official website.
- Go to python.org/downloads.
- Download the latest stable version.
- Run the installer. Crucially, on the first screen of the installer, make sure to check the box that says "Install python3 launcher" and "Add python3 to PATH".
Step 2: Install the requests Library
Once you have a working Python, installing requests is simple using pip, Python's package installer.

-
Open your Terminal. You can find it in
Applications/Utilitiesor search for it with Spotlight (Cmd + Space). -
Run the installation command. It's good practice to use
python3andpip3to be explicit about which version you're using.pip3 install requests
-
Wait for the installation to complete. You will see output indicating that
requestsand its dependencies (likecertifiandcharset-normalizer) have been successfully downloaded and installed.
Step 3: Verify the Installation
It's always a good idea to confirm that the library was installed correctly.
-
Check the version:
pip3 show requests
This will print details about the installed package, including its location and version.
-
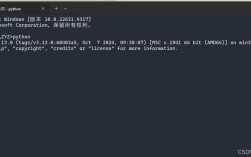
Run a quick test in the Python interpreter:
python3
Then, in the Python shell, type the following commands:
>>> import requests
>>> print(requests.__version__)
If this prints a version number (e.g.,
31.0), you have successfully installedrequests! Typeexit()or pressCtrl+Dto leave the Python shell.
Step 4: Your First requests Example
Let's make a simple GET request to httpbin.org, a fantastic service for testing HTTP requests.
Create a new file named test_requests.py and add the following code:
# test_requests.py
import requests
# The URL we want to send the request to
url = 'https://httpbin.org/get'
try:
    # Send a GET request to the URL
    response = requests.get(url)
    # Raise an exception if the request returned an unsuccessful status code (4xx or 5xx)
    response.raise_for_status()
    # Print the status code of the response
    print(f"Status Code: {response.status_code}")
    # Print the response headers as a Python dictionary
    print("\nResponse Headers:")
    print(response.headers)
    # Print the response content as JSON (since httpbin.org/get returns JSON)
    # .json() parses the response text into a Python dictionary
    print("\nResponse Content (as JSON):")
    print(response.json())
    # You can also access the raw text content
    # print("\nRaw Response Text:")
    # print(response.text)
except requests.exceptions.HTTPError as errh:
    print(f"Http Error: {errh}")
except requests.exceptions.ConnectionError as errc:
    print(f"Error Connecting: {errc}")
except requests.exceptions.Timeout as errt:
    print(f"Timeout Error: {errt}")
except requests.exceptions.RequestException as err:
    print(f"Oops: Something Else: {err}")
Now, run this script from your Terminal:
python3 test_requests.py
You should see output similar to this, showing the status code, headers, and a JSON object containing details about your request.
Common Problems and Solutions
Problem 1: pip3: command not found
This means pip isn't in your system's PATH.
- Solution: If you installed Python from the official installer, make sure you checked the "Add python to PATH" box. If you didn't, you can find
pipinside the Python application folder (e.g.,/Applications/Python 3.x/Install Certificates.commandand/Applications/Python 3.x/Install Pip.command). A simpler fix is to reinstall Python correctly.
Problem 2: ERROR: Could not build wheels for ...
This often happens when trying to install a package that needs to be compiled (like cryptography or lxml), and you're missing the necessary build tools (like Xcode Command Line Tools).
- Solution: Install the Xcode Command Line Tools.
xcode-select --install
After the installation is complete, try installing
requestsagain.
Problem 3: PermissionError or pip install without sudo
You should almost never use sudo pip3 install requests. This can lead to permission issues and conflicts with the system Python. If you get a permission error, it's usually because your pip is trying to install to a system-protected directory.
- Solution: The best practice is to use a virtual environment. This creates an isolated space for your project's dependencies.
Best Practice: Using a Virtual Environment
Virtual environments are essential for managing dependencies for different projects without them conflicting with each other.
-
Navigate to your project folder:
cd ~/Desktop/my_project
-
Create a virtual environment:
# This creates a folder named 'venv' with its own Python and pip
python3 -m venv venv
-
Activate the environment:
source venv/bin/activate
Your Terminal prompt will change to show
(venv), indicating the environment is active. -
Now, install
requestsinside the environment:pip install requests
Notice you don't need
python3orpip3here; the environment's versions are used. -
When you're done, deactivate the environment:
deactivate