Of course! Here is a comprehensive guide to installing Python using Homebrew, covering the standard installation, important considerations, and what to do next.

The Short & Sweet Answer
To install the latest stable version of Python, simply run this command in your terminal:
brew install python
That's it! Homebrew will download and install Python 3 (and its package manager, pip) along with a few useful tools.
Detailed Guide: What to Expect and What to Know
When you run brew install python, here's a more detailed breakdown of what happens.
What Does This Command Actually Do?
Running brew install python will:

- Install Python 3: This is the modern, recommended version of Python. All new projects should use Python 3.
- Install
pip: This is the standard package manager for Python, allowing you to install libraries from the Python Package Index (PyPI). - Install
setuptools: A utility for packaging and distributing Python projects. - Install
wheel: A built-format for Python packages that speeds up installation. - Install
venv: A module for creating lightweight, isolated Python environments (highly recommended for projects). - Create Symlinks: Homebrew will create command-line links so you can run
python3,pip3, etc., directly from your terminal.
Where Does it Get Installed?
Homebrew installs software into its own directory, which is typically:
/usr/local/ on Intel Macs
/opt/homebrew/ on Apple Silicon (M1/M2/M3) Macs
This is separate from the system Python that comes pre-installed with macOS. This is a good thing! It means you can safely update or modify your Homebrew Python without breaking your operating system.
Verifying the Installation
After the installation is complete, it's crucial to verify that it worked correctly.
a) Check the Python Version This should show you the version you just installed (e.g., 3.11.x or 3.12.x).

python3 --version
Note: The command is
python3, notpython. This is intentional to avoid conflicts with the system'spythoncommand.
b) Check the Pip Version
This confirms that pip was also installed correctly.
pip3 --version
c) Check the Installation Path This will show you that Python is indeed living in the Homebrew directory.
which python3
The output should be /usr/local/bin/python3 or /opt/homebrew/bin/python3.
The "Gotcha": python vs. python3
You might notice that you have to type python3. What if you want to just type python?
You can create a symbolic link to make python point to your Homebrew python3. Warning: This can have unintended side effects, as some system scripts might expect python to point to the older system version. Proceed with caution.
# Create the link (safe, but be aware of the potential issues)
brew postinstall python
This command is the official Homebrew way to set up the python symlink. It's generally safe, but if you ever run into a script complaining about Python versions, you'll know why.
Step-by-Step Walkthrough
Let's put it all together in a clean sequence.
Step 1: Update Homebrew It's always a good practice to update Homebrew's formulae before installing anything new.
brew update
Step 2: Install Python Run the installation command.
brew install python
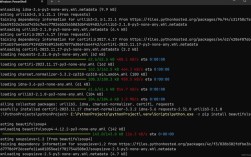
Wait for it to finish. You'll see a lot of text scrolling by as it downloads, compiles, and installs.
Step 3: Verify the Installation Run the verification commands from above.
# Check Python version
python3 --version
# Expected output: Python 3.12.0 (or similar)
# Check Pip version
pip3 --version
# Expected output: pip 23.2.1 (or similar) from /opt/homebrew/lib/python3.12/site-packages/pip (python 3.12)
# Check the location
which python3
# Expected output: /opt/homebrew/bin/python3
Step 4: (Optional) Set up the python symlink
If you want to use python instead of python3.
brew postinstall python
Now, which python should point to the same location as which python3.
Next Steps: What to Do After Installing
You have Python! Now what?
-
Create a Virtual Environment (Highly Recommended) Virtual environments are isolated spaces for your projects. They prevent conflicts between dependencies for different projects.
# Create a new directory for your project
mkdir my-awesome-project
cd my-awesome-project
# Create a virtual environment named 'venv'
python3 -m venv venv
# Activate the environment
source venv/bin/activate
# Your terminal prompt will change to show (venv)
# Now, 'python' and 'pip' will automatically refer to the
# versions inside this environment.
-
Install a Package With your virtual environment active, you can install packages using
pip.# (Inside your activated virtual environment) pip install requests # Verify it was installed pip list
-
Write and Run a Script Create a file named
hello.py:print("Hello from my new Python installation!")Run it from your terminal:
python hello.py
Troubleshooting
- "Error: No such keycask 'python'": This is very rare. It means Homebrew can't find the formula. Run
brew updateand try again. - Permission Issues: If you get permission denied errors, make sure your user is in the
admingroup. You should not need to usesudowith Homebrew commands. - Conflicts with System Python: If a script fails, it might be trying to use the system Python. You can force it to use your Homebrew Python by specifying the full path:
/usr/local/bin/pythonor/opt/homebrew/bin/python. This is another reason virtual environments are so useful.