最常用、最推荐的安装命令是使用 pip:

# 安装支持 CPU 的 TensorFlow
pip install tensorflow
# 如果你有 NVIDIA 显卡并想使用 GPU 加速
pip install tensorflow[and-cuda]
环境准备:安装 Python 和 pip
TensorFlow 是一个 Python 库,因此您需要先安装 Python。
a. 检查是否已安装 Python 和 pip
打开您的终端或命令提示符,运行以下命令:
- Windows: 打开 "命令提示符" 或 "PowerShell"。
- macOS / Linux: 打开 "终端"。
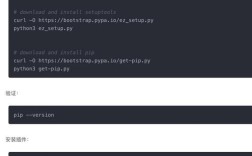
# 检查 Python 版本 (推荐 Python 3.8 - 3.11)
python --version
# 或者
python3 --version
# 检查 pip 版本
pip --version
# 或者
pip3 --version
如果命令未找到,说明您需要先安装 Python,推荐从 Python 官网 (python.org) 下载并安装。在安装时,请务必勾选 "Add Python to PATH" 选项。
创建虚拟环境 (强烈推荐)
为了避免不同项目之间的库版本冲突,最佳实践是为每个项目创建一个独立的虚拟环境。

a. 创建虚拟环境
# 创建一个名为 'tf_env' 的虚拟环境
# (你可以替换成你喜欢的任何名字)
python -m venv tf_env
b. 激活虚拟环境
- Windows (CMD):
tf_env\Scripts\activate
- Windows (PowerShell):
.\tf_env\Scripts\Activate.ps1
- macOS / Linux:
source tf_env/bin/activate
激活后,您的命令行提示符前面通常会显示
(tf_env),表示您已在该虚拟环境中。
选择并安装 TensorFlow
您需要根据自己的硬件(CPU 或 GPU)选择合适的版本。
安装 CPU 版本 (最简单,通用)
如果您没有 NVIDIA 显卡,或者只是想进行学习和实验,CPU 版本是最简单、最通用的选择。
# 在激活的虚拟环境中运行
pip install tensorflow
安装 GPU 版本 (性能强大,适合训练)
如果您有 NVIDIA 显卡,安装 GPU 版本可以极大地加速模型训练(速度可能是 CPU 的几倍甚至几十倍)。

重要前提条件:
- NVIDIA 显卡: 必须是 CUDA 架构的 NVIDIA GPU。
- NVIDIA 驱动程序: 安装与您的 GPU 兼容的最新版驱动程序,可以从 NVIDIA 官网 下载。
- CUDA Toolkit: TensorFlow 需要 CUDA。TensorFlow 2.10+ 版本开始,
pip会自动下载并管理与 TensorFlow 版本匹配的 CUDA 运行时库,您无需手动安装完整的 CUDA Toolkit。 这是目前最推荐的方式。 - cuDNN: 同样,
pip也会自动下载所需的 cuDNN 库。
安装步骤:
-
检查 GPU 是否可用: 在安装 TensorFlow 之前,您可以使用
nvidia-smi命令检查您的驱动和 CUDA 版本。nvidia-smi
您会看到类似下面的输出,注意
CUDA Version一行。+-----------------------------------------------------------------------------+ | NVIDIA-SMI 515.65.01 Driver Version: 515.65.01 CUDA Version: 11.7 | |-------------------------------+----------------------+----------------------+ | GPU Name Persistence-M| Bus-Id Disp.A | Volatile Uncorr. ECC | | Fan Temp Perf Pwr:Usage/Cap| Memory-Usage | GPU-Util Compute M. | | | | MIG M. | |===============================+======================+======================| | 0 NVIDIA GeForce ... Off | 00000000:01:00.0 Off | N/A | | 30% 35C P8 15W / 350W | 250MiB / 12288MiB | 0% Default | | | | N/A | +-------------------------------+----------------------+----------------------+ ...在这个例子中,CUDA 版本是 11.7,安装 TensorFlow 时,
pip会确保下载与 11.7 兼容的版本。 -
安装 TensorFlow with GPU 支持:
# 在激活的虚拟环境中运行
# 这会安装 TensorFlow 以及它所需的 CUDA 和 cuDNN 运行时库
pip install tensorflow[and-cuda]
验证安装
安装完成后,运行以下 Python 代码来验证 TensorFlow 是否正确安装并可以正常工作。
a. 验证 CPU 版本
import tensorflow as tf
print("TensorFlow 版本:", tf.__version__)
# 创建一个简单的计算图
a = tf.constant(2)
b = tf.constant(3)
c = tf.multiply(a, b)
# 运行计算
print("2 * 3 =", c)
# 检查可用的设备
print("可用的设备:")
print(tf.config.list_physical_devices())
如果输出类似下面这样,说明 CPU 版本安装成功:
TensorFlow 版本: 2.12.0
2 * 3 = tf.Tensor(6, shape=(), dtype=int32)
可用的设备:
[PhysicalDevice(name='/physical_device:CPU:0', device_type='CPU')]
b. 验证 GPU 版本
import tensorflow as tf
print("TensorFlow 版本:", tf.__version__)
# 检查 TensorFlow 是否能检测到 GPU
gpus = tf.config.list_physical_devices('GPU')
if gpus:
    try:
        # 打印找到的 GPU
        print("找到以下 GPU:")
        for gpu in gpus:
            print(gpu)
        # 设置 GPU 为内存增长模式,避免一开始就占用所有显存
        for gpu in gpus:
            tf.config.experimental.set_memory_growth(gpu, True)
        # 在 GPU 上执行一个简单计算
        print("\n在 GPU 上进行计算...")
        with tf.device('/GPU:0'):
            a = tf.constant([[1.0, 2.0, 3.0], [4.0, 5.0, 6.0]])
            b = tf.constant([[1.0, 2.0], [3.0, 4.0], [5.0, 6.0]])
            c = tf.matmul(a, b)
        print("矩阵乘法结果:")
        print(c.numpy())
    except RuntimeError as e:
        # 内存增长必须在 GPU 初始化之前设置
        print(e)
else:
    print("未检测到 GPU,将使用 CPU。")
如果输出中列出了您的 GPU,并且计算在 GPU 上执行,说明 GPU 版本安装成功。
常见问题与解决方案 (FAQ)
Q1: pip install 失败,出现错误 "Could not build wheels for XXX" 或 "Microsoft Visual C++ 14.0 is required"。
- 原因 (Windows): 这通常是因为缺少编译 C++ 扩展所需的编译工具(如 Microsoft C++ Build Tools)。
- 解决方案:
- 安装 Microsoft C++ Build Tools,从 Visual Studio 下载页面 下载 "Build Tools for Visual Studio"。
- 在安装程序中,选择 "C++ build tools" 工作负载,并确保包含 "Windows 10/11 SDK" 和 "English language pack"。
- 安装完成后,重新打开命令提示符,再次运行
pip install tensorflow。
Q2: 安装 GPU 版本后,tf.config.list_physical_devices('GPU') 返回空列表。
- 原因:
- NVIDIA 驱动未安装或版本过旧。
pip没有正确下载 CUDA 运行时库(.whl文件)。- CUDA 版本与 TensorFlow 版本不兼容(虽然自动下载机制已大大降低此风险)。
- 解决方案:
- 再次运行
nvidia-smi,确认驱动已安装且CUDA Version字段有值。 - 删除旧的 TensorFlow 环境,重新创建并安装
tensorflow[and-cuda]。 - (高级)尝试手动安装一个特定版本的 TensorFlow,
pip install tensorflow==2.12.0,这个版本与 CUDA 11.7 绑定得很好。
- 再次运行
Q3: 如何安装指定版本的 TensorFlow?
-
解决方案: 只需在
pip install命令后指定版本号即可。# 安装 2.10.0 版本 pip install tensorflow==2.10.0 # 安装最新的预发布版本 pip install tensorflow-nightly
Q4: 在 Jupyter Notebook 或 Google Colab 中使用?
- Jupyter Notebook: 在已经激活了虚拟环境的终端中,安装
jupyter和tensorflow,然后启动jupyter notebook即可。pip install jupyter jupyter notebook
- Google Colab: Colab 默认已经安装好了 TensorFlow,并且免费提供 GPU/TPU,您只需要在代码单元格中
import tensorflow as tf,然后使用tf.device('/GPU:0')即可,这是学习和实验的最佳平台。
希望这份详细的指南能帮助您成功下载和安装 TensorFlow!