Of course! This is a very common and important topic. "Windows Java" can refer to a few different things, so let's break it down clearly.

Here’s a comprehensive guide covering:
- What Java is and why it's used on Windows.
- How to install and set up Java on Windows.
- How to write, compile, and run a simple Java program on Windows.
- Common issues and solutions.
- Modern Java development on Windows (using an IDE).
What is Java and Why is it Used on Windows?
Java is a popular, class-based, object-oriented programming language designed to have as few implementation dependencies as possible. It's often called "write once, run anywhere" (WORA) because compiled Java code (called "bytecode") can run on any platform that has a Java Virtual Machine (JVM).
Why is it used on Windows?
- Cross-Platform Applications: Developers can write one application that runs on Windows, macOS, and Linux without changing the code.
- Enterprise Software: A huge portion of large-scale business applications, banking systems, and e-commerce platforms are built on Java (e.g., Apache, Eclipse, Google's Android OS).
- Big Data: Frameworks like Hadoop, Spark, and Kafka are primarily Java-based.
- Android Development: While Kotlin is now the official language, Java is still widely used for building Android apps.
- Desktop Applications: Many desktop tools, especially in scientific and engineering fields, are built with Java (e.g., IntelliJ IDEA, Apache NetBeans, Minecraft).
How to Install and Set Up Java on Windows
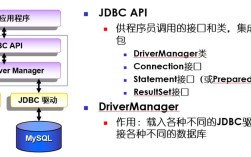
This is the most crucial step. You need to install the Java Development Kit (JDK), which includes the compiler (javac), the runtime environment (JRE), and other tools.

Step 1: Download the JDK
The best place to get the official, modern JDK is from Oracle or Eclipse Temurin (a community-driven, open-source build recommended by many developers).
-
Go to the download page:
- Oracle JDK: https://www.oracle.com/java/technologies/downloads/
- Eclipse Temurin (Recommended for most users): https://adoptium.net/
-
Select the version:
- For beginners, the latest LTS (Long-Term Support) version is best (e.g., JDK 21, JDK 17).
- Choose the installer for Windows x64 Installer.
Step 2: Install the JDK
-
Run the downloaded installer (e.g.,
jdk-21_windows-x64_bin.exe). (图片来源网络,侵删)
 -
Follow the installation wizard. It is highly recommended to accept the default installation path, which is typically:
C:\Program Files\Java\jdk-21(for Oracle)C:\Program Files\Eclipse Adoptium\jdk-21.0.2-hotspot(for Temurin)
Do not install in a path with spaces (like
C:\Program Files) if you can avoid it, although modern systems handle it well.
Step 3: Configure Environment Variables
This is the most important step. You need to tell Windows where to find the Java tools.
-
Find the Java Path: Open the installation folder you just created (e.g.,
C:\Program Files\Java\jdk-21). Inside, you'll see abinfolder. This is the path you need. -
Open Environment Variables:
- Press the Windows Key, type "environment variables", and select "Edit the system environment variables".
- In the System Properties window, click the "Environment Variables..." button.
-
Set the
JAVA_HOMEVariable:- In the "System variables" section (the bottom half), click "New...".
- Variable name:
JAVA_HOME - Variable value: The path to your JDK installation folder (e.g.,
C:\Program Files\Java\jdk-21). - Click OK.
-
Update the
PathVariable:- In the "System variables" section, find and select the
Pathvariable, then click "Edit...". - Click "New" and add the path to the
binfolder inside your JDK installation (e.g.,C:\Program Files\Java\jdk-21\bin). - Pro Tip: Move the new Java path to the top of the list to ensure Windows uses this version of Java, not another one that might be installed.
- Click OK on all the windows to save.
- In the "System variables" section, find and select the
Step 4: Verify the Installation
-
Open a new Command Prompt or PowerShell window. This is important, as it will load the new environment variables.
-
Type the following commands and press Enter after each:
java -version
You should see output like this:
openjdk version "21.0.2" 2025-01-16
OpenJDK Runtime Environment Temurin-21.0.2+7 (build 21.0.2+7)
OpenJDK 64-Bit Server VM Temurin-21.0.2+7 (build 21.0.2+7, mixed mode, sharing)
javac -version
You should see output like this:
javac 21.0.2
If both commands work and show the correct version, your Java setup is successful!
How to Write, Compile, and Run a Java Program
Let's do the classic "Hello, World!" example.
Step 1: Write the Code
-
Open a simple text editor like Notepad, Notepad++, or VS Code.
-
Type the following code:
public class HelloWorld { public static void main(String[] args) { System.out.println("Hello, World!"); } } -
Save the file in a new folder (e.g.,
C:\Users\YourUser\JavaProjects) with the exact nameHelloWorld.java. The filename must match the public class name exactly.
Step 2: Compile the Code (Create the .class file)
- Open a Command Prompt or PowerShell.
- Navigate to the directory where you saved your file. For example:
cd C:\Users\YourUser\JavaProjects
- Use the Java compiler (
javac) to create the bytecode:javac HelloWorld.java
If successful, you will see a new file in your folder:
HelloWorld.class. This is the compiled Java bytecode.
Step 3: Run the Program (Execute the bytecode)
-
Make sure you are still in the same directory in your Command Prompt.
-
Use the Java runtime (
java) to run your compiled program:java HelloWorld
Important: Notice you do not include the
.classextension when running the program. You are telling thejavacommand which class to run, not which file to execute. -
You should see the output:
Hello, World!
Common Issues and Solutions
-
Problem:
'javac' is not recognized as an internal or external command...- Cause: The
Pathenvironment variable is not set correctly, or you opened a new terminal window after setting it. - Solution: Double-check your
Pathvariable and make sure the JDK'sbindirectory is included. Open a new Command Prompt/PowerShell window and try again.
- Cause: The
-
Problem:
Error: Could not find or load main class HelloWorld- Cause 1: You typed
java HelloWorld.classby mistake. - Solution 1: Type
java HelloWorld(without the.class). - Cause 2: You are not in the correct directory.
- Solution 2: Use
dirto list files and confirmHelloWorld.classis there. Usecdto navigate to the correct folder. - Cause 3: Your class is part of a package (a more advanced concept).
- Solution 3: For now, just make sure your simple
.javafile is in the current directory.
- Cause 1: You typed
Modern Java Development on Windows (Using an IDE)
While using the command line is great for learning, professional developers use an Integrated Development Environment (IDE). An IDE provides code editing, compilation, debugging, and project management all in one place.
The most popular Java IDEs are:
-
IntelliJ IDEA (Recommended):
- Community Edition: Free and powerful enough for most development. Download it here.
- It has excellent code completion, smart refactoring tools, and a built-in debugger.
-
Visual Studio Code (VS Code):
- A lightweight, free code editor that becomes a powerful IDE with extensions.
- You'll need to install the "Extension Pack for Java" from Microsoft, which includes the Java debugger, Maven/Gradle support, and more.
-
Eclipse IDE for Java Developers:
- The original open-source IDE for Java. It's very powerful but can feel a bit more complex than IntelliJ. Download it here.
Why use an IDE?
- Syntax Highlighting: Code is color-coded for readability.
- Auto-completion: Suggests code as you type.
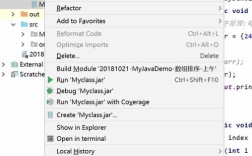
- One-Click Compilation & Running: You just press a "Run" button.
- Integrated Debugger: Allows you to pause your code, inspect variables, and find bugs step-by-step.
- Project Management: Easily handle multi-file projects.