目录
- 第一步:安装必要的库
- 第二步:准备文本数据
- 第三步:生成最基础的词云
- 第四步:自定义词云样式
- 更改背景颜色
- 更改词云形状
- 更改字体、颜色和最大词数
- 停用词过滤
- 第五步:进阶技巧与完整代码示例
- 常见问题与解决方法
第一步:安装必要的库
你需要安装 wordcloud 库,以及它的一个依赖库 Pillow(用于处理图像),我们还需要 matplotlib 来显示生成的图片。

打开你的终端或命令行工具,运行以下命令:
pip install wordcloud matplotlib Pillow
第二步:准备文本数据
词云的核心就是文本,你可以从任何来源获取文本,
- 本地的一个
.txt文件 - 网页爬取的文本
- 字符串变量
为了简单起见,我们先使用一个字符串变量。
# 准备一段文本
text = """
Python is an interpreted, high-level, general-purpose programming language.
Created by Guido van Rossum and first released in 1991, Python's design philosophy emphasizes code readability with its notable use of significant whitespace.
As a general-purpose language, Python is used in many domains, from web development to data science and machine learning.
Python's simple, easy-to-learn syntax can mislead Python developers beginners into thinking that it is easy to master.
After all, it's a high-level programming language that is miles away from the machine language, making it easier to code and understand.
However, Python's simplicity is deceptive. While it is easy to learn the basics, mastering Python requires a deep understanding of its advanced concepts and libraries.
"""
# 你也可以从文件中读取文本
# with open("your_text_file.txt", "r", encoding="utf-8") as f:
#     text = f.read()
第三步:生成最基础的词云
这是最简单的用法,wordcloud 库会自动处理文本、计算词频并生成一张默认样式的词云图。

from wordcloud import WordCloud
import matplotlib.pyplot as plt
# 1. 创建 WordCloud 对象
# 这里我们只传入文本数据
wordcloud = WordCloud().generate(text)
# 2. 使用 matplotlib 显示词云图
plt.imshow(wordcloud, interpolation='bilinear')
plt.axis("off")  # 关闭坐标轴
plt.show()
代码解释:
WordCloud(): 创建一个词云对象,使用所有默认参数。.generate(text): 根据传入的文本数据生成词云。matplotlib.pyplot(简写为plt): Python 最常用的绘图库。plt.imshow(): 显示图像。interpolation='bilinear': 一种图像插值方法,可以让图片在放大时更平滑。plt.axis("off"): 隐藏图表的坐标轴,让词云看起来更整洁。
运行这段代码,你将得到一张默认的、背景为白色、形状为矩形的词云图。
第四步:自定义词云样式
词云的强大之处在于高度的可定制性,我们可以通过给 WordCloud() 传递参数来改变它的外观。
更改背景颜色
使用 background_color 参数。

wordcloud = WordCloud(background_color="white").generate(text)
# 或者设置成黑色
# wordcloud = WordCloud(background_color="black").generate(text)
更改词云形状
通过 mask 参数,你可以用一张图片作为词云的“蒙版”,词云会根据图片的形状进行填充。
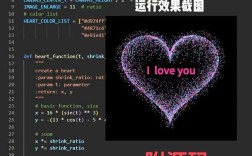
你需要准备一张 白色背景、黑色主体 的图片作为蒙版,这里我们使用一个心形图片 heart_mask.png。
from wordcloud import WordCloud, ImageColorGenerator
from PIL import Image
import numpy as np
import matplotlib.pyplot as plt
# 准备文本
text = (同上)
# 1. 加载蒙版图片
mask = np.array(Image.open("heart_mask.png"))
# 2. 创建 WordCloud 对象,并传入蒙版
wordcloud = WordCloud(mask=mask, background_color="white").generate(text)
# 3. 显示词云
plt.imshow(wordcloud, interpolation='bilinear')
plt.axis("off")
plt.show()
效果: 词云会呈现出心形的轮廓。
更改字体、颜色和最大词数
- 字体: 使用
font_path参数指定一个中文字体路径(如果你处理的是中文文本)。(非常重要!) - 颜色:
colormap参数可以设置一组颜色,词云会从中随机选取。 - 最大词数:
max_words限制显示在词云中的词语数量。
# 确保你有一个中文字体文件,'SimHei.ttf' (黑体)
# Windows 系统通常有 'C:/Windows/Fonts/simhei.ttf'
# Mac 系统通常有 '/System/Library/Fonts/STHeiti Light.ttc'
# Linux 系统需要自行安装中文字体
# 如果是英文,可以不设置 font_path
wordcloud = WordCloud(
    font_path="C:/Windows/Fonts/simhei.ttf",  # 设置中文字体
    background_color="white",
    max_words=100,          # 最多显示100个词
    colormap="viridis"      # 使用 'viridis' 颜色映射
).generate(text)
plt.imshow(wordcloud, interpolation='bilinear')
plt.axis("off")
plt.show()
停用词过滤
我们希望过滤掉像 "的", "是", "在", "和" 等没有实际意义的词(停用词)。
wordcloud 库内置了一些英文停用词,但没有中文停用词,我们可以自己创建一个停用词列表,或者使用 stopwords 参数。
# 创建一个停用词集合
stopwords = set(["的", "是", "在", "和", "一个", "Python", "language"])
# 创建 WordCloud 对象,并传入停用词
wordcloud = WordCloud(
    stopwords=stopwords,
    background_color="white"
).generate(text)
plt.imshow(wordcloud, interpolation='bilinear')
plt.axis("off")
plt.show()
第五步:进阶技巧与完整代码示例
这里是一个更完整的示例,它结合了蒙版、颜色生成、停用词等高级功能。
场景: 生成一个以“Python”为轮廓的词云,并且词的颜色从蒙版图片中提取。
准备工作:
- 找一张以 "Python" 字母为主体的图片,
python_logo.png。 - 确保这张图的背景是透明的或白色的,主体是彩色的。
import numpy as np
from PIL import Image
from wordcloud import WordCloud, ImageColorGenerator
import matplotlib.pyplot as plt
# 1. 准备文本数据
text = """
Python is an interpreted, high-level, general-purpose programming language.
Created by Guido van Rossum and first released in 1991, Python's design philosophy emphasizes code readability with its notable use of significant whitespace.
As a general-purpose language, Python is used in many domains, from web development to data science and machine learning.
Python's simple, easy-to-learn syntax can mislead Python developers beginners into thinking that it is easy to master.
After all, it's a high-level programming language that is miles away from the machine language, making it easier to code and understand.
However, Python's simplicity is deceptive. While it is easy to learn the basics, mastering Python requires a deep understanding of its advanced concepts and libraries.
Data science, machine learning, artificial intelligence, web development, automation, scripting.
"""
# 2. 加载蒙版图片
python_mask = np.array(Image.open("python_logo.png"))
# 3. (可选) 创建停用词集合
stopwords = set(["Python", "is", "a", "an", "the", "and", "in", "from", "to"])
# 4. 创建 WordCloud 对象
# 设置背景为白色,蒙版,停用词,最大词数
wc = WordCloud(
    background_color="white",
    mask=python_mask,
    stopwords=stopwords,
    max_words=200,
    contour_width=1,  # 轮廓宽度
    contour_color='steelblue' # 轮廓颜色
)
# 5. 生成词云
wc.generate(text)
# 6. 从蒙版图片中生成颜色
image_colors = ImageColorGenerator(python_mask)
# 7. 创建一个图形来显示结果
fig, axes = plt.subplots(1, 2, figsize=(12, 6))
# 左图:使用蒙版本身的颜色
axes[0].imshow(wc.recolor(color_func=image_colors), interpolation="bilinear")
axes[0].set_title("Colored by Image")
axes[0].axis("off")
# 右图:使用默认的颜色
axes[1].imshow(wc, interpolation="bilinear")
axes[1].set_title("Default Colors")
axes[1].axis("off")
plt.tight_layout()
plt.show()
# 8. (可选) 将词云保存为图片
# wc.to_file("python_wordcloud.png")
效果说明:
- 这段代码会生成一个两图对比的窗口。
- 左边的词云,词的颜色会从
python_logo.png的彩色部分提取。 - 右边的词云,则使用
wordcloud默认的颜色方案。 contour_width和contour_color为词云的轮廓添加了颜色,使其更加突出。
第六步:常见问题与解决方法
Q1: 中文词云显示为方框或乱码怎么办?
A: 这是最常见的问题,原因是 wordcloud 库默认不支持中文字体,你必须通过 font_path 参数指定一个系统中存在的中文字体文件。
- Windows: 字体通常在
C:/Windows/Fonts/目录下,simhei.ttf(黑体),simsun.ttc(宋体)。 - macOS: 字体通常在
/System/Library/Fonts/或/Library/Fonts/目录下,STHeiti Light.ttc(黑体)。 - Linux: 需要先安装中文字体,
sudo apt-get install fonts-wqy-microhei。
正确做法:
# 确保路径正确
wordcloud = WordCloud(font_path="/System/Library/Fonts/STHeiti Light.ttc", ...).generate(your_chinese_text)
Q2: 词云图片很小,分辨率很低怎么办?
A: matplotlib 默认的图片分辨率不高,你可以通过调整 plt.figure 的 dpi (dots per inch) 来提高输出图片的质量。
# 在 plt.imshow 之前,创建一个高分辨率的画布
plt.figure(figsize=(10, 10), dpi=300) # 设置更大的画布和更高的DPI
wordcloud = WordCloud(...).generate(text)
plt.imshow(wordcloud, interpolation='bilinear')
plt.axis("off")
# 保存图片时也可以指定DPI
plt.savefig("high_res_wordcloud.png", dpi=300, bbox_inches='tight')
plt.show()
希望这个详细的教程能帮助你掌握 Python wordcloud 库的使用!祝你玩得开心!