Of course! Using Python to work with serial ports on Linux is a very common task, especially for communicating with microcontrollers (like Arduinos), GPS modules, industrial equipment, and other embedded systems.

Here's a comprehensive guide covering everything from installation to advanced usage.
Prerequisites: Install pyserial
The go-to library for serial communication in Python is pyserial. It's a pure Python implementation and works seamlessly on Linux, macOS, and Windows.
First, ensure you have Python installed. Then, install the library using pip:
pip install pyserial
Finding Your Serial Device
Before you can communicate with a device, you need to know its device file path on Linux. Serial devices are typically represented as files in the /dev/ directory.

Common Device Paths:
/dev/ttyUSB0- For USB-to-Serial adapters (like FTDI, CH340, CP2102)./dev/ttyACM0- For Arduino boards and other devices that appear as virtual COM ports./dev/ttyS0- For built-in serial ports.
How to Find Your Device:
-
List Connected Devices: The
lscommand is your friend. You can list devices and filter for serial ones.# List all devices with 'tty' in the name ls /dev/tty*
You might see output like this:
/dev/tty /dev/tty0 /dev/tty1 /dev/tty10 /dev/tty11 /dev/tty12 /dev/tty13 /dev/tty14 /dev/tty15 /dev/tty16 /dev/tty17 /dev/tty18 /dev/tty19 /dev/tty2 /dev/tty20 /dev/tty21 /dev/tty22 /dev/tty23 /dev/tty24 /dev/tty25 /dev/tty26 /dev/tty27 /dev/tty28 /dev/tty29 /dev/tty3 /dev/tty30 /dev/tty31 /dev/tty32 /dev/tty33 /dev/tty34 /dev/tty35 /dev/tty36 /dev/tty37 /dev/tty38 /dev/tty39 /dev/tty4 /dev/tty40 /dev/tty41 /dev/tty42 /dev/tty43 /dev/tty44 /dev/tty45 /dev/tty46 /dev/tty47 /dev/tty48 /dev/tty49 /dev/tty5 /dev/tty50 /dev/tty51 /dev/tty52 /dev/tty53 /dev/tty54 /dev/tty55 /dev/tty56 /dev/tty57 /dev/tty58 /dev/tty59 /dev/tty6 /dev/tty60 /dev/tty61 /dev/tty62 /dev/tty63 /dev/tty7 /dev/tty8 /dev/tty9 /dev/ttyS0 /dev/ttyS1 /dev/ttyS2 /dev/ttyS3 /dev/ttyUSB0 # <-- This is likely your USB device /dev/ttyACM0 # <-- This is likely your Arduino -
Identify the Correct Device (More Robust Method): If you have multiple devices, it can be hard to tell which is which. The
dmesgcommand shows kernel messages, which is very helpful for identifying newly connected hardware.- Connect your device (e.g., plug in your Arduino).
- Run
dmesgand look at the end of the output:
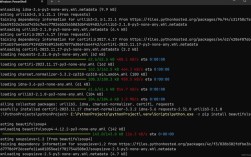
dmesg | tail
You'll see messages like this:
 (图片来源网络,侵删)
[12345.678901] usb 1-1.2: new full-speed USB device number 5 using ehci-pci
[12345.679102] usb 1-1.2: New USB device found, idVendor=2341, idProduct=0043
[12345.679203] usb 1-1.2: New USB device strings: Mfr=1, Product=2, SerialNumber=3
[12345.679304] usb 1-1.2: Product: Arduino Uno
[12345.679405] usb 1-1.2: Manufacturer: Arduino (www.arduino.cc)
[12345.679506] cdc_acm 1-1.2:1.0: ttyACM0: USB ACM device
[12345.679607] usbcore: registered new interface driver cdc_acm
[12345.679708] cdc_acm: USB Abstract Control Model driver for USB modems and ISDN adapters
The key line here is
ttyACM0: USB ACM device. This tells you that the device connected as/dev/ttyACM0.
Basic Python Script: Reading and Writing
Let's create a simple script that opens a serial port, sends a command, and reads the response.
# serial_example.py
import serial
import time
# --- Configuration ---
# Replace with your actual serial port
SERIAL_PORT = '/dev/ttyACM0'
# Replace with your device's baud rate (must match the device's setting)
BAUD_RATE = 9600
# Timeout in seconds. If no data is received, the read() call will block for this long.
TIMEOUT = 1
# --- Main Program ---
try:
    # 1. Open the serial port
    # The 'with' statement ensures the port is automatically closed
    with serial.Serial(SERIAL_PORT, BAUD_RATE, timeout=TIMEOUT) as ser:
        print(f"Connected to {ser.name} at {ser.baudrate} baud.")
        # 2. Send data (must be bytes)
        # The 'encode()' method converts a string to bytes
        command = b'Hello, Device!\n' # Use 'b' prefix for bytes string
        print(f"Sending: {command.decode('utf-8')}")
        ser.write(command)
        # 3. Read data
        # ser.in_waiting tells you how many bytes are available to read
        if ser.in_waiting > 0:
            # Read all available bytes
            response = ser.read(ser.in_waiting)
            print(f"Received: {response.decode('utf-8')}")
        else:
            print("No data received.")
        # Optional: A more robust read loop
        print("\n--- Starting read loop for 5 seconds ---")
        start_time = time.time()
        while (time.time() - start_time) < 5:
            if ser.in_waiting > 0:
                line = ser.readline() # Reads until a newline or timeout
                print(f"Read: {line.decode('utf-8').strip()}")
            time.sleep(0.1) # Small delay to prevent busy-waiting
except serial.SerialException as e:
    print(f"Error: Could not open or use serial port {SERIAL_PORT}.")
    print(f"Details: {e}")
except Exception as e:
    print(f"An unexpected error occurred: {e}")
How to Run It:
- Make sure your device is connected and you've identified its port (e.g.,
/dev/ttyACM0). - Modify the
SERIAL_PORTvariable in the script if necessary. - Run the script from your terminal:
python3 serial_example.py
Common serial.Serial Parameters
When you initialize the Serial object, you can configure it with several parameters:
port: The device path (e.g.,/dev/ttyUSB0).baudrate: The speed of communication (e.g., 9600, 115200). This must match the device's setting.bytesize: Number of data bits (e.g.,serial.EIGHTBITS).parity: Parity checking (e.g.,serial.PARITY_NONE,serial.PARITY_EVEN).stopbits: Number of stop bits (e.g.,serial.STOPBITS_ONE).timeout: Read timeout in seconds.None: Block forever until data is received (default).0: Non-blocking, returns immediately with whatever is available.x > 0: Wait up toxseconds for data.
xonxoff: Enable software flow control.rtscts: Enable hardware flow control.
Troubleshooting
Problem: SerialException: [Errno 13] Permission denied: '/dev/ttyACM0'
- Cause: Your regular user doesn't have permission to access the serial device file. By default, these files are often owned by the
dialoutoruucpgroup. - Solution 1 (Quick Fix): Use
sudoto run your script. This is not recommended for regular use.sudo python3 serial_example.py
- Solution 2 (Proper Fix): Add your user to the correct group.
- Find the group that owns the device:
ls -l /dev/ttyACM0
# Output: crw-rw---- 1 root dialout 188, 0 Jan 1 12:34 /dev/ttyACM0
# In this case, the group is 'dialout'
- Add your username to the
dialoutgroup (replaceyour_usernamewith your actual username):sudo usermod -a -G dialout your_username
- Log out and log back in for the group change to take effect. You only need to do this once.
- Find the group that owns the device:
Problem: No data is being read (ser.in_waiting is always 0).
- Cause 1: The baud rate in your Python script does not match the baud rate configured on the device.
- Cause 2: The device is not sending data, or it's not sending the data you expect.
- Cause 3: The device might require a specific delay or initialization sequence before it starts responding.
Problem: Garbage or non-printable characters are received.
- Cause: The baud rate is incorrect. This is the most common cause of garbled serial data. Double-check the setting on your device.
Advanced Example: A Simple Terminal
This script allows you to interact with your serial device from your terminal, similar to a program like minicom or screen.
# serial_terminal.py
import serial
import sys
SERIAL_PORT = '/dev/ttyACM0'
BAUD_RATE = 9600
def main():
    try:
        with serial.Serial(SERIAL_PORT, BAUD_RATE, timeout=1) as ser:
            print(f"Connected to {ser.name}. Type 'exit' to quit.")
            print("-" * 30)
            while True:
                # Read from user input
                user_input = input("You: ")
                if user_input.lower() == 'exit':
                    break
                # Send to serial port
                ser.write((user_input + '\n').encode('utf-8'))
                # Read from serial port
                if ser.in_waiting > 0:
                    response = ser.readline().decode('utf-8').strip()
                    print(f"Device: {response}")
    except serial.SerialException as e:
        print(f"Serial error: {e}")
    except KeyboardInterrupt:
        print("\nExiting.")
    except Exception as e:
        print(f"An error occurred: {e}")
if __name__ == "__main__":
    main()
This example demonstrates a more interactive pattern of sending and receiving data, which is very useful for debugging.