Of course! "Windows Python Nginx" is a very powerful and common stack for web development and deployment on Windows. It's often used to create a robust production environment or a local development setup that closely mimics production.

Here’s a comprehensive guide covering everything from the "why" to a step-by-step setup, configuration, and deployment process.
Why Use Nginx with Python on Windows?
You might wonder, "IIS is the built-in web server for Windows, why use Nginx?" Here are the key reasons:
- Reverse Proxy: This is the primary reason. Nginx acts as a front door for your application. It handles incoming web traffic and forwards requests to your Python application (running on a different port, like 8000). This is crucial for production.
- Performance & Concurrency: Nginx is asynchronous and event-driven, making it incredibly efficient at handling thousands of simultaneous connections with low memory usage. It's much better at serving static files (CSS, JavaScript, images) than most Python web frameworks.
- Load Balancing: If you ever need to run multiple instances of your Python application to handle more traffic, Nginx can distribute the load between them seamlessly.
- SSL/TLS Termination: Nginx can easily handle encrypting and decrypting HTTPS traffic, offloading this complex task from your Python application.
- Caching: Nginx can cache responses from your Python application, dramatically speeding up responses for frequently accessed content.
- Cross-Platform Consistency: The configuration and setup for an Nginx + Python stack are identical on Linux, macOS, and Windows. This makes it easy to develop on Windows and deploy to a Linux server.
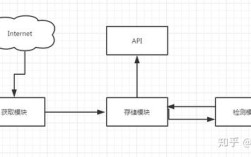
Core Concepts: How They Work Together
Understanding the flow of traffic is essential.
- User Request: A user's browser makes a request to your domain (e.g.,
http://myapp.com). - Nginx (The Reverse Proxy): Nginx receives the request on port 80 (HTTP) or 443 (HTTPS).
- Static Files: If the request is for a static file (e.g.,
/static/style.css), Nginx serves it directly from the file system. This is very fast. - Dynamic Request: If the request is for a dynamic page (e.g.,
/api/users), Nginx inspects the URL and forwards the request to your Python application server. It does this using aproxy_passdirective. - Python Application (WSGI Server): Your Python web framework (like Flask or Django) doesn't listen directly to the web. It runs behind a WSGI (Web Server Gateway Interface) server. Popular choices include:
- Gunicorn: A stable, reliable, and widely used WSGI server.
- Waitress: A pure-Python WSGI server that's easy to use and great for Windows.
- Uvicorn: An ASGI server, perfect for modern async frameworks like FastAPI.
- Response: The Python application processes the request, generates a response, and sends it back to Nginx.
- Final Response: Nginx receives the response from Python and sends it back to the user's browser.
Diagram:

User's Browser
       |
       | (HTTP/HTTPS Request)
       V
+---------------------+
|      Nginx          |  (Listens on port 80/443)
| - Handles SSL       |
| - Serves Static Files|
| - Proxies Dynamic   |
|   Requests          |
+---------------------+
       |
       | (Internal Request on port 8000)
       V
+---------------------+
|  WSGI Server        |  (e.g., Gunicorn, Waitress)
| (Running your       |
|  Python App)        |
+---------------------+
Step-by-Step Setup Guide
Let's set up a complete, working environment.
Prerequisites
- Python 3: Installed and added to your system's PATH.
- Git: (Optional, but highly recommended for cloning projects).
- Administrator Privileges: Needed to install Nginx as a service and open ports.
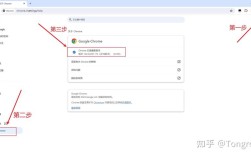
Step 1: Install Nginx for Windows
- Download: Go to the official Nginx Windows download page: http://nginx.org/en/download.html
- Choose Version: Download the latest "mainline" version (e.g.,
nginx-1.25.x.zip). - Extract: Unzip the downloaded file to a simple, path-free location like
C:\nginx. Avoid spaces in the path. - Test Run:
- Open a Command Prompt or PowerShell as an Administrator.
- Navigate to the Nginx directory:
cd C:\nginx - Start Nginx:
start nginx - Check if it's working by opening your browser and navigating to
http://localhost. You should see the "Welcome to nginx!" page. - To stop Nginx, run
nginx -s stop. To reload configuration, runnginx -s reload.
Step 2: Create a Sample Python Application
We'll use a simple Flask app for this example.
-
Create Project Folder: Create a folder for your project, e.g.,
C:\projects\my_flask_app. -
Create App File: Inside that folder, create a file named
app.pyand paste the following code: (图片来源网络,侵删)
# C:\projects\my_flask_app\app.py from flask import Flask, jsonify app = Flask(__name__) @app.route('/') def home(): return "<h1>Hello from Python Flask!</h1><p>Nginx is proxying this request.</p>" @app.route('/api/status') def status(): return jsonify({"status": "OK", "message": "Application is running"}) if __name__ == '__main__': # For development only. We'll use a proper server in production. app.run(host='127.0.0.1', port=5000, debug=True) -
Install Flask: Open a terminal in your project folder and install Flask:
pip install Flask
Step 3: Configure Nginx as a Reverse Proxy
Now, we'll tell Nginx how to forward requests to our Flask app.
-
Open Nginx Config: Navigate to
C:\nginx\confand opennginx.confin a text editor (like VS Code or Notepad++). -
Modify the
serverblock: Find theserverblock that listens on port 80. We will add alocationblock to handle proxying.# C:\nginx\conf\nginx.conf # ... (other settings) ... http { # ... (other settings) ... server { listen 80; server_name localhost; # This is the key part for proxying location / { # The address of your Python application server proxy_pass http://127.0.0.1:5000; # These headers are important for passing info to the app proxy_set_header Host $host; proxy_set_header X-Real-IP $remote_addr; proxy_set_header X-Forwarded-For $proxy_add_x_forwarded_for; proxy_set_header X-Forwarded-Proto $scheme; } # Optional: Serve static files directly from a 'static' folder # location /static/ { # alias C:/projects/my_flask_app/static/; # expires 30d; # } } # ... (other settings) ... } -
Test Nginx Configuration: Before restarting, always check your config for syntax errors:
# From C:\nginx>
nginx -t
If it says
syntax is okandtest is successful, you're good to go.
Step 4: Run the Application and Nginx
-
Start the Python App: Open a new terminal (not as admin), navigate to your project folder (
C:\projects\my_flask_app), and run the app:python app.py
You should see output indicating the server is running on
http://127.0.0.1:5000. -
Start Nginx: Open an Administrator terminal, navigate to
C:\nginx, and start Nginx:start nginx
-
Test It! Open your browser and go to
http://localhost. You should see "Hello from Python Flask!". Nginx is correctly forwarding the request from port 80 to your app on port 5000.
Production-Grade Setup: Using Gunicorn
Running python app.py is fine for development, but it's not suitable for production. A single process can't handle many concurrent requests. We need a proper WSGI server like Gunicorn.
-
Install Gunicorn:
pip install gunicorn
-
Run your app with Gunicorn:
- Open a terminal in your project folder.
- Run the following command. This starts 4 worker processes.
gunicorn --workers 4 --bind 127.0.0.1:5000 app:app
gunicorn: The command to run the server.--workers 4: The number of worker processes.--bind 127.0.0.1:5000: The address and port for Gunicorn to listen on.app:app: The firstappis the filename (app.py), and the secondappis the Flask application instance inside that file.
-
Update Nginx Configuration: Your Nginx config from Step 3 already works! Just make sure your Python app is running via Gunicorn instead of the Flask dev server. Now your setup is much more robust.
Running Nginx as a Windows Service
For a true production environment, you want Nginx to start automatically when the server boots. The easiest way is to use a third-party tool like NSSM (Non-Sucking Service Manager).
- Download NSSM: Get it from https://nssm.cc/download. Get the
nssm.exefile. - Install the Service:
- Open an Administrator Command Prompt.
- Run
nssm install nginx. - A GUI window will appear. Fill it out:
- Path:
C:\nginx\nginx.exe - Arguments:
-p C:\nginx\nginx.pid(This helps manage the service) - Startup directory:
C:\nginx
- Path:
- Click Install service.
- Manage the Service:
- Start:
net start nginx - Stop:
net stop nginx - Restart:
net restart nginx - You can also manage it through the "Services" app (
services.msc).
- Start:
Now your Nginx server will run reliably in the background, just like a system service.