Of course. Here is a comprehensive guide to installing and using OpenCV for Python 2.7.

⚠️ Important Warning: Python 2.7 is End-of-Life
Before you proceed, it is critically important to understand that Python 2.7 reached its official end-of-life on January 1, 2025. This means:
- No Security Updates: It no longer receives security patches, making it vulnerable.
- No Bug Fixes: Issues will not be fixed.
- No New Features: The language and its standard library will not evolve.
- Library Incompatibility: Most modern Python libraries, including the latest versions of OpenCV, no longer support Python 2.7.
You should only use this information for maintaining legacy systems. For any new project, you must use Python 3 (e.g., Python 3.8+).
Step 1: Prerequisites
You need to have Python 2.7 and pip (Python's package installer) correctly installed on your system.
-
Check Python Version: Open your terminal or command prompt and run:
 (图片来源网络,侵删)
python --version
You should see
Python 2.7.x. -
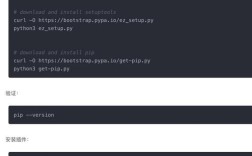
Check Pip Version:
pip --version
If you get an error, you may need to install
pipfor Python 2.7. On Linux/macOS, you can often do this with your system's package manager (e.g.,sudo apt-get install python-pip). On Windows, you might need to download it from the official pip website.
Step 2: Install OpenCV for Python 2.7
The recommended way to install OpenCV is through pip. The package name for the main library is opencv-python.

-
Install the Core Library: This command will install the core
cv2module, which includes the main OpenCV functionality. It will also automatically install its dependencies, like NumPy.pip install opencv-python==3.4.18.65
Why specify a version? Because newer versions of
opencv-pythondropped support for Python 2.7. Version4.18.65is one of the last to support it. -
(Optional) Install Additional Modules:
opencv-contrib-python: This includes the core modules plus the "contrib" modules, which have extra algorithms and features. This is often what you want.pip install opencv-contrib-python==3.4.18.65
opencv-python-headless: Use this if you only need the core library and don't need to display images or video windows (e.g., for a server-side image processing script). It's smaller and has no GUI dependencies.
Step 3: Verify the Installation
After the installation is complete, you should verify that OpenCV was installed correctly and that it's linked to your Python 2.7 environment.
-
Check the Package Version:
pip show opencv-python
This should show you the version you just installed (
4.18.65). -
Run a Python Script: Create a simple Python file (e.g.,
test_opencv.py) and run it.# test_opencv.py import cv2 # Check the version print("OpenCV Version: {}".format(cv2.__version__)) # Check if the path to the Haar Cascade data is available # This is useful for face detection examples print("Haar Cascade Data Path: {}".format(cv2.data.haarcascades))Run this script from your terminal:
python test_opencv.py
If everything is installed correctly, you will see output similar to this:
OpenCV Version: 3.4.18.65
Haar Cascade Data Path: /usr/local/lib/python2.7/site-packages/cv2/data/haarcascade_frontalface_default.xml
(The path will vary depending on your system.)
Step 4: A Simple Example (Python 2.7 Syntax)
Here is a classic "Hello World" example for OpenCV: displaying an image. Notice the print statement syntax, which is different from Python 3.
# display_image.py
import cv2
import sys # For exiting the program
# Check if an image path was provided as a command-line argument
if len(sys.argv) < 2:
    print "Usage: python display_image.py <image_path>"
    sys.exit(1)
# Read the image from the file path provided
# sys.argv[0] is the script name, sys.argv[1] is the first argument
image_path = sys.argv[1]
image = cv2.imread(image_path)
# Check if the image was loaded successfully
if image is None:
    print "Error: Could not open or find the image at " + image_path
    sys.exit(1)
# Create a window and display the image
# The 'WINDOW_AUTOSIZE' flag prevents the image from being scaled down
cv2.namedWindow('Image Display', cv2.WINDOW_AUTOSIZE)
cv2.imshow('Image Display', image)
# Wait for a key press to close the window
# The '0' means it will wait indefinitely for a key press
print "Press any key to close the window..."
cv2.waitKey(0)
# Destroy all windows
cv2.destroyAllWindows()
print "Window closed."
To run this example:
- Save the code as
display_image.py. - Get an image file (e.g.,
my_photo.jpg). - Run from your terminal:
python display_image.py my_photo.jpg
A window should appear with your image. Press any key to close it.
Key Differences to Remember for Python 2.7
- Print Statement:
print "Hello World"instead ofprint("Hello World"). - Integer Division:
5 / 2results in2(integer division). To get floating-point division, you need to cast one operand:5 / 2.0orfrom __future__ import division. - Exception Handling:
except Exception, e:instead ofexcept Exception as e:. - Importing:
from collections import defaultdictis fine, but for division, you needfrom __future__ import divisionat the top of your file.
Troubleshooting
ImportError: No module named cv2: This means the installation failed or you are running the script with a different Python version (e.g.,python3instead ofpython). Make sure yourpipandpythoncommands are pointing to the Python 2.7 versions.- Build Errors on Linux/macOS: If you tried to compile from source, it can be complex. Using
pipwith a pre-compiled wheel (as shown above) is the most reliable method. If you must compile, ensure you have all necessary development libraries installed (build-essential,libgtk-3-dev,libavcodec-dev, etc., depending on your OS). - DLL Load Failed on Windows: This often happens if there's a mismatch between the Python architecture (32-bit vs. 64-bit) and the OpenCV library architecture. Make sure you install the correct version (e.g., if you have 32-bit Python, install the 32-bit version of
opencv-python). You can check your Python architecture with:python -c "import struct; print(struct.calcsize('P') * 8)"