Of course! Let's break down how to connect a Java application with a C/C++ application using a Web Service. This is a classic and powerful integration pattern.

Here's a complete guide covering the concepts, technologies, and a step-by-step example.
The Core Concept: Why Use a Web Service?
A web service acts as a language-agnostic middleman. It allows different applications (written in different languages, running on different operating systems) to communicate over a network using standard web protocols.
- Java Application: The "client" that makes a request.
- Web Service: The "server" that processes the request and sends a response. It exposes a standard interface (like a URL).
- C/C++ Application: Can be either the client (calling the service) or the server (implementing the service), but it's most commonly the client due to Java's excellent server-side support.
Key Advantages:
- Interoperability: Java and C/C++ can "talk" to each other seamlessly.
- Platform Independence: Communication happens over HTTP/HTTPS, which works everywhere.
- Standardization: Uses well-established protocols (XML, JSON, SOAP, REST).
The Main Architectural Approaches
There are two primary ways to structure this communication:

Approach 1: Java as the Server, C/C++ as the Client (Most Common)
This is the most common and practical scenario. The Java application acts as a robust server (e.g., a Spring Boot app), exposing a web service. The C/C++ application acts as a client, making HTTP requests to this service.
- Java (Server): Exposes an endpoint like
http://java-server.com/api/data. - C/C++ (Client): Sends an HTTP request to
http://java-server.com/api/dataand receives the response.
Approach 2: C/C++ as the Server, Java as the Client
This is less common because building a web service server in C/C++ requires more manual work (e.g., using libraries like libcurl, cpp-httplib, or Pistache). However, it's possible if the C/C++ application has performance-critical logic that must be exposed.
- C/C++ (Server): Runs a web server that exposes an endpoint.
- Java (Client): Makes an HTTP request to the C/C++ server.
Key Technologies & Protocols
The "how" of the communication is defined by the protocol.
| Protocol | Description | Java Support | C/C++ Support | Best For |
|---|---|---|---|---|
| REST (with JSON) | Uses standard HTTP methods (GET, POST, PUT, DELETE). Data is usually lightweight JSON. | Excellent. Spring Boot, JAX-RS (Jersey, RESTEasy). Built-in HttpURLConnection, libraries like Apache HttpClient, OkHttp. |
Good. Libraries like libcurl, cpp-httplib, Boost.Beast. Very common. | Modern web/mobile apps, microservices. This is the most popular choice today. |
| SOAP (with XML) | A more rigid, protocol-based standard. Uses XML for messages and relies on a WSDL file for describing the service. | Excellent. Native support via JAX-WS (part of Java EE). Frameworks like Apache CXF, Spring-WS. |
Good. Libraries like gSOAP, Axis2/C, SOA4C++. More complex to set up. | Enterprise-level applications, transactions, when strict contracts (WSDL) are required. |
| gRPC | Uses HTTP/2 for high performance. Data is serialized using Protocol Buffers (Protobuf). | Excellent. Official support from Google. | Excellent. Official support from Google. | High-performance, low-latency microservices, especially within a company's internal network. |
Recommendation: For most new projects, REST with JSON is the way to go due to its simplicity, flexibility, and widespread adoption.

Step-by-Step Example: Java Server (REST/JSON) + C Client
Let's build a practical example where a Java Spring Boot application exposes a "Hello World" endpoint, and a C program calls it and prints the response.
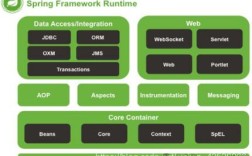
Part A: The Java Web Service (Server)
We'll use Spring Boot because it makes creating REST APIs incredibly easy.
Project Setup (using Maven): Create a new Spring Boot project (you can use start.spring.io) with these dependencies:
- Spring Web
- Spring DevTools (optional, for auto-reloading)
Your pom.xml will look something like this:
<?xml version="1.0" encoding="UTF-8"?>
<project xmlns="http://maven.apache.org/POM/4.0.0" ...>
    <modelVersion>4.0.0</modelVersion>
    <parent>
        <groupId>org.springframework.boot</groupId>
        <artifactId>spring-boot-starter-parent</artifactId>
        <version>3.1.5</version> <!-- Use a recent version -->
        <relativePath/>
    </parent>
    <groupId>com.example</groupId>
    <artifactId>java-webservice</artifactId>
    <version>0.0.1-SNAPSHOT</version>
    <name>java-webservice</name>
    <description>Demo project for Spring Boot</description>
    <properties>
        <java.version>17</java.version>
    </properties>
    <dependencies>
        <dependency>
            <groupId>org.springframework.boot</groupId>
            <artifactId>spring-boot-starter-web</artifactId>
        </dependency>
        <dependency>
            <groupId>org.springframework.boot</groupId>
            <artifactId>spring-boot-devtools</artifactId>
            <scope>runtime</scope>
            <optional>true</optional>
        </dependency>
        <dependency>
            <groupId>org.springframework.boot</groupId>
            <artifactId>spring-boot-starter-test</artifactId>
            <scope>test</scope>
        </dependency>
    </dependencies>
    <build>
        <plugins>
            <plugin>
                <groupId>org.springframework.boot</groupId>
                <artifactId>spring-boot-maven-plugin</artifactId>
            </plugin>
        </plugins>
    </build>
</project>
Create the REST Controller:
Create a new Java file src/main/java/com/example/javawebservice/HelloController.java.
package com.example.javawebservice;
import org.springframework.web.bind.annotation.GetMapping;
import org.springframework.web.bind.annotation.RequestParam;
import org.springframework.web.bind.annotation.RestController;
import java.util.concurrent.atomic.AtomicLong;
@RestController
public class HelloController {
    private static final String template = "Hello, %s!";
    private final AtomicLong counter = new AtomicLong();
    @GetMapping("/greeting")
    public Greeting greeting(@RequestParam(value = "name", defaultValue = "World") String name) {
        return new Greeting(counter.incrementAndGet(), String.format(template, name));
    }
}
// A simple POJO (Plain Old Java Object) to represent the JSON response
class Greeting {
    private final long id;
    private final String content;
    public Greeting(long id, String content) {
        this.id = id;
        this.content = content;
    }
    public long getId() {
        return id;
    }
    public String getContent() {
        return content;
    }
}
Run the Server:
Run the JavaWebserviceApplication.java main class. Your server will start on http://localhost:8080.
You can test it by opening your browser and navigating to:
http://localhost:8080/greeting?name=JavaUser
You should see this JSON response:
{"id":1,"content":"Hello, JavaUser!"}
Part B: The C Client
Now, let's create a C program that calls this Java endpoint. We'll use the libcurl library, which is the standard for HTTP in C.
Install libcurl:
- On Debian/Ubuntu:
sudo apt-get install libcurl4-openssl-dev - On Fedora/CentOS:
sudo dnf install libcurl-devel - On macOS (with Homebrew):
brew install curl
Write the C Code:
Create a file named client.c.
#include <stdio.h>
#include <curl/curl.h>
// This callback function will be called by libcurl for each chunk of data received
static size_t WriteCallback(void *contents, size_t size, size_t nmemb, void *userp) {
    size_t total_size = size * nmemb;
    // Cast the userp to a FILE* and write the data to it
    fwrite(contents, 1, total_size, (FILE *)userp);
    return total_size;
}
int main(void) {
    CURL *curl;
    CURLcode res;
    // Initialize libcurl globally
    curl_global_init(CURL_GLOBAL_DEFAULT);
    // Initialize a curl easy handle
    curl = curl_easy_init();
    if (curl) {
        // The URL of the Java web service
        curl_easy_setopt(curl, CURLOPT_URL, "http://