Of course! Creating and managing a Java project in Eclipse is a fundamental skill for any Java developer. This guide will walk you through the entire process, from creating your first "Hello, World" project to more advanced concepts.

Part 1: Creating Your First Java Project
Let's start with the basics.
Step 1: Launch Eclipse
Open the Eclipse IDE you installed.
Step 2: Create a New Project
- Go to the menu bar and select File > New > Java Project.
Alternatively, you can click the "Open New Project Dialog" icon (looks like a folder with a ) in the toolbar.
Step 3: Configure Your Project
A dialog box will appear. Here’s what you need to fill in:

- Project name: This is the most important field. Give your project a descriptive name, for example,
MyFirstJavaApp. - Location: This shows where the project files will be stored on your computer. You can leave it as the default or browse to a different location.
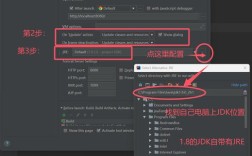
- JRE (Java Runtime Environment):
- Eclipse will usually detect a Java installation automatically.
- If it says "Use an execution environment JRE", it's best to select a version like JavaSE-11 or JavaSE-17. These are long-term support (LTS) versions.
- If you have a specific JDK (Java Development Kit) installed and want to use it, click "Configure JREs...", select a JDK from the list, and click "Finish". Then, make sure it's selected in the project creation dialog.
Step 4: Create a Source Folder (Best Practice)
Eclipse automatically creates a src folder. This is where you will place your Java source code. This is the standard and correct way to organize your project.
Step 5: Finish and Create the Project
Click Finish.
You will now see your new project in the "Project Explorer" view on the left side of the Eclipse window. It should look something like this:
MyFirstJavaApp
└── src
Part 2: Writing and Running Your First Java Program
Now let's write the classic "Hello, World!" program.

Step 1: Create a Java Class
- In the Project Explorer, right-click on the
srcfolder. - Select New > Class.
- In the dialog box:
- Package: It's a best practice to use packages to organize your code. Enter
com.example.hello. - Name: Enter
HelloWorld. - Make sure the box
public static void main(String[] args)is checked. This will automatically generate themainmethod, which is the entry point for any Java application.
- Package: It's a best practice to use packages to organize your code. Enter
- Click Finish.
Eclipse will create a new file HelloWorld.java and open it in the editor. It will contain the following boilerplate code:
package com.example.hello;
public class HelloWorld {
    public static void main(String[] args) {
        // TODO Auto-generated method stub
    }
}
Step 2: Write the Code
Replace the // TODO comment with the code to print "Hello, World!".
package com.example.hello;
public class HelloWorld {
    public static void main(String[] args) {
        System.out.println("Hello, World!");
    }
}
Step 3: Run the Program
There are two easy ways to run your code:
- Using the Green "Run" Button: Look for the green "play" icon in the toolbar and click it.
- Right-Clicking the File: Right-click anywhere inside the
HelloWorld.javaeditor window and select Run As > Java Application.
Step 4: View the Output
The output will appear in the "Console" view at the bottom of the Eclipse window.
Hello, World!Congratulations! You've successfully created, written, and run a Java program in Eclipse.
Part 3: Understanding the Eclipse Workspace
When you work in Eclipse, you're working within a Workspace. A workspace is a folder on your computer that contains all your projects and their settings.
- Project Explorer: This is the main view for managing your projects. It shows a tree-like structure of your files and folders.
- Package Explorer: This is an older name for the same view. In modern Eclipse versions, it's just called "Project Explorer".
- Problems View: This view is crucial. It shows you compilation errors, warnings, and other problems in your code. If your program won't run, check here first.
- Console View: Where you see the output of your running programs.
- Editor Area: The large space in the middle where you write and edit your code.
Part 4: Common Tasks and Best Practices
Adding External Libraries (JAR Files)
If your project needs to use an external library (like a database driver or a JSON parsing library), you need to add it to the project's Build Path.
- Download the JAR file (e.g.,
mysql-connector-j-8.x.x.jar). - In the Project Explorer, right-click on your project and go to Build Path > Configure Build Path....
- In the dialog that opens, go to the Libraries tab and click Add External JARs....
- Navigate to and select the JAR file you downloaded.
- Click Apply and Close.
Organizing Code with Packages
Packages are essential for managing larger projects. They prevent naming conflicts and organize code logically.
- To create a new package, right-click the
srcfolder, select New > Package, and give it a name (e.g.,com.example.models,com.example.utils). - When you create a new class, select the appropriate package from the dropdown menu.
Refactoring Code
Eclipse has powerful tools for refactoring (improving the structure of your code without changing its behavior).
- Rename: Right-click a class, method, or variable, select Refactor > Rename..., and type the new name. Eclipse will update all references to it throughout your project.
- Extract Method: Select a block of code, right-click, select Refactor > Extract Method..., give the new method a name, and Eclipse will wrap the selected code in a new method.
Part 5: Troubleshooting Common Issues
-
Problem:
"The import XXX cannot be resolved"- Cause: You are trying to use a class from a library that is not in your project's Build Path.
- Solution: Right-click the project -> Build Path -> Configure Build Path... -> Libraries tab -> Add the required JAR.
-
Problem:
"Could not find or load main class HelloWorld"- Cause 1: You are trying to run the class from the wrong package. You must run the class that contains the
mainmethod. - Cause 2: Your project is not configured correctly. Go to Run > Run Configurations..., select your application on the left, and ensure the correct project and main class are selected on the "Main" tab.
- Cause 1: You are trying to run the class from the wrong package. You must run the class that contains the
-
Problem: Eclipse is running slowly.
- Solution: You may have run out of memory. You can increase the memory allocated to Eclipse by editing its
eclipse.inifile (located in your Eclipse installation directory). Find the-Xmsand-Xmxlines and increase their values (e.g., change-Xmx1024mto-Xmx2048mto allocate 2GB of RAM).
- Solution: You may have run out of memory. You can increase the memory allocated to Eclipse by editing its