Of course! Here is a comprehensive guide to creating and consuming a SOAP Web Service in Java, covering both the classic approach with JAX-WS and the modern approach with Spring Boot.

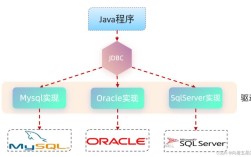
What is a SOAP Web Service?
- SOAP (Simple Object Access Protocol) is a protocol for exchanging structured information in web services.
- It's XML-based and platform-independent.
- It's highly extensible and supports standards for security, transactions, and reliability.
- Communication is typically done over HTTP/HTTPS, but other protocols like SMTP can also be used.
- It uses a
WSDL(Web Services Description Language) file to describe the service, its operations, and the format of messages.
Part 1: The Classic Approach (JAX-WS)
JAX-WS (Java API for XML Web Services) is the standard Java API for creating SOAP web services. It's built into the Java standard library (starting from Java 6).
We will create a simple service that takes a name and returns a greeting.
Step 1: Create a Dynamic Web Project in Eclipse/IntelliJ
- In your IDE, create a new "Dynamic Web Project".
- Make sure your project is configured with a Servlet container (like Apache Tomcat).
- Add the JAX-WS libraries. Since they are part of the JDK, you usually don't need to add external JARs for basic functionality.
Step 2: Create the Service Endpoint Interface (SEI)
This is a standard Java interface that defines the methods exposed by the web service. The JAX-WS runtime will use this to generate the WSDL.
GreetingService.java

import javax.jws.WebMethod;
import javax.jws.WebService;
import javax.jws.soap.SOAPBinding;
// This annotation marks this class as a Web Service.
@WebService
// Specifies the SOAP binding style. DOCUMENT means the message is in a document format (XML).
@SOAPBinding(style = SOAPBinding.Style.DOCUMENT, use = SOAPBinding.Use.LITERAL)
public interface GreetingService {
    // This annotation marks the method as a web service operation.
    @WebMethod
    String getGreeting(String name);
}
Step 3: Create the Service Implementation Bean (SIB)
This is the concrete class that implements the SEI. It contains the actual business logic.
GreetingServiceImpl.java
import javax.jws.WebService;
// The serviceName and endpointInterface are good practice to specify.
@WebService(serviceName = "GreetingService", endpointInterface = "com.example.GreetingService")
public class GreetingServiceImpl implements GreetingService {
    @Override
    public String getGreeting(String name) {
        if (name == null || name.trim().isEmpty()) {
            return "Hello, Stranger!";
        }
        return "Hello, " + name + "!";
    }
}
Step 4: Create the Publisher
This is a simple Java class with a main method to deploy the service on a specific URL and start the server.
Publisher.java

import javax.xml.ws.Endpoint;
public class Publisher {
    public static void main(String[] args) {
        // The URL where the service will be published.
        // Use your server's address and port.
        String url = "http://localhost:8080/soap-webservice/GreetingService";
        // Create an instance of the service implementation.
        GreetingService serviceImpl = new GreetingServiceImpl();
        // Publish the service.
        System.out.println("Publishing SOAP service at: " + url);
        Endpoint.publish(url, serviceImpl);
        // Note: The endpoint will run as long as this JVM is running.
        // For a real application, you'd deploy this to a servlet container like Tomcat.
    }
}
Step 5: Deploy and Test
- Run the Publisher: Right-click on
Publisher.javaand "Run as Java Application". - Access the WSDL: Open a web browser and navigate to
http://localhost:8080/soap-webservice/GreetingService?wsdl. You should see the XML definition of your service. - Test with SoapUI:
- Download and install SoapUI.
- Create a new SoapUI project and point it to the WSDL URL.
- SoapUI will automatically parse the WSDL and create a request for the
getGreetingoperation. - Enter a name (e.g., "Alice") in the request and click the "Run" button.
- You should get a response like this:
<S:Envelope xmlns:S="http://schemas.xmlsoap.org/soap/envelope/">
  <S:Body>
    <ns2:getGreetingResponse xmlns:ns2="http://example.com/">
      <return>Hello, Alice!</return>
    </ns2:getGreetingResponse>
  </S:Body>
</S:Envelope>
Part 2: The Modern Approach (Spring Boot with Spring-WS)
Spring-WS is a product of the Spring community that focuses on creating document-driven SOAP web services. It provides a more modern, Spring-based approach.
Step 1: Set up the Spring Boot Project
Use the Spring Initializr (start.spring.io) to create a new project with the following dependencies:
Spring WebSpring Web Services(This is the key one for SOAP)
Your pom.xml will look something like this:
pom.xml
<?xml version="1.0" encoding="UTF-8"?>
<project xmlns="http://maven.apache.org/POM/4.0.0" xmlns:xsi="http://www.w3.org/2001/XMLSchema-instance"
         xsi:schemaLocation="http://maven.apache.org/POM/4.0.0 https://maven.apache.org/xsd/maven-4.0.0.xsd">
    <modelVersion>4.0.0</modelVersion>
    <parent>
        <groupId>org.springframework.boot</groupId>
        <artifactId>spring-boot-starter-parent</artifactId>
        <version>3.2.5</version> <!-- Use a recent version -->
        <relativePath/> <!-- lookup parent from repository -->
    </parent>
    <groupId>com.example</groupId>
    <artifactId>spring-soap-service</artifactId>
    <version>0.0.1-SNAPSHOT</version>
    <name>spring-soap-service</name>
    <description>Spring Boot SOAP Web Service Example</description>
    <properties>
        <java.version>17</java.version>
    </properties>
    <dependencies>
        <dependency>
            <groupId>org.springframework.boot</groupId>
            <artifactId>spring-boot-starter-web</artifactId>
        </dependency>
        <dependency>
            <groupId>org.springframework.boot</groupId>
            <artifactId>spring-boot-starter-web-services</artifactId>
        </dependency>
        <dependency>
            <groupId>org.springframework.boot</groupId>
            <artifactId>spring-boot-starter-test</artifactId>
            <scope>test</scope>
        </dependency>
    </dependencies>
    <build>
        <plugins>
            <plugin>
                <groupId>org.springframework.boot</groupId>
                <artifactId>spring-boot-maven-plugin</artifactId>
            </plugin>
        </plugins>
    </build>
</project>
Step 2: Create the Request and Response Payloads
Spring-WS works with XML schema (XSD) to generate Java classes. This is a best practice.
- Create an
xsddirectory insrc/main/resources. - Create a file named
greeting.xsdin that directory.
src/main/resources/xsd/greeting.xsd
<?xml version="1.0" encoding="UTF-8"?>
<xs:schema xmlns:xs="http://www.w3.org/2001/XMLSchema"
           xmlns:tns="http://example.com/spring-soap"
           targetNamespace="http://example.com/spring-soap"
           elementFormDefault="qualified">
    <xs:element name="getGreetingRequest">
        <xs:complexType>
            <xs:sequence>
                <xs:element name="name" type="xs:string"/>
            </xs:sequence>
        </xs:complexType>
    </xs:element>
    <xs:element name="getGreetingResponse">
        <xs:complexType>
            <xs:sequence>
                <xs:element name="greeting" type="xs:string"/>
            </xs:sequence>
        </xs:complexType>
    </xs:element>
</xs:schema>
Step 3: Generate Java Classes from XSD
Use the xjc tool (which comes with the JDK) or a Maven plugin to generate Java classes from the XSD.
Using a Maven plugin (add this to your pom.xml):
<plugin>
    <groupId>org.jvnet.jaxb2.maven2</groupId>
    <artifactId>maven-jaxb2-plugin</artifactId>
    <version>0.15.3</version>
    <executions>
        <execution>
            <goals>
                <goal>generate</goal>
            </goals>
        </execution>