Of course! Let's dive deep into Python for MonkeyRunner. It's a powerful tool for UI testing and automating Android devices, though it's important to know its status.

What is MonkeyRunner?
MonkeyRunner is a Python API and execution environment that provides APIs for writing programs that control an Android device or emulator from a workstation. It's part of the Android SDK.
Key Concepts:
- API: You write Python scripts that use the
com.android.monkeyrunnermodule to interact with the device. - Device Connection: A script connects to a single device or emulator at a time.
- Actions: You can perform actions like:
- Installing and uninstalling APKs.
- Touching, dragging, and pressing buttons on the screen.
- Taking screenshots.
- Running an Android
Intent. - Copying files between the device and your workstation.
- Assertions: You can take screenshots and compare them to a "golden" (expected) image to verify the UI state.
Important Status: MonkeyRunner is Deprecated
This is the most important thing to know:
MonkeyRunner has been deprecated since API level 30 (Android 11). It is no longer included in modern Android SDKs.
(图片来源网络,侵删)

Why was it deprecated? The Android team recommended moving to modern UI testing frameworks like Espresso (for Java/Kotlin) and UI Automator (for cross-app, black-box testing). These frameworks are more reliable, faster, and better integrated with Android Studio and Gradle.
Should you still learn/use it?
- For New Projects: No. You should use modern frameworks like Espresso, UI Automator, or the newer Jetpack Compose Testing APIs.
- For Maintaining Old Code: Yes. If you're working on a legacy project that uses MonkeyRunner, you'll need to understand it to maintain it.
- For Learning: Yes, it's a great concept starter. It provides a simple, scriptable way to understand the core ideas of mobile UI automation before tackling the more complex, modern frameworks.
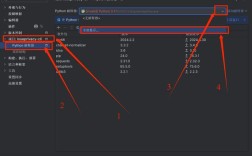
Setting Up the Environment (For Older SDKs)
If you have an older SDK (pre-API 30), here's how to set it up.
- Install the Android SDK: Make sure you have the Android SDK installed on your machine.
- Locate MonkeyRunner: The
monkeyrunnerscript is located in the SDK'stools/directory (e.g.,android-sdk/tools/monkeyrunner). - Add to PATH (Optional but Recommended): Add the
tools/directory to your system's PATH environment variable so you can runmonkeyrunnerfrom any terminal. - Verify Installation: Open a terminal and run:
monkeyrunner --help
You should see help information.
 (图片来源网络,侵删)
Core MonkeyRunner API
The MonkeyRunner class provides the main functions for connecting to a device and other utilities.
| Method | Description |
|---|---|
MonkeyRunner.waitForConnection([timeout, device_id]) |
Connects to the device/emulator. Waits for timeout seconds. Returns a MonkeyDevice object. |
MonkeyRunner.sleep(seconds) |
Pauses script execution for a given number of seconds. |
MonkeyRunner.takeSnapshot() |
Takes a screenshot of the device's current screen and returns a MonkeyImage object. |
Key Classes
MonkeyDevice
Represents the Android device or emulator. You use this object to interact with the device.
| Method | Description |
|---|---|
touch(x, y, 'DOWN') / touch(x, y, 'UP') / touch(x, y, 'DOWN_AND_UP') |
Simulates a touch event at coordinates (x, y). DOWN_AND_UP is a simple tap. |
drag(startX, startY, endX, endY, duration, steps) |
Simulates a drag gesture. duration is in milliseconds. steps is the number of move events. |
press('KEYCODE_HOME'), press('KEYCODE_BACK') |
Simulates pressing a hardware button. Use constants from android.view.KeyEvent. |
installPackage('path/to/app.apk') |
Installs an APK on the device. |
removePackage('com.example.app') |
Uninstalls an app by its package name. |
startActivity(component) |
Starts an activity. component is a string like 'com.example.app/.MainActivity'. |
getProperty(prop_name) |
Gets a system property (e.g., 'ro.build.version.sdk'). |
shell('command') |
Executes a shell command on the device (e.g., shell('am force-stop com.example.app')). |
MonkeyImage
Represents an image, typically a screenshot.
| Method | Description |
|---|---|
writeToFile('path/to/image.png', 'png') |
Saves the image to a file on your workstation. |
sameAs(other_image, percent) |
Compares this image with another MonkeyImage. percent is the allowed difference (0.0 to 1.0). Returns True or False. |
Practical Example: A Simple UI Test Script
Let's create a script that:
- Connects to an emulator.
- Opens the Settings app.
- Takes a screenshot.
- Saves the screenshot.
- Waits a few seconds.
- Presses the "Back" button.
- Takes another screenshot.
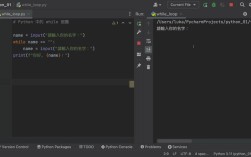
Save this as run_test.py:
# run_test.py
from com.android.monkeyrunner import MonkeyRunner, MonkeyDevice, MonkeyImage
# 1. Connect to the device/emulator
# Timeout is 10 seconds. The device_id can be specified if multiple devices are connected.
print("Connecting to device...")
device = MonkeyRunner.waitForConnection(10.0)
if not device:
    print("Error: Could not connect to device.")
    exit(1)
print("Successfully connected to device.")
# 2. Open the Settings app
# The component name is 'package_name/activity_name'
print("Opening Settings app...")
device.startActivity(component='com.android.settings/.Settings')
# 3. Wait for the app to load
MonkeyRunner.sleep(3.0)
# 4. Take a screenshot of the current screen
print("Taking screenshot...")
snapshot1 = device.takeSnapshot()
# 5. Save the screenshot to the current directory
print("Saving screenshot1.png...")
snapshot1.writeToFile('screenshot1.png', 'png')
# 6. Wait a bit more
MonkeyRunner.sleep(2.0)
# 7. Simulate pressing the Back button
print("Pressing Back button...")
device.press('KEYCODE_BACK')
# 8. Wait for the back action to complete
MonkeyRunner.sleep(1.0)
# 9. Take a second screenshot
print("Taking second screenshot...")
snapshot2 = device.takeSnapshot()
# 10. Save the second screenshot
print("Saving screenshot2.png...")
snapshot2.writeToFile('screenshot2.png', 'png')
print("Test script finished.")
How to Run the Script:
-
Make sure your Android emulator is running.
-
Open a terminal.
-
Navigate to the directory where you saved
run_test.py. -
Run the script using the
monkeyrunnercommand:monkeyrunner run_test.py
After running, you should see two new files in your directory: screenshot1.png (the Settings screen) and screenshot2.png (the Home screen).
Comparison with Modern Alternatives
| Feature | MonkeyRunner (Python) | Espresso (Java/Kotlin) | UI Automator (Java/Kotlin) |
|---|---|---|---|
| Language | Python | Java, Kotlin | Java, Kotlin |
| Type | Black-box (interacts with UI elements by coordinates) | White-box (tests interact with specific View IDs) | Black-box (interacts with UI elements by text, content description, etc.) |
| Dependencies | Old Android SDK | Android Gradle Plugin, Android Support/AndroidX Libraries | Android Gradle Plugin, Android Support/AndroidX Libraries |
| Reliability | Low (prone to "flakiness" if UI layout changes) | High (tightly coupled to the app's UI) | Medium (more robust than Espresso for cross-app) |
| Speed | Slow (each command can take time) | Very Fast (runs on the device in a dedicated process) | Fast |
| Integration | Poor (manual script execution) | Excellent (integrated into Android Studio, Gradle, CI/CD) | Excellent (integrated into Android Studio, Gradle, CI/CD) |
| Use Case | Legacy automation, simple scripts, learning | Unit and Integration tests for your own app | Cross-app tests (e.g., testing a "Share" button that opens another app) |
Summary
| Pros of MonkeyRunner | Cons of MonkeyRunner |
|---|---|
| Simple Python scripting is easy to learn. | Deprecated and no longer supported. |
| Good for quick, manual UI checks. | Unreliable and "flaky" due to coordinate-based interaction. |
| No need for complex build systems (like Gradle). | Slow execution. |
| Useful for automating tasks beyond pure UI (e.g., installing APKs). | Poor integration with modern development tools. |
While MonkeyRunner is a piece of history in the Android ecosystem, understanding its principles provides a solid foundation for appreciating the robustness and power of modern testing frameworks like Espresso and UI Automator. For any new development, you should invest your time in learning those.