Of course! Let's break down "Linux Python Spyder" into a comprehensive guide. This is a very powerful and common combination for scientific computing and data analysis.

Here's what we'll cover:
- What it is: A quick overview of each component and how they work together.
- Why Use This Combination? The key benefits.
- Installation: The best ways to install Python, Spyder, and its dependencies on Linux.
- Using Spyder: A tour of the interface and essential features.
- Tips and Troubleshooting: Common issues and how to solve them.
What is "Linux Python Spyder"?
It's a stack of three technologies that work seamlessly together:
- Linux: The operating system. It provides the stable, powerful, and flexible environment where everything runs. Popular distributions for this include Ubuntu, Mint, Fedora, and Debian.
- Python: The programming language. It's a high-level, interpreted language famous for its simplicity and readability. It has become the dominant language for scientific computing, data science, and machine learning thanks to its vast ecosystem of libraries.
- Spyder: The Integrated Development Environment (IDE). Spyder is a free and open-source IDE specifically designed for Python, with a strong focus on data science, scientific, and engineering applications. It's often compared to MATLAB.
Think of it this way: Linux is your workshop, Python is your toolbox, and Spyder is your workbench. The workbench (Spyder) is designed to make it incredibly easy to use the tools (Python libraries) in your workshop (Linux).
Why Use This Combination?
This setup is a favorite among scientists, engineers, and data analysts for several key reasons:

- Powerful Scientific Computing: Python has a core library called NumPy for numerical operations, which is highly optimized and works extremely well on Linux.
- Data Analysis & Visualization: Libraries like Pandas (for data manipulation) and Matplotlib/Seaborn (for plotting) integrate perfectly with Spyder. You can view your data in spreadsheets (the Variable Explorer) and generate plots directly within the IDE.
- Interactive Development: Spyder's core feature is its interactive console. You can run code line-by-line or block-by-block and see the results immediately. This is fantastic for debugging and exploring data.
- Excellent Debugging: Spyder has a built-in debugger that allows you to set breakpoints, step through your code line by line, inspect variables at any point, and watch expressions. This makes finding and fixing bugs much easier.
- All-in-One Environment: You get the editor, console, variable explorer, plot window, and file browser all in one application, which is much more efficient than switching between separate windows.
- Free and Open Source: The entire stack is free to use, modify, and distribute.
Installation (The Most Important Part)
The best way to manage Python packages on Linux is using a virtual environment. This isolates your project's dependencies from the system's Python, preventing conflicts.
Step 1: Install System Dependencies
First, you need to install the essential tools and libraries that Spyder depends on. Open your terminal (Ctrl+Alt+T) and run:
# For Debian/Ubuntu/Mint
sudo apt update
sudo apt install python3-pip python3-dev python3-venv qtbase5-dev qtwebengine5-dev
# For Fedora/CentOS/RHEL
sudo dnf install python3-pip python3-devel python3-venv qt5-qtbase-devel qt5-qtwebengine-devel
Step 2: Create and Activate a Virtual Environment
It's a best practice to create a dedicated environment for each project.
# Create a new directory for your project (optional but good practice)
mkdir my_spyder_project
cd my_spyder_project
# Create a virtual environment named 'venv'
python3 -m venv venv
# Activate the environment
source venv/bin/activate
# Your terminal prompt should now change to show (venv)
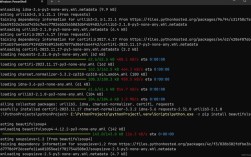
Step 3: Install Spyder and its Dependencies
Inside your active virtual environment, install Spyder. The spyder-kernels package is required for the interactive console to work correctly.

# Upgrade pip first
pip install --upgrade pip
# Install Spyder and its required kernel
pip install spyder-kernels spyder
Note: If you are using a system-wide Python (not recommended), you might need to use sudo pip3 install .... However, this can cause conflicts, which is why the virtual environment method is strongly preferred.
Step 4: Launch Spyder
Once the installation is complete, you can launch Spyder from your terminal:
spyder
Or, if you prefer a graphical application menu, you can often find "Spyder" listed under "Programming" or "Development".
Using Spyder: A Quick Tour
When you launch Spyder, you'll see a well-organized interface with several panes. You can rearrange or close any of them.
- Editor (Center-Left): This is where you write your Python scripts (
.pyfiles). It features syntax highlighting, code completion, and line numbers. - IPython Console (Bottom-Right): This is your interactive console. You can run code directly here. To run a script from the editor, press the green "play" button or
F5. The output will appear in this console. - Variable Explorer (Top-Right): This is one of Spyder's killer features. After you run code, any variables (lists, arrays, DataFrames, etc.) you've created will appear here. You can view their contents, edit them, and even plot them directly from this window.
- Plots Pane (Bottom-Left): Any plots you generate using Matplotlib will appear here. You can zoom, pan, and save them.
- File Explorer (Top-Left): A simple file browser to navigate your project directory.
A Simple Workflow Example:
-
In the Editor, create a new file (
File -> New File) and save it asanalysis.py. -
Paste this code into the editor:
import numpy as np import matplotlib.pyplot as plt # Create some data x = np.linspace(0, 10, 100) y = np.sin(x) # Print a variable to the console print("The first 5 values of y are:", y[:5]) # Create a plot plt.figure() plt.plot(x, y) plt.title("Sine Wave") plt.xlabel("X-axis") plt.ylabel("Y-axis") plt.grid(True) -
Press the Run button (or
F5). You'll see:- The print statement output in the IPython Console.
- A new plot window will appear in the Plots pane.
- A variable named
xandywill appear in the Variable Explorer, where you can inspect their shapes and values.
Tips and Troubleshooting
Problem: Spyder looks blurry or has font rendering issues.
- Cause: This is a common issue on high-DPI (4K) screens. Qt, the framework Spyder is built on, can sometimes struggle with scaling.
- Solution: You can try setting the
QT_SCALE_FACTORenvironment variable before launching Spyder.# Run this command in your terminal before 'spyder' QT_SCALE_FACTOR=1.5 spyder
You may need to adjust the
5value to find what looks best on your screen. You can also add this line to your~/.bashrcor~/.bash_profilefile to make it permanent.
Problem: I get an error about PyQt5 or PyQtWebEngine not being found.
- Cause: You likely skipped Step 1 of the installation (installing system dependencies).
- Solution: Go back and install the required Qt development libraries using
aptordnfas shown in Step 1. Then, re-install Spyder inside your virtual environment (pip install --upgrade --force-reinstall spyder).
Problem: How do I install new libraries?
-
Solution: Always do it inside your activated virtual environment!
# Make sure your environment is active: (venv) should be in your prompt
source venv/bin/activate
# Install the library, e.g., for machine learning
pip install scikit-learn
The library will now be available only in this project's environment.
Problem: Spyder is slow to start.
- Cause: On startup, Spyder scans your environment to find all installed packages. If you have hundreds or thousands of packages, this can be slow.
- Solution: This is another reason virtual environments are so helpful. They keep your project's dependencies clean and minimal, ensuring Spyder starts quickly.