Of course! This is a very common question for new Python users on macOS. Let's break it down into simple, understandable steps.

The core concepts you need to understand are:
- Python: The programming language itself.
- IDLE: The basic, simple editor that comes with Python. It's great for beginners but not for serious development.
- pip: The package manager for Python. It's a tool used to install and manage "packages" (which are libraries or modules of code written by others).
Here is a complete guide on how to handle these three on your Mac.
Part 1: Understanding Python on macOS
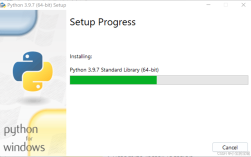
Modern macOS (from Catalina 10.15 onwards) comes with Python 3 pre-installed. This is great because you don't need to download it from python.org.
How to check if you have Python 3 and where it is:

Open the Terminal app (you can find it in Applications/Utilities or search for it with Spotlight Cmd + Space).
Type the following command and press Enter:
python3 --version
You should see something like Python 3.x.x (e.g., Python 3.9.6). This confirms you have a system version of Python 3.
Important: On the Mac, python (without the 3) might point to an older, system-managed Python 2 (which is deprecated). It's a best practice to always use python3 to be explicit.

Part 2: Using IDLE
IDLE is the simple graphical interface that comes with Python. It lets you write and run code in a single window.
How to launch IDLE:
-
Open the Terminal app.
-
Type the following command and press Enter:
python3 -m idlelib
- This command tells Python 3 to run the
idlelibmodule, which starts the IDLE graphical interface.
- This command tells Python 3 to run the
You will see a window titled "Python 3.x.x Shell" appear. This is the IDLE interactive interpreter. You can type Python code directly into it and press Enter to see the results.
To create a new file:
- Inside the IDLE shell, go to the menu bar and click
File -> New File. - A new, empty window will open. This is your text editor.
- Write your code (e.g.,
print("Hello, World!")). - Save the file (e.g.,
hello.py). - Run it by clicking
Run -> Run Module(or pressingF5).
A Note on IDLE: While IDLE is functional, most professional developers use more advanced code editors like Visual Studio Code (VS Code), PyCharm, or Sublime Text. These offer features like syntax highlighting, auto-completion, and debugging tools that make coding much easier.
Part 3: Using pip to Install Packages
pip is the tool you'll use most often. It downloads and installs packages from the Python Package Index (PyPI), which is a huge repository of community-built Python code.
How to check if pip is installed:
In the Terminal, type:
pip3 --version
If you see a version number, you're good to go. If you get an error like pip3: command not found, you may need to install it. On modern macOS, it usually comes with Python, but if not, you can install it with:
python3 -m ensurepip --default-pip
How to use pip to install a package:
Let's install a popular package called requests, which is used for making web requests.
-
Open the Terminal.
-
Type the following command and press Enter:
pip3 install requests
You will see pip download and install the package and its dependencies. That's it! The package is now available for you to use in your Python scripts.
How to use a package in your code:
-
Create a new Python file using IDLE or another editor (e.g.,
test_requests.py). -
Add the following code:
import requests # Make a GET request to a public API response = requests.get('https://api.github.com') # Print the status code of the response print(f"Status Code: {response.status_code}") # Print the first 100 characters of the response content print(f"Response content: {response.text[:100]}...") -
Run the file from your Terminal:
python3 test_requests.py
You should see output indicating that you successfully connected to the GitHub API.
Part 4: The Modern Alternative: venv and pipenv
For any real project, you should never install packages globally using pip3 install <package>. This can lead to version conflicts.
The standard practice is to create a virtual environment for each project. A virtual environment is an isolated space where you can install packages for that specific project without affecting your system's global Python installation.
Method 1: Using the built-in venv (Recommended for beginners)
-
Create a project folder:
mkdir my_project
cd my_project
-
Create the virtual environment:
python3 -m venv venv
- This creates a new folder named
venvinside your project.
- This creates a new folder named
-
Activate the environment:
source venv/bin/activate
- Your Terminal prompt will change to show
(venv)at the beginning. This means the environment is active. - Now, when you use
pip, it will automatically use the pip inside yourvenv, not the system one.
- Your Terminal prompt will change to show
-
Install packages inside the environment:
pip install requests
-
Deactivate the environment when you're done:
deactivate
Your prompt will return to normal.
Method 2: Using pipenv (Easier and more powerful)
pipenv combines pip and venv into one easy-to-use tool and manages dependencies automatically.
-
Install pipenv (globally, this is one of the few times it's okay):
pip3 install pipenv
-
Create a project folder and navigate into it:
mkdir my_pipenv_project
cd my_pipenv_project
-
Install a package using pipenv:
pipenv install requests
pipenvwill automatically create and activate a virtual environment for you.- It will also create a
Pipfileand aPipfile.lockto track your project's dependencies.
-
To work in the environment, just run:
pipenv shell
-
To exit the environment, type
exitor close the terminal.
Summary and Best Practices
| Tool | What it is | How to use it on macOS |
|---|---|---|
| Python | The programming language. | Use python3 in the Terminal. Your Mac comes with it. |
| IDLE | A simple, built-in code editor. | Launch from Terminal with python3 -m idlelib. Good for absolute beginners, but consider VS Code for serious work. |
| pip | The package manager for Python. | Use pip3 install <package_name> in the Terminal. Always use it inside a virtual environment for projects. |
| venv | A tool to create isolated project environments. | python3 -m venv venv, then source venv/bin/activate. The standard, built-in way. |
| pipenv | A modern tool that combines pip and venv. |
pipenv install <package_name>. Easier dependency management. Highly recommended. |
Key Takeaway: For learning, python3 and IDLE are fine. For any real project, use pipenv or venv to manage your packages and keep your system clean.