Of course! Here is a comprehensive guide to getting started with OpenCV in Python on Ubuntu. This guide covers everything from installation to a simple "Hello World" example and more advanced use cases.

Table of Contents
- Prerequisites: What you need before you start.
- Installation: The recommended way to install OpenCV and its dependencies.
- Verification: How to check if your installation was successful.
- Your First Program: A simple script to display an image.
- Common Tasks: Reading/writing images, videos, and using the webcam.
- Troubleshooting: Solutions for common problems.
- Next Steps: Where to go from here.
Prerequisites
Before you install OpenCV, make sure you have the following:
- Ubuntu System: A working installation of Ubuntu (e.g., 20.04, 22.04).
- Python 3: OpenCV 4.x requires Python 3. You can check your Python version with:
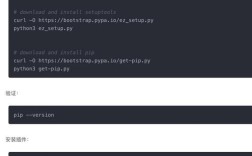
python3 --version
- pip: Python's package installer. It usually comes with Python. Check with:
pip3 --version
- Build Tools: You'll need a C++ compiler and other build tools to compile some of OpenCV's dependencies.
sudo apt update
sudo apt install build-essential cmake git pkg-config
Installation (Recommended Method)
The easiest and most recommended way to install OpenCV on Ubuntu is using pip. This method will handle all Python dependencies automatically.
Step 1: Install System Dependencies for Image/Video I/O
OpenCV needs libraries to handle different image formats (like JPEG, PNG) and video files (like MP4). Installing them via apt prevents many common errors.
sudo apt update
sudo apt install libjpeg-dev libpng-dev libtiff-dev
sudo apt install libavcodec-dev libavformat-dev libswscale-dev
libjpeg-dev,libpng-dev,libtiff-dev: For reading/writing common image formats.libavcodec-dev,libavformat-dev,libswscale-dev: Part of FFmpeg, essential for video I/O.
Step 2: Install Python Libraries
It's best practice to use a virtual environment to avoid conflicts with system-wide packages.

a) Create a Virtual Environment (Recommended)
# Install the virtual environment package
sudo apt install python3-venv
# Create a directory for your project (optional but good practice)
mkdir opencv_project
cd opencv_project
# Create the virtual environment
python3 -m venv venv
# Activate the virtual environment
source venv/bin/activate
Your terminal prompt should now change to show (venv) at the beginning.
b) Install OpenCV with pip
Now, inside your active virtual environment, install OpenCV. The opencv-python package includes the main OpenCV modules. The opencv-contrib-python package includes extra algorithms and is often recommended.

# Install the core library
pip install opencv-python
# OR, for extra algorithms (recommended)
pip install opencv-contrib-python
This will download and install OpenCV and its NumPy dependency, which is crucial for handling image data as arrays.
Verification
To ensure everything is working, create a simple Python script to print the OpenCV version.
-
Create a file named
check_version.py:nano check_version.py
-
Add the following code:
import cv2 print("OpenCV Version:", cv2.__version__) -
Run the script from your terminal:
python3 check_version.py
If you see a version number (e.g., 8.1.78), your installation was successful!
Your First Program: Display an Image
Let's create a classic "Hello World" program for OpenCV: reading an image from a file and displaying it in a window.
-
Get an image: Find a JPEG or PNG file and save it in your project directory. Let's call it
my_image.jpg. -
Create the script: Create a file named
show_image.py:nano show_image.py
-
Add the code:
import cv2 import sys # Path to the image file image_path = 'my_image.jpg' # Read the image # cv2.imread() reads an image from a file and returns it as a NumPy array image = cv2.imread(image_path) # Check if the image was loaded successfully if image is None: print(f"Error: Could not read image from {image_path}") sys.exit(1) # Display the image in a window # The first argument is the window title cv2.imshow('My Image', image) # Wait for a key press # The program will wait indefinitely until any key is pressed cv2.waitKey(0) # Close all OpenCV windows cv2.destroyAllWindows() -
Run the script:
python3 show_image.py
A window should appear with your image. Press any key to close it and end the script.
Common Tasks
A. Reading and Writing Images
import cv2
# Read an image
img = cv2.imread('input.jpg')
# Check if image is loaded
if img is None:
    print("Error: Image not found!")
    exit()
# Write the image to a new file
# The format is determined by the file extension (e.g., .png, .jpg)
cv2.imwrite('output.png', img)
print("Image saved as output.png")
B. Accessing Your Webcam
This script will open your webcam and display the live feed in a window. Press 'q' to quit.
import cv2
# Create a VideoCapture object to access the default webcam (index 0)
cap = cv2.VideoCapture(0)
if not cap.isOpened():
    print("Error: Could not open webcam.")
    exit()
while True:
    # Read a frame from the webcam
    # ret is a boolean that is True if a frame was read successfully
    # frame is the image itself
    ret, frame = cap.read()
    if not ret:
        print("Error: Failed to capture frame.")
        break
    # Display the frame
    cv2.imshow('Webcam Feed', frame)
    # Check for 'q' key press to exit
    # The waitKey(1) waits for 1 millisecond for a key press
    if cv2.waitKey(1) & 0xFF == ord('q'):
        break
# Release the VideoCapture object and close all windows
cap.release()
cv2.destroyAllWindows()
C. Processing an Image (Grayscale Example)
OpenCV images are NumPy arrays. This makes it easy to perform operations.
import cv2
import numpy as np
# Read a color image
image = cv2.imread('my_image.jpg')
# Convert the image to grayscale
# The cv2.cvtColor() function is used for color space conversions
gray_image = cv2.cvtColor(image, cv2.COLOR_BGR2GRAY)
# Display the original and grayscale images
cv2.imshow('Original Image', image)
cv2.imshow('Grayscale Image', gray_image)
# Wait for a key press and then close windows
cv2.waitKey(0)
cv2.destroyAllWindows()
Note: OpenCV reads images in BGR (Blue, Green, Red) format by default, not the more common RGB. This is important when working with other libraries like Matplotlib.
Troubleshooting
-
Problem:
ImportError: No module named 'cv2'- Solution: You likely installed it with
pipinstead ofpip3, or you are not in the virtual environment where you installed it. Double-check your Python command (python3) and ensure your virtual environment is activated (source venv/bin/activate).
- Solution: You likely installed it with
-
Problem:
cv2.error: OpenCV(4.x.x) /io/opencv/modules/highgui/src/window.cpp:...: error: (-215:Assertion failed) size.width>0 && size.height>0 in function 'imshow'- Solution: This error means you are trying to display an empty or invalid image. The
cv2.imread()function returnsNoneif it fails to read the file (e.g., wrong path, corrupt file). Always checkif image is None:after usingcv2.imread().
- Solution: This error means you are trying to display an empty or invalid image. The
-
Problem: Webcam window is black or doesn't open.
- Solution: Your system might be using a different camera index. Try
1,2, etc., instead of0incv2.VideoCapture(0). Also, ensure no other application (like Zoom or Cheese) is using the webcam.
- Solution: Your system might be using a different camera index. Try
Next Steps
Now that you have a working installation, you can explore the vast world of OpenCV!
-
Official Documentation: The best resource. It has detailed explanations and examples for almost every function.
-
Tutorials:
- PyImageSearch: An excellent resource for practical, project-based tutorials.
- LearnOpenCV: Great articles and tutorials by the creators of the OpenCV-Python Tutorials.
-
Key Areas to Explore:
- Image Processing: Blurring, thresholding, edge detection (Canny), morphological operations.
- Feature Detection: Finding corners (Harris, Shi-Tomasi), detecting blobs (SIFT, SURF, ORB).
- Object Detection: Using pre-trained models like Haar Cascades (for faces, eyes) or deep learning models (YOLO, SSD).
- Video Analysis: Background subtraction, optical flow for tracking motion.
- Camera Calibration: Correcting lens distortion.