Of course! The term "Python ArcGIS Editor" can mean a few different things, so I'll cover the most common interpretations, from simple editing to building custom editing tools.

Here’s a breakdown of how you can use Python for editing in ArcGIS, from basic to advanced.
Interpretation 1: Using Python for Simple, Repetitive Edits
This is the most common use case. You have a geodatabase (File, Personal, or SDE) and you need to perform a series of edits (add, update, delete features) in a script. This is far more efficient and less error-prone than doing it manually in ArcMap or ArcPro.
Core Concepts for Editing with ArcPy
Editing with arcpy involves three main steps, wrapped in a transaction:
- Start an Edit Session:
arcpy.da.Editorcreates an editing context. This locks the data to prevent others from editing it at the same time and groups all your subsequent operations into a single transaction. - Perform Edit Operations: Use
arcpy.da.InsertCursor,arcpy.da.UpdateCursor, orarcpy.da.SearchCursorto create, modify, or read feature attributes and geometry. - Stop the Edit Session: Crucially, you must stop the edit session and choose to save or discard your changes. If you don't, your edits are lost and the lock on the data is not released.
Code Example: Adding New Features to a Feature Class
Let's say we have a feature class named Parks in a geodatabase C:\Data\CityData.gdb. We want to add a new park.

import arcpy
import os
# --- Setup ---
# Set the workspace to the geodatabase containing your feature class
workspace = r"C:\Data\CityData.gdb"
arcpy.env.workspace = workspace
# Define the feature class you want to edit
fc_name = "Parks"
fc_path = os.path.join(workspace, fc_name)
# Define the attributes and geometry for the new park
# Geometry is a tuple of X, Y coordinates for a point
new_park_attributes = [
{"name": "Central Park", "area_acres": 50.1, "SHAPE": arcpy.Point(1021000, 654000)},
{"name": "Riverside Park", "area_acres": 32.5, "SHAPE": arcpy.Point(1021500, 653500)}
]
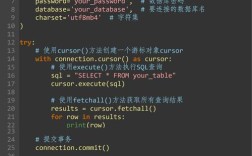
try:
# --- 1. Start an Edit Session ---
# The 'with' statement ensures the edit session is always stopped
with arcpy.da.Editor(workspace) as edit_session:
# --- 2. Perform Edit Operations ---
# Use an InsertCursor to add new rows
# The fields list must match the order of the values you insert
fields_to_insert = ["name", "area_acres", "SHAPE"]
with arcpy.da.InsertCursor(fc_path, fields_to_insert) as cursor:
for park in new_park_attributes:
# Create a Point object for the geometry
point = park["SHAPE"]
# Prepare a tuple of values in the correct order for the cursor
# The order must match the 'fields_to_insert' list
values = (park["name"], park["area_acres"], point)
# Insert the new row
cursor.insertRow(values)
print(f"Successfully added park: {park['name']}")
# --- The 'with' block for the edit session automatically calls stop(False) or stop(True) ---
# To save the edits, you need to call stop(True) explicitly
edit_session.stop(True) # True = save edits
print("\nEdit session saved successfully.")
except Exception as e:
print(f"An error occurred: {e}")
# If an error occurs, the edit session should be stopped and discarded
# The 'with' statement handles this, but it's good practice to be aware.
if 'edit_session' in locals():
edit_session.stop(False) # False = discard edits
print("Edits were discarded due to an error.")
Interpretation 2: Building a Custom Graphical Editor (Add-in)
This is a more advanced interpretation. You want to create a custom tool or panel inside ArcGIS Pro (or ArcMap) that provides a user interface for editing. This is typically done using Python Add-ins.
Why use a Python Add-in for Editing?
- User-Friendly Interface: Provide buttons, combo boxes, and text inputs for users to specify edit parameters.
- Custom Workflows: Automate complex editing tasks that are difficult to do with the standard editor.
- Integration: Embed your custom editor directly into the ArcGIS Pro interface.
High-Level Workflow for Creating a Python Add-in Editor:
- Plan the UI: Decide what your tool will look like. Will it be a button that runs a script? A tool with input fields? A dockable panel?
- Install the ArcGIS Pro Python Add-in Wizard: This is a desktop application that generates the boilerplate code and project structure for you.
- Design the Add-in: Use the wizard to create buttons, tools, and panels. It will generate the necessary
.configfile and Python stubs. - Write the Python Code: This is where the magic happens. The wizard creates a
toolclass.pyfile where you'll write your editing logic, very similar to the first example, but triggered by a UI element.
Example: A Button Add-in to Buffer and Merge Features
Let's say you want a button that:
- Asks the user to select a polygon layer.
- Asks for a buffer distance.
- Buffers the selected features.
- Merges the resulting buffers into a single new feature.
The code for the button's onClick method would look like this:
# This code would go inside the Python class generated by the add-in wizard.
import arcpy
import os
class BufferAndMergeTool(object):
    """Implementation for CityDataaddin.BufferAndMergeTool"""
    def __init__(self):
        self.enabled = True
        self.checked = False
        self.cursor = 0
    def onClick(self):
        """Called when the tool is clicked."""
        # In a real add-in, you'd get these from GUI elements (text boxes, combo boxes)
        # For this example, we'll hardcode them.
        input_layer = "Parcels" # This would be the selected layer in the TOC
        buffer_distance = "100 feet"
        output_fc = "Merged_Parcels_Buffer"
        # Get the full path to the input layer
        mxd = arcpy.mapping.MapDocument("CURRENT")
        df = arcpy.mapping.ListDataFrames(mxd)[0]
        input_layer_obj = arcpy.mapping.ListLayers(mxd, input_layer, df)[0]
        input_fc_path = input_layer_obj.dataSource
        # Define workspace and output path
        workspace = os.path.dirname(input_fc_path)
        output_path = os.path.join(workspace, output_fc)
        try:
            # --- 1. Start Edit Session ---
            # The edit session should be scoped to the layer's workspace
            with arcpy.da.Editor(workspace) as edit_session:
                # Perform Buffer
                print(f"Buffering {input_layer}...")
                temp_buffer = "in_memory/temp_buffer"
                arcpy.Buffer_analysis(input_fc_path, temp_buffer, buffer_distance)
                # Perform Dissolve (Merge)
                print(f"Dissolving buffer...")
                arcpy.Dissolve_management(temp_buffer, output_path, dissolve_field="", multi_part="SINGLE_PART")
                print(f"Successfully created merged buffer at: {output_path}")
                # --- 2. Stop Edit Session and Save ---
                edit_session.stop(True)
                arcpy.AddMessage("Edit session saved.")
        except arcpy.ExecuteError:
            print(arcpy.GetMessages(2))
            if 'edit_session' in locals():
                edit_session.stop(False) # Discard on error
        except Exception as e:
            print(e)
            if 'edit_session' in locals():
                edit_session.stop(False)
Interpretation 3: Building a Full-Featured, Data-Driven Editor
This is the most complex scenario. You are building a complete, standalone desktop application (e.g., using PyQt or Tkinter) that uses ArcGIS technology as its "GIS engine" for data access and editing. This is common for organizations with very specific, non-standard workflows.

Why build a standalone editor?
- Complete Control: You control every aspect of the user experience, from the menu bar to the data entry forms.
- Workflow Enforcement: You can build complex logic directly into the UI to prevent invalid edits (e.g., checking for overlapping polygons before allowing a save).
- Integration with Other Systems: You can connect your editor to external databases, web services, or business logic systems.
Key Technologies:
- PyQt/PySide: The most popular choice for building rich desktop GUIs in Python.
- ArcPy (
arcpy.da): Used for all interactions with ArcGIS geodatabases (starting/stopping edits, cursors, etc.). - ArcGIS API for Python (
arcgis): Can be used to connect to ArcGIS Online, Portal, or Feature Services for web-based editing.