Of course! Here is a comprehensive guide to getting started with Selenium on a Mac using Python. This guide will cover everything from installation to writing your first script and handling common macOS-specific issues.

Table of Contents
- Prerequisites
- Step 1: Install Python
- Step 2: Install a Browser Driver (Selenium's "Key")
- Option A: The Easy Way (Selenium Manager)
- Option B: The Manual Way (Recommended for understanding)
- Step 3: Install Selenium
- Step 4: Your First Script: "Hello, World!" of Web Automation
- Step 5: Common Tasks & Code Examples
- Finding Elements
- Interacting with Elements
- Handling Waits (Crucial for modern websites)
- Step 6: Running Your Script
- Troubleshooting Common macOS Issues
WebDriverException: Message: unknown error: Chrome failed to startselenium.common.exceptions.SessionNotCreatedException: Message: Message: session not created: This version of ChromeDriver only supports Chrome version X- Permission Denied Error
Prerequisites
- A Mac: Any recent Mac (running macOS Big Sur or later) will work perfectly.
- Homebrew (Recommended): Homebrew is the most popular package manager for macOS. It makes installing software like Python and browsers much easier. If you don't have it, you can install it by pasting this command into your Terminal:
/bin/bash -c "$(curl -fsSL https://raw.githubusercontent.com/Homebrew/install/HEAD/install.sh)"
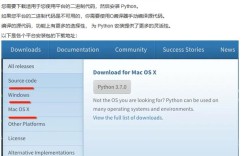
Step 1: Install Python
Most modern macOS versions come with Python 3 pre-installed. You can check this by opening your Terminal (you can find it in Applications/Utilities or search for it with Spotlight) and typing:
python3 --version
If you see a version number (e.g., Python 3.11.4), you can skip to Step 3. If it says command not found, you'll need to install it.
Using Homebrew (Recommended):
brew install python
This will install the latest stable version of Python 3 and set up all the necessary paths for you.

Step 2: Install a Browser Driver
Selenium controls the browser by using a small program called a driver. This driver acts as a bridge between your Python script and the web browser (Chrome, Firefox, etc.). You need one for each browser you want to automate.
Option A: The Easy Way (Selenium Manager)
Selenium 4.6.0 and later has a built-in manager that automatically downloads and manages the correct driver for you. This is the recommended method for beginners.
You don't need to do anything manually for this step. Just ensure your browser (Chrome, Firefox, Edge) is up to date, and Selenium will handle the driver in the background.
Option B: The Manual Way (Recommended for understanding)
If you want more control or are using an older version of Selenium, you can download the driver manually. We'll use Chrome as our example.

-
Check Your Chrome Version: Open Chrome, go to
chrome://settings/helpto see your exact Chrome version (e.g.,0.6422.77). -
Download the Matching ChromeDriver:
- Go to the official ChromeDriver download page: https://googlechromelabs.github.io/chrome-for-testing/
- Find the version that matches your Chrome version.
- Download the
mac-x64ormac-arm64(for Apple Silicon Macs like M1/M2/M3) zip file. The file will be named something likechromedriver_mac64.zip.
-
Add ChromeDriver to Your PATH: The
PATHis a list of directories where your system looks for executable files. To make ChromeDriver accessible from anywhere, you should add its location to your PATH.- Unzip the downloaded file. You will get a
chromedriverexecutable. - Move this
chromedriverfile to a directory that is already in yourPATH, like/usr/local/bin. This is the standard location for system-wide executables installed via Homebrew.
# Make sure you are in the directory where you unzipped chromedriver
# Or provide the full path to the file
mv chromedriver /usr/local/bin/
- Verify it's working by typing
chromedriver --versionin your Terminal. It should print the version number.
- Unzip the downloaded file. You will get a
Step 3: Install Selenium
Now, let's install the Python library itself. We'll use pip, Python's package installer.
-
Open your Terminal.
-
It's best practice to use a virtual environment to keep your projects isolated. Create one:
# Create a new directory for your project
mkdir my_selenium_project
cd my_selenium_project
# Create a virtual environment named 'venv'
python3 -m venv venv
# Activate the virtual environment
source venv/bin/activate
Your terminal prompt should now change to show
(venv). -
Install the Selenium package:
pip install selenium
Step 4: Your First Script
Create a new file named first_script.py in your my_selenium_project directory and open it in a code editor (like VS Code, Sublime Text, or even TextEdit).
Paste the following code into the file:
# first_script.py
from selenium import webdriver
from selenium.webdriver.common.by import By
from selenium.webdriver.chrome.service import Service
from webdriver_manager.chrome import ChromeDriverManager # Optional, but useful
# --- Method 1: Using Selenium Manager (Easiest) ---
# Selenium will automatically download and manage the driver.
driver = webdriver.Chrome()
# --- Method 2: Using a manually installed driver ---
# If you added chromedriver to /usr/local/bin, you can just do this:
# driver = webdriver.Chrome()
# --- Method 3: Using webdriver-manager (a great middle-ground) ---
# This library automatically downloads the driver for you, just like Selenium Manager.
# pip install webdriver-manager
# from selenium.webdriver.chrome.service import Service
# service = Service(ChromeDriverManager().install())
# driver = webdriver.Chrome(service=service)
try:
    # 1. Navigate to a website
    print("Opening Google...")
    driver.get("https://www.google.com")
    # 2. Get the page title and print it
    print(f"Page title is: {driver.title}")
    # 3. Find the search box element and type something
    # The name "q" is the name attribute of the search input
    search_box = driver.find_element(By.NAME, "q")
    search_box.send_keys("Selenium with Python on Mac")
    # 4. Press Enter
    search_box.submit()
    # 5. Wait for the results to load and print the new title
    # A simple sleep is not ideal, but works for a simple demo.
    # We'll cover better methods later.
    import time
    time.sleep(3)
    print(f"Search results page title is: {driver.title}")
finally:
    # 6. Always close the browser window
    print("Closing the browser.")
    driver.quit()
Step 5: Common Tasks & Code Examples
Here are some essential commands you'll use frequently.
Finding Elements
Selenium offers several strategies to find elements on a page. The most common are:
| Strategy | Method | Description |
|---|---|---|
| ID | driver.find_element(By.ID, "id_value") |
The most reliable, as IDs should be unique. |
| Name | driver.find_element(By.NAME, "name_value") |
Useful for forms. Not always unique. |
| CSS Selector | driver.find_element(By.CSS_SELECTOR, "div.class p#id") |
Very powerful and flexible. Highly recommended. |
| XPath | driver.find_element(By.XPATH, "//div[@class='my-class']//a") |
Very powerful, can be complex. Good for navigating the document structure. |
| Link Text | driver.find_element(By.LINK_TEXT, "Click Here") |
Used specifically for finding links with exact text. |
Note: Use find_element for the first match or find_elements (plural) for a list of all matches.
Interacting with Elements
# Click a button
button = driver.find_element(By.ID, "submit-button")
button.click()
# Get text from an element
header_text = driver.find_element(By.TAG_NAME, "h1").text
print(f"Header text: {header_text}")
# Get an attribute
link_url = driver.find_element(By.LINK_TEXT, "My Profile").get_attribute("href")
print(f"Profile URL: {link_url}")
Handling Waits (Crucial!)
Modern websites load content dynamically. If your script tries to interact with an element before it appears, it will fail. Explicit Waits are the solution.
from selenium.webdriver.support.ui import WebDriverWait
from selenium.webdriver.support import expected_conditions as EC
# Wait up to 10 seconds for an element to be clickable
try:
    # This will wait until the element is present AND clickable
    wait = WebDriverWait(driver, 10)
    submit_button = wait.until(
        EC.element_to_be_clickable((By.ID, "submit-button"))
    )
    submit_button.click()
    print("Button clicked successfully!")
except Exception as e:
    print(f"Could not click the button: {e}")
Step 6: Running Your Script
Make sure your virtual environment is still active ((venv) is in your prompt). In your Terminal, run the script:
python3 first_script.py
You should see a Chrome window open, perform the actions, and then close. The terminal will print the titles as it goes.
Step 7: Troubleshooting Common macOS Issues
Issue 1: WebDriverException: Message: unknown error: Chrome failed to start
-
Cause: This is a very common error. It usually means ChromeDriver cannot find the Google Chrome application or there's a version mismatch.
-
Solutions:
-
Version Mismatch: Ensure your ChromeDriver version exactly matches your Google Chrome version. This is the #1 cause.
-
Selenium Manager: If you are using Selenium 4.6+, try using the automatic Selenium Manager method and remove any manual
Servicesetup. It's much more reliable. -
Chrome Path: If Chrome is in a non-standard location, you might need to tell Selenium where it is:
from selenium.webdriver.chrome.service import Service
from selenium import webdriver
# Find the path to your Chrome application
# Right-click on Chrome in your Applications folder -> "Show Package Contents"
# The path is usually /Applications/Google Chrome.app/Contents/MacOS/Google Chrome
chrome_path = "/Applications/Google Chrome.app/Contents/MacOS/Google Chrome"
options = webdriver.ChromeOptions()
options.binary_location = chrome_path
# If you are using Selenium Manager
driver = webdriver.Chrome(options=options)
-
Issue 2: selenium.common.exceptions.SessionNotCreatedException: Message: session not created: This version of ChromeDriver only supports Chrome version X
- Cause: A clear version mismatch. Your ChromeDriver is too old or too new for your installed Chrome browser.
- Solution: Download the correct version of ChromeDriver that matches your Chrome version (as described in Step 2).
Issue 3: OSError: [Errno 13] Permission denied: '/path/to/chromedriver'
- Cause: You downloaded the ChromeDriver file, but it doesn't have "execute" permissions.
- Solution: In your Terminal, navigate to the directory where
chromedriveris and run:chmod +x chromedriver
If you moved it to
/usr/local/bin, this step is usually not needed as that directory has the correct permissions.