Of course! Using FFmpeg with Java is a powerful combination for handling video and audio processing tasks. Here’s a comprehensive guide covering the "why," "how," and best practices.

Why Use FFmpeg with Java?
You might wonder, "Why not just use a pure Java library like JAVE (Java Audio Video Encoder) or Xuggler?" The main reasons are:
- Power and Features: FFmpeg is the undisputed king of multimedia processing. It supports virtually every audio and video codec, container format, and filter imaginable. A Java library can only wrap a small subset of this power.
- Performance: FFmpeg is written in highly optimized C/C++. For CPU-intensive tasks like encoding, decoding, or filtering, running the native FFmpeg binary will almost always be faster than a pure Java implementation.
- Maturity and Reliability: FFmpeg has been under active development for over 20 years. It's incredibly stable, well-tested, and used by countless production systems worldwide (YouTube, VLC, Twitch, etc.).
The Java part acts as the "brain" of your application (handling the UI, business logic, database interactions), while FFmpeg acts as the "muscle" (doing the heavy multimedia lifting).
The Core Approaches
There are two primary ways to integrate FFmpeg into a Java application:
Approach 1: ProcessBuilder (Recommended for Simplicity)
This approach involves executing the FFmpeg command-line tool as an external process from your Java code. It's the simplest method, requires no native libraries in your project, and is very flexible.

How it works:
- You construct a command string as if you were running it in a terminal.
- You use Java's
ProcessBuilderto start a new process with that command. - You manage the input, output, and error streams of the process.
Pros:
- Simple: Easy to understand and implement.
- No Dependencies: You only need the FFmpeg executable on the system.
- Full Control: You can use any FFmpeg flag or feature.
Cons:
- Performance Overhead: Starting a new process has a cost.
- Error Handling: You need to carefully check the process exit code and read the error stream to debug failures.
- Platform Dependent: You need to provide the correct FFmpeg binary for each OS (Windows, Linux, macOS).
Approach 2: Java Native Interface (JNI) / Wrapper Libraries (Recommended for Performance & Integration)
This approach involves using a Java library that is a direct wrapper around the FFmpeg C/C++ libraries.

Popular Libraries:
- JAVE 2 (Java Audio Video Encoder): One of the most well-known. It's a higher-level wrapper that simplifies common tasks. It uses JNI under the hood.
- JavaCV: This is the modern, powerful, and highly recommended choice. It's a set of wrappers for popular computer vision and multimedia libraries, including FFmpeg, OpenCV, GStreamer, and more. It uses JNI and provides a much more direct and efficient mapping to the FFmpeg API.
Pros:
- High Performance: No process startup overhead. Calls are direct.
- Better Integration: You can pass Java objects (like
InputStreamorbyte[]) directly to the FFmpeg functions. - Event-Driven: You can listen for events (e.g., a new frame is ready) instead of just waiting for the process to finish.
Cons:
- Complexity: Setting up can be more difficult. You need to manage native library files (
.dll,.so,.dylib). - Dependency Management: The libraries can be large and have their own dependencies.
Practical Implementation Examples
Let's look at concrete examples for both approaches.
Prerequisite: Get FFmpeg
You need the FFmpeg executable. The easiest way is to download a pre-compiled build from the official FFmpeg website or use a package manager.
- On Debian/Ubuntu:
sudo apt update
sudo apt install ffmpeg
- On macOS (with Homebrew):
brew install ffmpeg
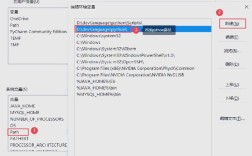
- On Windows: Download the
ffmpeg-git-full.7z(or similar) from the site, extract it, and add thebindirectory to your system'sPATH.
Example 1: Using ProcessBuilder (Simple Transcoding)
Let's write a Java program that takes a video file, converts it to MP4, and reduces its resolution.
FFmpeg Command:
ffmpeg -i input.webm -vf "scale=640:360" -c:v libx264 -c:a aac output.mp4
-i input.webm: Input file.-vf "scale=640:360": Apply a video filter to scale to 640x360.-c:v libx264: Use the H.264 video codec.-c:a aac: Use the AAC audio codec.output.mp4: The output file.
Java Code (ProcessBuilderExample.java):
import java.io.IOException;
public class ProcessBuilderExample {
    public static void main(String[] args) {
        // Path to your input and output files
        String inputFile = "input.webm";
        String outputFile = "output.mp4";
        // The FFmpeg command
        // Note: On Windows, you might need "ffmpeg.exe"
        ProcessBuilder pb = new ProcessBuilder(
            "ffmpeg",
            "-i", inputFile,
            "-vf", "scale=640:360",
            "-c:v", "libx264",
            "-c:a", "aac",
            outputFile
        );
        try {
            // Start the process
            Process process = pb.start();
            // Optional: Read the error stream to see FFmpeg's output
            // This is crucial for debugging
            new Thread(() -> {
                try (var reader = process.getErrorReader()) {
                    String line;
                    while ((line = reader.readLine()) != null) {
                        System.out.println("[FFmpeg] " + line);
                    }
                } catch (IOException e) {
                    e.printStackTrace();
                }
            }).start();
            // Wait for the process to finish
            int exitCode = process.waitFor();
            if (exitCode == 0) {
                System.out.println("Conversion successful!");
            } else {
                System.err.println("Conversion failed with exit code: " + exitCode);
            }
        } catch (IOException | InterruptedException e) {
            e.printStackTrace();
        }
    }
}
Example 2: Using JavaCV (Advanced & Powerful)
This is the preferred method for any serious application.
Step 1: Add JavaCV Dependency
You need to add the JavaCV dependency to your pom.xml (Maven) or build.gradle (Gradle).
Maven (pom.xml):
<dependency>
    <groupId>org.bytedeco</groupId>
    <artifactId>javacv-platform</artifactId>
    <version>1.5.10</version> <!-- Check for the latest version -->
</dependency>
Note: javacv-platform will automatically download the correct native libraries for your OS.
Step 2: JavaCV Code (JavaCVExample.java)
This example does the same transcoding as the ProcessBuilder example but shows how to use the JavaCV API.
import org.bytedeco.ffmpeg.global.avcodec;
import org.bytedeco.ffmpeg.global.avutil;
import org.bytedeco.javacv.FFmpegFrameGrabber;
import org.bytedeco.javacv.FFmpegFrameRecorder;
import org.bytedeco.javacv.Frame;
import org.bytedeco.javacv.FrameRecorder;
public class JavaCVExample {
    public static void main(String[] args) {
        String inputFile = "input.webm";
        String outputFile = "javacv_output.mp4";
        try (FFmpegFrameGrabber grabber = new FFmpegFrameGrabber(inputFile);
             FFmpegFrameRecorder recorder = new FFmpegFrameRecorder(outputFile, 640, 360)) {
            // Configure the grabber
            grabber.setOption("threads", "0"); // Use multi-threading for decoding
            grabber.start();
            // Configure the recorder
            recorder.setVideoCodec(avcodec.AV_CODEC_ID_H264); // H.264
            recorder.setFormat("mp4");
            recorder.setFrameRate(grabber.getVideoFrameRate());
            recorder.setVideoBitrate(1000000); // 1 Mbps
            recorder.setAudioCodec(avcodec.AV_CODEC_ID_AAC); // AAC
            // Set pixel format to avoid warnings
            recorder.setPixelFormat(avutil.AV_PIX_FMT_YUV420P);
            recorder.start();
            Frame frame;
            System.out.println("Starting transcoding...");
            // Read frames from the grabber and write them to the recorder
            while ((frame = grabber.grab()) != null) {
                if (frame.image != null) {
                    recorder.record(frame);
                }
                if (frame.samples != null) {
                    recorder.recordSamples(frame.sampleRate, frame.audioChannels, frame.samples);
                }
            }
            System.out.println("Transcoding finished successfully.");
        } catch (FrameGrabber.Exception | FrameRecorder.Exception e) {
            e.printStackTrace();
        }
    }
}
Best Practices & Considerations
-
Asynchronous Execution: Video processing can take a long time. Never run these operations on your main application thread (the UI thread in a Swing/JavaFX app). Use a separate
Thread, anExecutorService, or a framework like Spring's@Async.ExecutorService executor = Executors.newSingleThreadExecutor(); executor.submit(() -> { // Your FFmpeg processing code here }); executor.shutdown(); -
Error Handling and Logging:
- ProcessBuilder: Always read the process's error stream. FFmpeg writes detailed information (and errors) there.
- JavaCV: Wrap your code in
try-with-resourcesto ensureFrameGrabberandFrameRecorderare closed properly. Catch specific exceptions.
-
Resource Management:
- Files: Ensure you have write permissions for the output directory and enough disk space.
- Memory: For very large files, be mindful of memory usage. JavaCV streams frames, which is more memory-efficient than loading a whole video into RAM.
-
Dependency Management:
- When using
ProcessBuilder, your application depends on FFmpeg being installed on the target machine. Document this requirement clearly. - When using JavaCV, you bundle the native libraries with your application. This makes deployment easier but increases your application's size.
- When using
Summary: Which Approach to Choose?
| Feature | ProcessBuilder |
JavaCV (JNI Wrapper) |
|---|---|---|
| Ease of Use | Easier for simple tasks. | Steeper learning curve, but more powerful. |
| Performance | Slower (process startup). | Much Faster (direct calls). |
| Flexibility | Maximum flexibility (any command). | High, but limited by the wrapper's API. |
| Dependencies | Only needs ffmpeg on the OS. |
Bundles native libraries with the app. |
| Best For | Quick scripts, simple tools, or when you need to use a very specific, complex FFmpeg command. | Production applications, server-side processing, UI apps with real-time video, and any performance-sensitive task. |
For any serious project, JavaCV is the recommended path. It provides the best of both worlds: the raw power of FFmpeg with the integration and performance benefits of a native library, all wrapped in a manageable Java API.