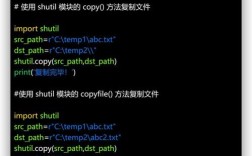
Of course! The Python logo is a fantastic and fun project to create with tkinter because it's a great way to practice drawing shapes, combining colors, and organizing your code.

Here is the Python logo, which is composed of two interlocking shapes, one in the classic Python yellow and the other in the iconic Python blue.
The Python Logo
Here's what we're aiming for:
The Code
This code is well-commented to help you understand each part. It creates a window, draws the two main shapes, adds the text, and arranges everything neatly.
import tkinter as tk
# --- Constants for Colors and Dimensions ---
# Using the official Python logo colors
PYTHON_YELLOW = "#FFD43B"
PYTHON_BLUE = "#306998"
BACKGROUND_COLOR = "#F0F0F0"  # A light grey for the window background
# --- Main Application Class ---
class PythonLogoApp:
    def __init__(self, root):
        self.root = root
        self.root.title("Python Logo with Tkinter")
        self.root.config(bg=BACKGROUND_COLOR)
        # Set the window size and make it non-resizable for a clean look
        self.root.geometry("400x400")
        self.root.resizable(False, False)
        # Create a Canvas widget to draw on
        # The canvas is a flexible area where you can draw shapes, text, and images.
        self.canvas = tk.Canvas(root, width=350, height=350, bg=BACKGROUND_COLOR, highlightthickness=0)
        self.canvas.pack(pady=25) # Center the canvas vertically with some padding
        # --- Draw the Logo Components ---
        self.draw_logo()
        # --- Add the Text ---
        self.add_text()
    def draw_logo(self):
        """Draws the two interlocking shapes of the Python logo."""
        # Coordinates for the first shape (Yellow)
        # These are relative to the canvas (0,0) at the top-left.
        yellow_points = [
            50, 150,  # Start point
            150, 50,  # Top curve
            250, 150, # Right side
            150, 250  # Bottom curve
        ]
        # Draw the first polygon (the yellow shape)
        # The 'smooth=True' argument makes the polygon have curved edges, which is key to the logo's look.
        self.canvas.create_polygon(yellow_points, fill=PYTHON_YELLOW, smooth=True, width=0)
        # Coordinates for the second shape (Blue)
        blue_points = [
            150, 50,   # Top curve
            250, 150,  # Right side
            150, 250,  # Bottom curve
            50, 150    # Left side
        ]
        # Draw the second polygon (the blue shape)
        self.canvas.create_polygon(blue_points, fill=PYTHON_BLUE, smooth=True, width=0)
    def add_text(self):
        """Adds the 'Python' text below the logo."""
        # Create the text on the canvas
        # 'font' specifies the typeface, size, and style.
        # 'fill' sets the color of the text.
        self.canvas.create_text(
            175,  # x-coordinate (center of the canvas)
            300,  # y-coordinate (below the shapes)
            text="Python",
            font=("Helvetica", 24, "bold"),
            fill="#333333"  # A dark grey for good contrast
        )
# --- Main Execution Block ---
if __name__ == "__main__":
    root = tk.Tk()
    app = PythonLogoApp(root)
    root.mainloop()
How to Run the Code
- Save the code above into a file named
python_logo.py. - Open a terminal or command prompt.
- Navigate to the directory where you saved the file.
- Run the script using the command:
python python_logo.py
A window should appear, displaying the Python logo.

Explanation of Key Tkinter Concepts Used
tk.Tk(): This creates the main window for your application.tk.Canvas(): This is the widget we use for drawing. It's like a blank canvas where you can place shapes, lines, text, and images. We set itsbg(background) color andhighlightthicknessto 0 for a cleaner border.canvas.create_polygon(points, ...): This is the core function for drawing the logo's shapes.points: A list of x, y coordinate pairs that define the vertices of the polygon. We've manually calculated these to approximate the logo's curves.fill: The color to fill the shape with.smooth=True: This is a crucial parameter. It tellstkinterto draw smooth, curved lines between the points instead of straight, jagged lines. This is what gives the logo its characteristic look.
canvas.create_text(x, y, ...): This function adds text to the canvas.x, y: The coordinates where the text will be centered.font: A tuple that specifies the font family ("Helvetica"), size (24), and style ("bold").fill: The color of the text.
root.mainloop(): This is the last and most important line. It starts the event loop, which makes the window wait for user actions (like closing it) and keeps it on the screen. Without this, the window would appear and disappear instantly.
Going Further: A More Advanced Version
If you want to get more advanced, you can use tkinter's built-in oval and arc shapes to create a more mathematically accurate version. This involves drawing parts of circles to form the interlocking shapes.
# --- Snippet for a more advanced logo using ovals and arcs ---
# (You would replace the draw_logo method in the class above with this)
def draw_logo_advanced(self):
    """Draws the logo using ovals and arcs for a more precise look."""
    # Yellow Shape (Left part)
    self.canvas.create_oval(50, 100, 200, 250, fill=PYTHON_YELLOW, outline="")
    # Blue Shape (Right part)
    self.canvas.create_oval(150, 100, 300, 250, fill=PYTHON_BLUE, outline="")
    # Create small white circles to "cut out" the interlocking parts
    # This is a simple way to simulate the complex path
    self.canvas.create_oval(140, 140, 180, 180, fill=BACKGROUND_COLOR, outline="")
    self.canvas.create_oval(170, 140, 210, 180, fill=BACKGROUND_COLOR, outline="")
# To use this, replace the call `self.draw_logo()` in __init__ with `self.draw_logo_advanced()`.
This advanced version is simpler in terms of the number of drawing commands but less faithful to the original logo's smooth, single-path design. The first version using create_polygon is generally considered the better tkinter approach for this specific logo.