Of course! Let's dive into creating a Python RADIUS agent. This is a fantastic project that involves network protocols, authentication, and security.

First, let's clarify the terminology. A "RADIUS agent" can mean two main things:
- A RADIUS Client: This is the most common use case. It's a device or application that sends authentication requests to a RADIUS server. For example, a VPN server, a Wi-Fi access point, or a network switch acting as a client to authenticate users against a central RADIUS server.
- A RADIUS Proxy / Server: This is an intermediary that receives requests from clients and then forwards them to another RADIUS server (or processes them itself). This is more complex and is what a full-fledged RADIUS server like
FreeRADIUSdoes.
In this guide, we will focus on building a RADIUS Client in Python. This is the most practical and common task for developers.
Core Concepts
- RADIUS (Remote Authentication Dial-In User Service): A networking protocol that provides centralized authentication, authorization, and accounting (AAA) management for users who connect and use a network service.
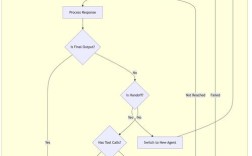
- Packet Flow:
- Client (Python App) sends a
Access-Requestpacket to the RADIUS Server. - Server validates the user credentials.
- Server sends back one of two responses:
Access-Accept: Authentication successful.Access-Reject: Authentication failed.
- Client (Python App) sends a
- Key Attributes:
User-Name: The username of the user being authenticated.User-Password: The user's password (which is encrypted using a shared secret).NAS-IP-Address: The IP address of the Network Access Server (our Python client).NAS-Port: The port number on the NAS.
- Ports:
- 1812 (Authentication): The standard port for
Access-RequestandAccess-Accept/Rejectpackets. - 1813 (Accounting): The standard port for accounting records (we won't cover this in the basic example).
- 1812 (Authentication): The standard port for
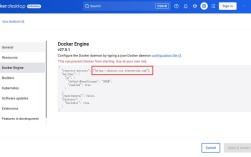
Step 1: Prerequisites
You need a RADIUS server to test against. The most popular and powerful one is FreeRADIUS.
-
Install FreeRADIUS:
 (图片来源网络,侵删)
- On Ubuntu/Debian:
sudo apt-get install freeradius freeradius-utils - On CentOS/RHEL:
sudo yum install freeradius freeradius-utils
- On Ubuntu/Debian:
-
Configure FreeRADIUS for Testing:
- Edit the default client configuration file:
sudo nano /etc/freeradius/3.0/clients.conf - Add a client definition for your Python script's machine. Replace
0.0.1with the actual IP of the machine running your Python script if it's not the same as the server.
# /etc/freeradius/3.0/clients.conf client localhost { ipaddr = 127.0.0.1 secret = testing123 # This is the shared secret require_message_authenticator = no } - Edit the default client configuration file:
-
Configure a Test User:
- Edit the users file:
sudo nano /etc/freeradius/3.0/users - Add a simple test user at the bottom. The line
Auth-Type := Localtells FreeRADIUS to check the localusersfile for the password.
# /etc/freeradius/3.0/users
# Test user
testuser        Cleartext-Password := "supersecret"
Note:
Cleartext-Passwordis only for testing. In production, use hashed passwords likeMD5-Password. - Edit the users file:
-
Restart FreeRADIUS:
 (图片来源网络,侵删)
sudo systemctl restart freeradius
Step 2: The Python RADIUS Client
We will use the excellent pyrad library, which is the de-facto standard for RADIUS in Python.
-
Install
pyrad:pip install pyrad
-
Write the Client Script (
radius_client.py):This script will:
- Connect to the FreeRADIUS server.
- Create an
Access-Requestpacket. - Set the
User-NameandUser-Password. - Send the packet and print the server's response.
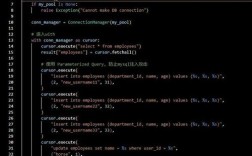
import pyrad.client
import pyrad.packet
from pyrad.dictionary import Dictionary
# --- Configuration ---
# IP address of your RADIUS server
SERVER = "127.0.0.1"
# Port for authentication
PORT = 1812
# The shared secret defined in clients.conf
SECRET = b"testing123"
# The path to the RADIUS dictionary file
# This file defines all the possible RADIUS attributes
DICTIONARY = "/etc/freeradius/3.0/dictionary"
def authenticate(username, password):
    """
    Authenticates a user against a RADIUS server.
    """
    try:
        # 1. Create a client object
        client = pyrad.client.Client(
            server=SERVER,
            authport=PORT,
            secret=SECRET,
            dict=Dictionary(DICTIONARY)
        )
        # 2. Create an Access-Request packet
        request = client.CreateAuthPacket(code=pyrad.packet.AccessRequest,
                                         User_Name=username,
                                         User_Password=password)
        # 3. Add the NAS-IP-Address attribute (optional but good practice)
        request["NAS-IP-Address"] = "127.0.0.1"
        # 4. Send the request and receive the response
        print(f"Sending Access-Request for user '{username}'...")
        reply = client.SendPacket(request)
        # 5. Process the response
        if reply.code == pyrad.packet.AccessAccept:
            print("-> Authentication ACCEPTED")
            return True
        elif reply.code == pyrad.packet.AccessReject:
            print("-> Authentication REJECTED")
            return False
        else:
            print(f"-> Unexpected response code: {reply.code}")
            print(f"-> Reply: {reply.ReplyPacket()}")
            return False
    except Exception as e:
        print(f"An error occurred: {e}")
        return False
if __name__ == "__main__":
    # --- Test Cases ---
    print("--- Test Case 1: Correct Credentials ---")
    authenticate("testuser", "supersecret")
    print("\n--- Test Case 2: Wrong Password ---")
    authenticate("testuser", "wrongpassword")
    print("\n--- Test Case 3: Unknown User ---")
    authenticate("unknownuser", "anypassword")
Step 3: Run and Test
- Make sure FreeRADIUS is running.
- Save the code above as
radius_client.py. - Run the script from your terminal:
python3 radius_client.py
Expected Output:
You should see output similar to this, confirming that your Python client is successfully communicating with the FreeRADIUS server.
--- Test Case 1: Correct Credentials ---
Sending Access-Request for user 'testuser'...
-> Authentication ACCEPTED
--- Test Case 2: Wrong Password ---
Sending Access-Request for user 'testuser'...
-> Authentication REJECTED
--- Test Case 3: Unknown User ---
Sending Access-Request for user 'unknownuser'...
-> Authentication REJECTED
If you check the FreeRADIUS logs (/var/log/freeradius/radius.log), you will see the incoming requests and how they were processed.
Advanced Topics & Best Practices
-
Password Encryption (CHAP): The example above uses
Cleartext-Passwordfor simplicity. In a real-world scenario, you must not send passwords in cleartext. RADIUS uses a shared secret to encrypt the password.- The
pyradlibrary handles this automatically. When you setUser_Password, it encrypts the password using theclient.secretbefore sending it. - You can also use more advanced methods like CHAP (Challenge-Handshake Authentication Protocol) for even better security.
pyradsupports this via theCHAP-Passwordattribute.
- The
-
Handling Timeouts and Retries: Network connections can fail. A robust client should handle connection errors and implement a retry mechanism.
# Inside the authenticate function, around the SendPacket call max_retries = 3 for i in range(max_retries): try: reply = client.SendPacket(request) # ... process reply ... break # Success, exit retry loop except pyrad.client.TimeoutError: print(f"Timeout, retrying ({i+1}/{max_retries})...") if i == max_retries - 1: print("-> Max retries reached. Authentication FAILED.") return False except Exception as e: print(f"An unexpected error occurred: {e}") return False -
Error Handling: Always wrap your RADIUS logic in
try...exceptblocks to catch network issues, malformed packets, or other exceptions. -
Logging: Instead of using
print()for debugging, use Python's built-inloggingmodule. This allows you to control log levels (DEBUG, INFO, ERROR) and output to files. -
Using a Library vs. Implementing from Scratch: For any serious application, always use a library like
pyrad. Implementing the RADIUS protocol from scratch is extremely complex due to its packet structure, attribute handling, and encryption details.pyradabstracts all of this away for you.