Of course! Let's dive deep into java.nio.ByteBuffer, a fundamental and powerful class in Java's NIO (New I/O) package.

What is a ByteBuffer?
At its core, a ByteBuffer is a container for a sequence of bytes. It's part of the java.nio package, introduced in Java 1.4 to provide a more efficient and flexible way to handle I/O operations compared to the traditional stream-based I/O.
Think of it as a smart, fixed-size array of bytes. "Smart" because it comes with a rich set of features for reading, writing, and manipulating data in a buffer.
Key Characteristics
- Capacity: The maximum number of elements a
ByteBuffercan hold. This is fixed when the buffer is created. - Limit: The index of the first element that should not be read or written. It acts as a boundary for the buffer's active content.
- Position: The index of the next element to be read or written. It's like a cursor that moves as you read or write data.
- Mark: A "bookmark" of a specific position. You can set a mark and later return to it using the
reset()method. - Byte Order: The order in which bytes are read from or written to the buffer (e.g., Big-Endian or Little-Endian). This is crucial for handling multi-byte data types like
intorlong.
These four properties (Capacity, Limit, Position, Mark) are the heart of how a ByteBuffer works. Understanding them is key to using it effectively.
How to Create a ByteBuffer
There are several ways to create a ByteBuffer:

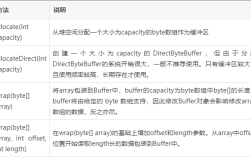
Allocate a Direct Buffer
This allocates memory directly from the operating system, outside the JVM's normal heap. It's more efficient for I/O operations (like network or file transfers) because it avoids an extra copy from the JVM heap to the native OS buffers.
import java.nio.ByteBuffer;
// Allocates a ByteBuffer with a capacity of 1024 bytes
ByteBuffer directBuffer = ByteBuffer.allocateDirect(1024);
Allocate a Heap Buffer
This is the most common type. The memory is allocated on the JVM's heap. It's slightly slower for direct I/O but easier to manage and can be garbage collected.
// Allocates a ByteBuffer on the heap with a capacity of 1024 bytes
ByteBuffer heapBuffer = ByteBuffer.allocate(1024);
Wrap an Existing byte Array
This creates a ByteBuffer that uses an existing byte array as its backing storage. It's a convenient way to work with data you already have in an array.
byte[] byteArray = { 1, 2, 3, 4, 5 };
ByteBuffer wrappedBuffer = ByteBuffer.wrap(byteArray);
// You can also specify an offset and length
ByteBuffer wrappedBufferPartial = ByteBuffer.wrap(byteArray, 1, 3); // Uses bytes at index 1, 2, 3
The Core Concept: Flipping the Buffer
The most important pattern when using a ByteBuffer is the "write-then-read" cycle. A buffer is designed to be used in one direction at a time.

- Writing Mode: When you create a buffer, its
positionis 0, and itslimitequals itscapacity. You write data into the buffer, and thepositionadvances. - The Flip: After you're done writing, you call the
flip()method. This method does two crucial things:- It sets the
limitto the currentposition(marking the end of the data you wrote). - It sets the
positionback to 0 (preparing to read from the beginning).
- It sets the
- Reading Mode: You now read data from the buffer, and the
positionadvances again. - Clearing/Resetting: After you're done reading, you typically call
clear()to reset thepositionto 0 and thelimitback to thecapacity, preparing the buffer for a new write cycle.
Code Example: A Complete Walkthrough
Let's see this in action.
import java.nio.ByteBuffer;
public class ByteBufferDemo {
    public static void main(String[] args) {
        // 1. Allocate a buffer
        ByteBuffer buffer = ByteBuffer.allocate(10);
        System.out.println("--- Initial State ---");
        System.out.println("Position: " + buffer.position());
        System.out.println("Limit: " + buffer.limit());
        System.out.println("Capacity: " + buffer.capacity());
        System.out.println();
        // 2. WRITING DATA
        System.out.println("--- Writing Data ---");
        // Put a byte
        buffer.put((byte) 10);
        // Put an int (4 bytes)
        buffer.putInt(987654321);
        // Put a string (converted to bytes)
        String text = "Hello";
        buffer.put(text.getBytes());
        System.out.println("Position after writing: " + buffer.position());
        System.out.println("Limit after writing: " + buffer.limit());
        System.out.println();
        // 3. PREPARE FOR READING (THE FLIP!)
        System.out.println("--- Flipping the Buffer ---");
        buffer.flip(); // This is the magic step!
        System.out.println("Position after flip: " + buffer.position());
        System.out.println("Limit after flip: " + buffer.limit()); // Limit is now at the end of the data
        System.out.println();
        // 4. READING DATA
        System.out.println("--- Reading Data ---");
        // Get a byte
        byte b = buffer.get();
        System.out.println("Read byte: " + b);
        // Get an int
        int i = buffer.getInt();
        System.out.println("Read int: " + i);
        // Get the remaining bytes as a string
        byte[] remainingBytes = new byte[buffer.remaining()];
        buffer.get(remainingBytes);
        String readText = new String(remainingBytes);
        System.out.println("Read string: " + readText);
        System.out.println("Position after reading: " + buffer.position());
        System.out.println("Limit after reading: " + buffer.limit());
        System.out.println();
        // 5. PREPARE FOR NEXT WRITE CYCLE (CLEAR)
        System.out.println--- Clearing the Buffer ---");
        buffer.clear();
        System.out.println("Position after clear: " + buffer.position());
        System.out.println("Limit after clear: " + buffer.limit());
        System.out.println("Capacity after clear: " + buffer.capacity());
    }
}
Common Methods
| Category | Method | Description |
|---|---|---|
| Writing | put(byte b) |
Puts a single byte into the buffer at the current position. |
put(byte[] src) |
Puts all bytes from the source array into the buffer. | |
putInt(int value) |
Puts an int value (4 bytes) into the buffer. |
|
putLong(long value), putShort(short value), etc. |
Similar for other primitive types. | |
| Reading | get() |
Gets a single byte from the buffer at the current position. |
get(byte[] dst) |
Reads bytes from the buffer into the destination array. | |
getInt() |
Reads an int value (4 bytes) from the buffer. |
|
getLong(), getShort(), etc. |
Similar for other primitive types. | |
| Control | flip() |
Switches from write mode to read mode. |
clear() |
Resets the buffer for a new write cycle. | |
rewind() |
Sets position to 0, without changing the limit. | |
compact() |
Copies remaining data to the beginning and sets position to the end of that data. Useful for partial reads. | |
mark() / reset() |
Sets a bookmark and returns to it. | |
| Views | asIntBuffer() |
Creates a view of this buffer as an IntBuffer. |
asLongBuffer(), asShortBuffer(), etc. |
Creates views for other data types. |
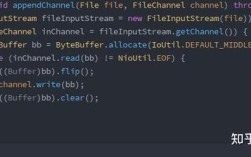
When to Use ByteBuffer
- High-Performance Network I/O: When dealing with sockets,
ByteBufferis the standard forjava.nio.channels.SocketChannel. It allows for non-blocking I/O and efficient data transfer. - File I/O: Similarly, with
java.nio.channels.FileChannel,ByteBufferis used to read from and write to files efficiently. - Serialization/Deserialization: It's a great tool for creating your own binary protocols. You have full control over the byte layout.
- Interacting with Native Code: When you need to pass data to a native library (via JNI), a direct
ByteBufferis the perfect way to do it without extra copying. - Image/Video Processing: These formats are often byte-based, making
ByteBuffera natural fit for manipulation.
Advantages over Traditional I/O (InputStream/OutputStream)
- Efficiency: Reduces the number of system calls for I/O, especially with direct buffers and scattering/gathering.
- Non-Blocking I/O: The cornerstone of NIO, allowing a single thread to manage multiple channels.
- Scattering and Gathering: You can read data from a channel into multiple buffers (
ScatteringByteChannel) or write data from multiple buffers to a channel (GatheringByteChannel), which is very efficient for complex data structures. - Control: You have fine-grained control over the data through the
position,limit, andmarkproperties.
Disadvantages
- Complexity: The
flip()andclear()pattern can be less intuitive than simpleread()andwrite()methods for beginners. - Not Thread-Safe: A
ByteBufferis not inherently thread-safe. If multiple threads access the same buffer, you must synchronize access externally.
Summary
ByteBuffer is a powerful, low-level tool in Java for handling sequences of bytes. While it has a steeper learning curve than traditional streams, its performance benefits and flexibility make it indispensable for modern, high-performance applications, especially in networking and file I/O. Mastering the concepts of position, limit, and the flip operation is the key to unlocking its potential.