Of course! This is a very specific question, and it's great that you're looking to set up a professional development environment. Let's break down how to get Python development working in MyEclipse on a Mac.

First, it's important to understand the landscape:
- MyEclipse: This is a commercial, enterprise-grade IDE built on top of the open-source Eclipse IDE. Its main strengths are in Java EE (web development with Spring, Hibernate, etc.), but it has excellent support for many other languages via plugins.
- Python on macOS: The standard and highly recommended way to manage Python versions and packages on a Mac is using Homebrew and a virtual environment tool like
venv(built-in) orpyenv(for managing multiple Python versions).
Here’s a complete guide to get you started.
Step 1: Install Prerequisites on Your Mac (Before MyEclipse)
This is the most critical step. A good Python setup on macOS doesn't start with the IDE; it starts with the system tools.
Install Homebrew
Homebrew is the package manager for macOS. It makes installing Python and other tools incredibly easy.

Open your Terminal (you can find it in /Applications/Utilities/ or search for it with Spotlight Cmd + Space).
Paste the following command and press Enter:
/bin/bash -c "$(curl -fsSL https://raw.githubusercontent.com/Homebrew/install/HEAD/install.sh)"
Follow the on-screen instructions. It might take a few minutes.
Install Python 3 via Homebrew
Even if your Mac comes with a Python 3 pre-installed, it's often better to let Homebrew manage it for consistency and easier updates.

In your Terminal, run:
brew install python
This command installs the latest stable version of Python 3. It will also install pip (Python's package installer) and setuptools.
Verify Your Installation
Check the versions to make sure everything is working. The python3 command ensures you are using the Homebrew version, not the system version.
# Check the Python 3 version
python3 --version
# Expected output: Python 3.x.x
# Check the pip version
pip3 --version
# Expected output: pip ... from /usr/local/lib/python3.x/site-packages
Step 2: Install MyEclipse for macOS
MyEclipse is a commercial product, so you'll need to download it from the official website.
- Go to the MyEclipse Download Page.
- Choose the version you need (e.g., "MyEclipse Core" for just the base IDE, or "MyEclipse" for the full suite).
- Download the macOS
.dmgfile. - Open the
.dmgfile and drag the MyEclipse icon into yourApplicationsfolder.
Step 3: Install Python Support in MyEclipse (PyDev)
MyEclipse, like Eclipse, uses plugins to add language support. For Python, the best and most popular plugin is PyDev.
-
Launch MyEclipse for the first time. It will ask you for a workspace location (a folder where your projects will be stored). Choose a convenient location.
-
Go to the menu:
Help->Install New Software... -
In the "Work with:" field, you need to add the PyDev update site. There are two common ways to do this:
-
Recommended (Eclipse Marketplace):
- Go to
Help->Eclipse Marketplace... - In the search box, type
PyDev. - Find "PyDev" in the results and click
Go->Install. - Follow the on-screen prompts to complete the installation. This is the easiest method.
- Go to
-
Manual (Update Site URL):
- In the "Install New Software" window, click
Add.... - In the "Name" field, type
PyDev. - In the "Location" field, paste this URL:
http://pydev.org/updates - Click
OK. - You should now see "PyDev" in the list of available software. Select it and click
Next, thenFinish.
- In the "Install New Software" window, click
-
-
MyEclipse will download and install PyDev. You may be prompted to restart the IDE. Click
Yes.
Step 4: Configure MyEclipse to Use Your Python Installation
Now, you need to tell PyDev where to find the Python interpreter you installed with Homebrew.
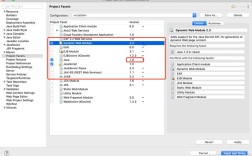
- Go to the menu:
MyEclipse->Preferences...(on macOS) orWindow->Preferences...(on other OSes). - In the preferences window, navigate to
PyDev->Interpreter - Python. - Click the
New...button on the right. - A "Select Interpreter" dialog will appear. In the "Interpreter Name" field, you can name it something descriptive like
Python 3 (Homebrew). - Click the
Browse...button next to the "Executable" field. - Navigate to your Python 3 executable. It should be located at:
/usr/local/bin/python3You can also typewhich python3in your Terminal to find the exact path. - Select the
python3executable and clickOpen. - Click
OKto return to the "Select Interpreter" dialog. - PyDev will now try to auto-detect the standard libraries. Click
OKorFinishto proceed. This might take a moment. - Back in the main Python Interpreter preferences, you should now see your new interpreter in the list. Make sure it is checked.
- Click
Apply and Close.
Step 5: Create Your First Python Project in MyEclipse
You're all set! Let's create a project.
- Go to
File->New->Project... - In the "New Project" wizard, expand the
PyDevfolder and selectPyDev Project. ClickNext. - Project Name: Give your project a name (e.g.,
MyFirstPyApp). - Project Layout: Choose
Use default (PyDev default). This creates asrcfolder for your source code, which is a good practice. - In the
Interpretersection, make sure the interpreter you just configured (e.g.,Python 3 (Homebrew)) is selected from the dropdown menu. - Click
Finish.
MyEclipse will create your project. You can now create a Python file:
- Right-click on your project in the "Project Explorer" view.
- Go to
New->PyDev Module. - Give it a name (e.g.,
hello) and make sure "PyDev__init__.pyfile" is checked. This makes it a proper Python package. - Click
Finish.
A new file hello.py will be created. Add some code:
# hello.py
def greet(name):
    print(f"Hello, {name}! Welcome to Python development in MyEclipse on Mac.")
if __name__ == "__main__":
    greet("Developer")
You can now run this file by right-clicking anywhere in the editor and selecting Run As -> Python Run. The output will appear in the "Console" view at the bottom of the screen.
Best Practice: Using Virtual Environments
For any real project, you should use a virtual environment to isolate its dependencies.
-
Create a Virtual Environment: In your Terminal, navigate to your project folder and run:
# For a project named 'MyFirstPyApp'
cd path/to/MyFirstPyApp
python3 -m venv venv
This creates a
venvfolder containing a self-contained Python environment. -
Activate the Environment:
source venv/bin/activate
Your Terminal prompt will change to show
(venv), indicating the environment is active. -
Add the Virtual Environment to MyEclipse:
- Go back to MyEclipse:
MyEclipse->Preferences...->PyDev->Interpreter - Python. - Click
New...again. - The executable for your virtual environment is located inside the
venvfolder:/path/to/MyFirstPyApp/venv/bin/python. - Select this executable. Name
- Go back to MyEclipse: