Of course! Using Python with Qt Creator is a powerful and popular combination. Qt Creator is an excellent, lightweight IDE that provides fantastic tools for developing Qt applications, and Python makes development fast and expressive.

Here’s a comprehensive guide covering everything you need to know, from setting up your environment to debugging and building your first application.
The Core Concept: PyQt vs. PySide
First, you need to understand the two main libraries that allow you to use Qt with Python.
| Feature | PyQt | PySide |
|---|---|---|
| Developer | Riverbank Computing | The Qt Company (official) |
| License | GPL or Commercial License | LGPL (more permissive for commercial apps) |
| API | Almost identical to Qt C++ API | Very similar to PyQt, designed to be its replacement |
| Qt Designer | pyuic6 (compiles .ui to .py) |
pyside6-uic (compiles .ui to .py) |
| Tools | pyrcc6 (for .qrc resource files) |
pyside6-rcc (for .qrc resource files) |
Recommendation: For new projects, PySide6 is generally recommended because of its more permissive LGPL license, which is ideal for both open-source and proprietary applications without requiring you to purchase a commercial license.
Installation: Getting the Tools Ready
You need two things: the Python library and the Qt Creator IDE.

A. Install Python and the Qt for Python Library (PySide6)
The easiest way to manage this is with pip.
-
Install Python: If you don't have it, download and install Python from python.org. Crucially, make sure to check "Add Python to PATH" during installation.
-
Install PySide6: Open your command prompt or terminal and run:
pip install pyside6
This single command will install PySide6 and all its dependencies, including a copy of the Qt libraries.
 (图片来源网络,侵删)
 -
Verify Installation: You can check if it's working by running this Python command:
import PySide6
print(PySide6.__version__)
B. Install Qt Creator
- Download the "Open Source" installer from the Qt Company website.
- Run the installer.
- When selecting components, make sure you choose a Qt version that matches the Python library you installed (e.g., if you installed
pyside6, you should install Qt 6.x). - You don't strictly need to install the "Qt Creator" source code or the "Qt 6" source code, but you do need the Qt 6 libraries for your platform (Windows, macOS, Linux).
Setting Up Qt Creator for Python Development
This is the most important step. Qt Creator needs to know how to find your Python interpreter and run your scripts.
Step 1: Create a New Project
- Open Qt Creator.
- Go to File > New Project...
- Select Applications > Python Project and click Choose.
- Give your project a name and choose a location. Click Next.
- Select "Non-Qt Console Application" as the template. This gives you a clean Python project without any Qt assumptions.
- Click Next.
- Crucially, on the "Project Setup" screen, select the correct Python interpreter that has PySide6 installed. Qt Creator should auto-detect it, but double-check.
- Click Finish. You now have a basic Python project.
Step 2: Configure the Kit
A "Kit" in Qt Creator is a collection of tools (compiler, debugger, Qt version) used to build a project. We need to tell our Python kit how to run our application.
- Go to Tools > Options...
- In the left pane, navigate to Kits > Kits.
- Find your Python kit (it might be named "Python 3.x (PySide6)"). Select it.
- On the right, look for the "Run" section.
- The "Run environment" should be set to "Python".
- Qt Creator will automatically find your
python.exeorpython3executable. This is what it will use to run your script.
You're now set up! You can write Python code in the editor, and pressing the green "Run" button will execute it.
Your First PySide6 Application in Qt Creator
Let's create a simple "Hello, World!" window using Qt Designer, which is integrated into Qt Creator.
Method 1: Using Qt Designer (The Visual Way)
This is the most common and productive workflow.
-
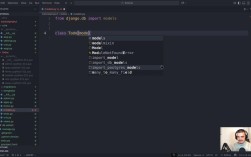
Create a UI File:
- In the "Projects" mode, right-click your project in the "Projects" pane on the left.
- Select Add New...
- Choose Qt > Qt Designer Form. Pick a
Widgettemplate and name itmain_window.ui. - Click Choose. Qt Designer will open.
-
Design the UI:
- Drag a
Labeland aPush Buttonfrom the "Containers" and "Buttons" sections of the widget box onto the form. - Select the
Labeland in the "Property Editor" pane on the right, change itstextproperty to "Hello from Python!". - Select the
Push Buttonand change itstextto "Click Me!". - Save the file (
Ctrl+S).
- Drag a
-
Compile the UI to Python:
- Open a terminal or command prompt.
- Navigate to your project's directory (where
main_window.uiis). - Run the
pyside6-uiccommand to convert the.uifile into a Python module:pyside6-uic main_window.ui -o ui_main_window.py
- You will now see a new file,
ui_main_window.py, in your project. This Python file contains a class that builds your UI.
-
Write the Python Logic:
- In Qt Creator, create a new Python file named
main.py. - Write the code to load the UI and connect the button's click event to a function.
import sys from PySide6.QtWidgets import QApplication, QMainWindow # Import the UI class generated by pyside6-uic from ui_main_window import Ui_MainWindow class MainWindow(QMainWindow): def __init__(self): super(MainWindow, self).__init__() # self.setupUi is the method from the generated UI file self.ui = Ui_MainWindow() self.ui.setupUi(self) # Connect the button's 'clicked' signal to our custom slot self.ui.pushButton.clicked.connect(self.on_button_clicked) def on_button_clicked(self): # This is our custom slot (function) print("Button was clicked!") self.ui.label.setText("Button Clicked!") if __name__ == "__main__": app = QApplication(sys.argv) window = MainWindow() window.show() sys.exit(app.exec()) - In Qt Creator, create a new Python file named
-
Run the Application:
- Make sure
main.pyis your active file in the editor. - Press the green "Run" button (or press
Ctrl+R). - Your window should appear, and clicking the button will update the label and print to the application output pane in Qt Creator.
- Make sure
Method 2: Pure Python Code (The Programmatic Way)
You can also build your UI entirely in Python without a .ui file.
-
Create a new Python file named
main_programmatic.py. -
Write the following code:
import sys from PySide6.QtWidgets import ( QApplication, QMainWindow, QWidget, QVBoxLayout, QLabel, QPushButton ) class MainWindow(QMainWindow): def __init__(self): super().__init__() self.setWindowTitle("Pure Python App") # Create central widget and layout central_widget = QWidget() self.setCentralWidget(central_widget) layout = QVBoxLayout(central_widget) # Create widgets self.label = QLabel("Hello from Python!") self.button = QPushButton("Click Me!") # Add widgets to layout layout.addWidget(self.label) layout.addWidget(self.button) # Connect signal to slot self.button.clicked.connect(self.on_button_clicked) def on_button_clicked(self): print("Button was clicked!") self.label.setText("Button Clicked!") if __name__ == "__main__": app = QApplication(sys.argv) window = MainWindow() window.show() sys.exit(app.exec()) -
Run this file as before. The result is identical.
Pro Tips for a Smooth Workflow
- Automate UI Compilation: Manually running `pys