Of course! Here is a comprehensive guide to using SIFT (Scale-Invariant Feature Transform) with OpenCV in Python.

What is SIFT?
SIFT is a powerful computer vision algorithm used to detect and describe local features in images. The key idea is that these features are invariant to scale, rotation, and illumination changes, and partially invariant to changes in viewpoint.
This makes SIFT extremely useful for:
- Object Detection: Finding an object in a larger image.
- Image Stitching: Creating panoramas from multiple images.
- 3D Modeling: Reconstructing 3D scenes from 2D images.
- Image Retrieval: Finding similar images in a large database.
The process has two main steps:
- Key Point Detection: Finding interesting points in the image (like corners, blobs, etc.).
- Key Point Description: For each key point, creating a unique "fingerprint" (a vector of numbers) that describes the local region around it.
The SIFT Patent Issue (Important!)
For a long time, SIFT was patented and not included in the main OpenCV build. This changed with OpenCV version 4.5.0. The patent has now expired, and SIFT is fully available again.

Prerequisites: Make sure you have a recent version of OpenCV:
pip install opencv-python
# For better performance, you can also install the contrib package
pip install opencv-contrib-python
Example 1: Basic SIFT Detection and Visualization
This is the simplest example: we'll load an image, find its SIFT keypoints, and draw them on the image.
import cv2
import numpy as np
import matplotlib.pyplot as plt
# 1. Load the image
# It's often better to convert to grayscale for feature detection
image_path = 'path/to/your/image.jpg'
image = cv2.imread(image_path)
if image is None:
    print(f"Error: Could not load image from {image_path}")
    exit()
gray_image = cv2.cvtColor(image, cv2.COLOR_BGR2GRAY)
# 2. Create a SIFT object
# The sift object holds the parameters for the SIFT algorithm
sift = cv2.SIFT_create()
# 3. Detect keypoints and compute descriptors
# keypoints: A list of detected key points.
#          Each key point is an object with information like (x, y) coordinates, size, angle, etc.
# descriptors: A numpy array where each row is the 128-dimensional descriptor vector
#              for the corresponding key point.
keypoints, descriptors = sift.detectAndCompute(gray_image, None)
print(f"Number of keypoints detected: {len(keypoints)}")
print(f"Shape of the descriptors matrix: {descriptors.shape}")
# 4. Draw the keypoints on the original image
# cv2.drawKeypoints() can draw in different styles:
# cv2.DRAW_MATCHES_FLAGS_DEFAULT: Circles with size and orientation
# cv2.DRAW_MATCHES_FLAGS_DRAW_RICH_KEYPOINTS: Draws a circle and the orientation
image_with_keypoints = cv2.drawKeypoints(
    image,
    keypoints,
    None,
    flags=cv2.DRAW_MATCHES_FLAGS_DRAW_RICH_KEYPOINTS
)
# 5. Display the results
plt.figure(figsize=(12, 6))
plt.subplot(1, 2, 1)
plt.imshow(cv2.cvtColor(image, cv2.COLOR_BGR2RGB))'Original Image')
plt.axis('off')
plt.subplot(1, 2, 2)
plt.imshow(cv2.cvtColor(image_with_keypoints, cv2.COLOR_BGR2RGB))'Image with SIFT Keypoints')
plt.axis('off')
plt.show()
What the output will look like: You'll see the original image and the same image with circles drawn around the detected keypoints. The size of the circle corresponds to the scale of the keypoint, and a line from the center shows its orientation.
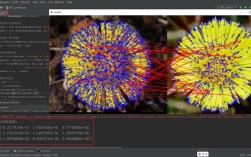
Example 2: Feature Matching between Two Images
This is the most common use case for SIFT. We'll find common keypoints between two images of the same object from different angles.

import cv2
import numpy as np
import matplotlib.pyplot as plt
# 1. Load two images
image1_path = 'path/to/image1.jpg'
image2_path = 'path/to/image2.jpg'
img1 = cv2.imread(image1_path, cv2.IMREAD_GRAYSCALE)
img2 = cv2.imread(image2_path, cv2.IMREAD_GRAYSCALE)
if img1 is None or img2 is None:
    print("Error: Could not load one or both images.")
    exit()
# 2. Initialize SIFT detector and find keypoints/descriptors for both images
sift = cv2.SIFT_create()
kp1, des1 = sift.detectAndCompute(img1, None)
kp2, des2 = sift.detectAndCompute(img2, None)
# 3. Match the descriptors using a FLANN based matcher
# FLANN (Fast Library for Approximate Nearest Neighbors) is much faster
# than brute-force matching for large descriptor sets.
# We use a ratio test to filter good matches.
FLANN_INDEX_KDTREE = 1
index_params = dict(algorithm=FLANN_INDEX_KDTREE, trees=5)
search_params = dict(checks=50)  # or pass empty dictionary
flann = cv2.FlannBasedMatcher(index_params, search_params)
matches = flann.knnMatch(des1, des2, k=2)
# 4. Apply ratio test to find good matches
# This helps filter out ambiguous matches.
good_matches = []
for m, n in matches:
    if m.distance < 0.7 * n.distance:
        good_matches.append(m)
print(f"Number of good matches: {len(good_matches)}")
# 5. Draw the matches
# We need to convert grayscale images back to BGR for drawing color matches
img1_bgr = cv2.cvtColor(img1, cv2.COLOR_GRAY2BGR)
img2_bgr = cv2.cvtColor(img2, cv2.COLOR_GRAY2BGR)
# cv2.drawMatchesKnn expects a list of lists of matches
match_img = cv2.drawMatchesKnn(
    img1_bgr, kp1,
    img2_bgr, kp2,
    [good_matches],
    None,
    flags=cv2.DrawMatchesFlags_NOT_DRAW_SINGLE_POINTS
)
# 6. Display the result
plt.figure(figsize=(15, 8))
plt.imshow(cv2.cvtColor(match_img, cv2.COLOR_BGR2RGB))'Feature Matching with SIFT')
plt.axis('off')
plt.show()
What the output will look like: You will see the two images placed side-by-side, with lines connecting the keypoints that were successfully matched. The ratio test helps ensure that these lines connect truly similar features and not random noise.
Key SIFT Parameters (in cv2.SIFT_create())
You can customize the SIFT algorithm's behavior when you create the object:
-
nfeatures: The number of best features to retain. By default, it's 0, meaning it keeps all detected features. You can set this to a lower number to speed up processing and focus on the most prominent features.sift = cv2.SIFT_create(nfeatures=500) # Keep only the top 500 features
-
nOctaveLayers: The number of layers in each octave. More layers can detect smaller features but is slower. Default is 3.sift = cv2.SIFT_create(nOctaveLayers=5)
-
contrastThreshold: Filters out weak features. A higher value means fewer features are detected. Default is 0.04.sift = cv2.SIFT_create(contrastThreshold=0.1) # Detect only strong features
-
edgeThreshold: Filters out features that are too close to the edges. A higher value means more features are detected. Default is 10.sift = cv2.SIFT_create(edgeThreshold=20)
-
sigma: The Gaussian blur applied to the input image at the 0th octave. Default is 1.6.sift = cv2.SIFT_create(sigma=1.0)
SIFT Alternatives
While SIFT is excellent, other feature detectors/descriptors are also popular:
- SURF: Faster than SIFT but patented (expired, but not in OpenCV by default). Similar performance.
- ORB (Oriented FAST and Rotated BRIEF): A great, fast, and free alternative. It's binary-based, making it very fast and suitable for real-time applications and mobile devices. It's often the go-to choice when SIFT is not available or too slow.
- BRISK: Another binary descriptor, faster than SIFT.
- KAZE / AKAZE: These are more recent and can provide better performance in some cases, especially AKAZE, which is scale-invariant and fast.
For most modern applications, especially where speed is a concern, ORB is an excellent choice to try first.