Of course! This is a classic and powerful combination for building real-time web applications. Here’s a comprehensive guide covering the concepts, a complete working example, and best practices.
Core Concepts: The Client-Side (HTML5 WebSocket)
The client-side is the web browser. Instead of the traditional HTTP request/response cycle, the browser opens a persistent connection to the server using the WebSocket API.
Key JavaScript APIs:
new WebSocket(url): Creates a new WebSocket connection.url: The WebSocket server address (e.g.,ws://localhost:8080/my-app). Usewss://for secure connections.
onopen: An event handler called when the connection is successfully established.onmessage: An event handler called when a message is received from the server. The data is in theevent.dataproperty.onerror: An event handler called when an error occurs.onclose: An event handler called when the connection is closed.send(data): Sends data to the server. The data can be a string,Blob, orArrayBuffer.close(): Closes the WebSocket connection.
Core Concepts: The Server-Side (Java)
On the Java server, you need a WebSocket "endpoint" that can listen for, accept, and manage connections from clients. The standard way to do this in Java is using the Java API for WebSocket (JSR-356), which is part of Java EE (and Jakarta EE in newer versions).
There are two main programming models for WebSocket endpoints:
- Programmatic API (
@ServerEndpoint): An annotation-based model. It's simpler and great for most use cases. You define a class with lifecycle methods (@OnOpen,@OnClose, etc.). - Programmatic API (
Endpoint): A more traditional, class-based inheritance model. It's more flexible but also more verbose.
For this guide, we'll focus on the simpler @ServerEndpoint model.
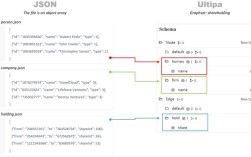
The Communication Protocol: JSON
To make the client and server understand each other, they need to agree on a message format. JSON (JavaScript Object Notation) is the most common choice because it's natively supported in JavaScript and easily parsed in Java.

We'll define a simple message structure:
{
  "type": "message",
  "content": "Hello from the client!"
}
Complete Working Example: A Simple Chat Application
Let's build a real-time chat application where a user can type a message and see it appear on all connected clients' screens in real-time.

Project Setup (Maven)
You'll need a basic Maven project. The key dependency is for the WebSocket API. For a server like Tomcat, you don't need to add this dependency explicitly as it's provided by the container.
pom.xml

<project xmlns="http://maven.apache.org/POM/4.0.0"
         xmlns:xsi="http://www.w3.org/2001/XMLSchema-instance"
         xsi:schemaLocation="http://maven.apache.org/POM/4.0.0 http://maven.apache.org/xsd/maven-4.0.0.xsd">
    <modelVersion>4.0.0</modelVersion>
    <groupId>com.example</groupId>
    <artifactId>websocket-chat</artifactId>
    <version>1.0-SNAPSHOT</version>
    <packaging>war</packaging>
    <properties>
        <maven.compiler.source>11</maven.compiler.source>
        <maven.compiler.target>11</maven.compiler.target>
    </properties>
    <dependencies>
        <!-- No explicit WebSocket dependency needed for Tomcat, it's provided -->
    </dependencies>
    <build>
        <finalName>websocket-chat</finalName>
        <plugins>
            <plugin>
                <groupId>org.apache.maven.plugins</groupId>
                <artifactId>maven-war-plugin</artifactId>
                <version>3.3.2</version>
            </plugin>
        </plugins>
    </build>
</project>
Step 1: The Java WebSocket Endpoint
This class will handle all WebSocket logic: connecting, disconnecting, and broadcasting messages.
src/main/java/com/example/chat/ChatServerEndpoint.java
package com.example.chat;
import jakarta.websocket.*;
import jakarta.websocket.server.ServerEndpoint;
import java.io.IOException;
import java.util.Collections;
import java.util.HashSet;
import java.util.Set;
@ServerEndpoint("/chat")
public class ChatServerEndpoint {
    // A thread-safe Set to store all active sessions
    private static final Set<Session> chatroomUsers = Collections.synchronizedSet(new HashSet<>());
    @OnOpen
    public void onOpen(Session session) {
        // Add the new session to the set of connected users
        chatroomUsers.add(session);
        System.out.println("New connection opened. Session ID: " + session.getId());
        try {
            // Notify everyone that a new user has joined
            broadcast("User " + session.getId() + " has joined the chat.");
        } catch (IOException e) {
            System.err.println("Error broadcasting onOpen message: " + e.getMessage());
        }
    }
    @OnMessage
    public void onMessage(String message, Session session) throws IOException {
        System.out.println("Message from " + session.getId() + ": " + message);
        // Broadcast the received message to all connected clients
        broadcast("User " + session.getId() + ": " + message);
    }
    @OnClose
    public void onClose(Session session) {
        // Remove the session from the set of connected users
        chatroomUsers.remove(session);
        System.out.println("Connection closed. Session ID: " + session.getId());
        try {
            // Notify everyone that a user has left
            broadcast("User " + session.getId() + " has left the chat.");
        } catch (IOException e) {
            System.err.println("Error broadcasting onClose message: " + e.getMessage());
        }
    }
    @OnError
    public void onError(Session session, Throwable throwable) {
        System.err.println("Error on session " + session.getId());
        throwable.printStackTrace();
    }
    /**
     * Helper method to send a message to all connected clients.
     * @param message The message to broadcast.
     */
    private void broadcast(String message) throws IOException {
        for (Session user : chatroomUsers) {
            if (user.isOpen()) {
                user.getBasicRemote().sendText(message);
            }
        }
    }
}
Step 2: The HTML5 Client
This HTML file contains the user interface and the JavaScript to connect to our Java endpoint.
src/main/webapp/index.html
<!DOCTYPE html>
<html lang="en">
<head>
    <meta charset="UTF-8">
    <meta name="viewport" content="width=device-width, initial-scale=1.0">Java WebSocket Chat</title>
    <style>
        body { font-family: Arial, sans-serif; margin: 20px; }
        #chat-log {
            border: 1px solid #ccc;
            padding: 10px;
            height: 300px;
            overflow-y: scroll;
            margin-bottom: 10px;
        }
        #message-input {
            width: 70%;
            padding: 8px;
        }
        #send-button {
            width: 25%;
            padding: 8px;
        }
    </style>
</head>
<body>
    <h1>Java WebSocket Chat</h1>
    <div id="chat-log"></div>
    <div>
        <input type="text" id="message-input" placeholder="Type a message...">
        <button id="send-button">Send</button>
    </div>
    <script>
        // Determine the WebSocket URL based on the current page protocol and host
        const protocol = window.location.protocol === 'https:' ? 'wss:' : 'ws:';
        const wsUrl = `${protocol}//${window.location.host}/websocket-chat/chat`;
        const chatLog = document.getElementById('chat-log');
        const messageInput = document.getElementById('message-input');
        const sendButton = document.getElementById('send-button');
        let ws;
        function connect() {
            ws = new WebSocket(wsUrl);
            ws.onopen = function(event) {
                console.log("Connected to WebSocket server.");
                appendLog("Connected to the chat server.");
            };
            ws.onmessage = function(event) {
                console.log("Message received from server: ", event.data);
                appendLog(event.data);
            };
            ws.onclose = function(event) {
                if (event.wasClean) {
                    console.log(`Connection closed cleanly, code=${event.code} reason=${event.reason}`);
                } else {
                    console.error('Connection died');
                }
                appendLog("Connection lost. Attempting to reconnect...");
                // Attempt to reconnect after 5 seconds
                setTimeout(connect, 5000);
            };
            ws.onerror = function(error) {
                console.error("WebSocket Error: " + error);
                appendLog("An error occurred.");
            };
        }
        function appendLog(message) {
            const p = document.createElement('p');
            p.textContent = message;
            chatLog.appendChild(p);
            // Auto-scroll to the bottom
            chatLog.scrollTop = chatLog.scrollHeight;