Of course! This is a classic and essential combination for building many types of applications, from small tools to enterprise-level systems. Let's break down how to connect Java (in Eclipse) to MySQL, covering everything from setup to executing a full "CRUD" (Create, Read, Update, Delete) example.

Overview of the Process
- Prerequisites: Install the necessary software (Java, Eclipse, MySQL).
- Setup MySQL: Create a database and a user for your application.
- Add JDBC Driver: Get the MySQL JDBC driver and add it to your Eclipse project.
- Write Java Code: Connect to the database, execute queries, and process the results.
- Best Practices: Use
try-with-resourcesandPreparedStatementto write safe and clean code.
Step 1: Prerequisites & Setup
1. Install Software
- Java Development Kit (JDK): Ensure you have JDK 8 or newer installed.
- Eclipse IDE for Java Developers: Download and install from the Eclipse website.
- MySQL Server: Download and install the Community Server from the MySQL website. During installation, you'll set a root password.
2. Create a Database and User in MySQL
- Open the MySQL command-line client (or a tool like MySQL Workbench).
- Log in as the root user:
mysql -u root -p
- Enter your root password when prompted.
- Create a new database for your project:
CREATE DATABASE java_test_db;
- Create a new user and grant it privileges on the database. It's bad practice to use the
rootuser in your application.CREATE USER 'java_user'@'localhost' IDENTIFIED BY 'your_strong_password'; GRANT ALL PRIVILEGES ON java_test_db.* TO 'java_user'@'localhost'; FLUSH PRIVILEGES;
- Exit the client:
EXIT;
Step 2: Add the MySQL JDBC Driver to Your Eclipse Project
The JDBC driver is a .jar file that acts as a bridge, allowing your Java code to communicate with the MySQL database.
- Download the Driver: Go to the MySQL Connector/J download page. Select "Platform Independent (Architecture Independent), ZIP Archive" and download it.
- Unzip the file: You will find a file named
mysql-connector-j-8.x.x.jar(the version number may vary). - Add the JAR to your Eclipse Project:
- In Eclipse, create a new Java project:
File -> New -> Java Project. Give it a name (e.g.,JavaMySQLExample) and clickFinish. - In the "Project Explorer" view, right-click on your project name (
JavaMySQLExample) and go toBuild Path -> Configure Build Path.... - In the Libraries tab, click
Add External JARs.... - Navigate to where you unzipped the driver file, select
mysql-connector-j-8.x.x.jar, and clickOpen. - Click
Apply and Close. You should now see the JAR file under your project'sReferenced Libraries.
- In Eclipse, create a new Java project:
Step 3: Java Code for Database Connection
Now, let's write the Java code. We will create a class to handle the connection and then a class to perform database operations.
1. A Utility Class for the Connection
It's good practice to have a class that manages the database connection.
DBUtil.java

import java.sql.Connection;
import java.sql.DriverManager;
import java.sql.SQLException;
public class DBUtil {
    // --- IMPORTANT: Update these values ---
    private static final String DB_URL = "jdbc:mysql://localhost:3306/java_test_db?useSSL=false&serverTimezone=UTC";
    private static final String DB_USER = "java_user";
    private static final String DB_PASSWORD = "your_strong_password";
    // ------------------------------------
    public static Connection getConnection() throws SQLException {
        try {
            // Load the MySQL JDBC driver
            Class.forName("com.mysql.cj.jdbc.Driver");
            System.out.println("Driver loaded successfully.");
        } catch (ClassNotFoundException e) {
            System.err.println("MySQL JDBC Driver not found.");
            e.printStackTrace();
            throw new SQLException("Driver not found", e);
        }
        return DriverManager.getConnection(DB_URL, DB_USER, DB_PASSWORD);
    }
}
Explanation:
DB_URL: The connection string.3306is the default MySQL port.java_test_dbis our database.useSSL=falseis for local development (in production, use proper SSL).serverTimezone=UTCprevents a time zone warning.DB_USER&DB_PASSWORD: The credentials for the user we created.Class.forName("com.mysql.cj.jdbc.Driver"): This line explicitly loads the driver class. While often not strictly necessary in modern JDBC drivers, it's good practice and ensures compatibility.DriverManager.getConnection(...): This is the standard method to establish a connection.
**Step 4: Complete CRUD Example
Let's create a table and then perform all four CRUD operations.
1. Create a Table
Run this SQL command in your MySQL client:
USE java_test_db;
CREATE TABLE employees (
    id INT AUTO_INCREMENT PRIMARY KEY,
    name VARCHAR(100) NOT NULL,
    position VARCHAR(100),
    salary DECIMAL(10, 2)
);
2. The Main Application Class
This class will demonstrate all operations.
MainApp.java
import java.sql.Connection;
import java.sql.PreparedStatement;
import java.sql.ResultSet;
import java.sql.SQLException;
import java.sql.Statement;
public class MainApp {
    public static void main(String[] args) {
        // --- 1. CREATE (Insert) ---
        System.out.println("--- CREATE ---");
        createEmployee("Alice", "Software Engineer", 95000.00);
        createEmployee("Bob", "Project Manager", 105000.00);
        // --- 2. READ (Select) ---
        System.out.println("\n--- READ (All Employees) ---");
        readAllEmployees();
        // --- 3. UPDATE ---
        System.out.println("\n--- UPDATE ---");
        updateEmployeeSalary(1, 100000.00); // Update Alice's salary
        System.out.println("Updated employee with ID 1.");
        readAllEmployees(); // Read again to see the change
        // --- 4. DELETE ---
        System.out.println("\n--- DELETE ---");
        deleteEmployee(2); // Delete Bob
        System.out.println("Deleted employee with ID 2.");
        readAllEmployees(); // Read again to confirm deletion
    }
    // CREATE Operation
    public static void createEmployee(String name, String position, double salary) {
        String sql = "INSERT INTO employees (name, position, salary) VALUES (?, ?, ?)";
        // Using try-with-resources to automatically close the connection and statement
        try (Connection conn = DBUtil.getConnection();
             PreparedStatement pstmt = conn.prepareStatement(sql)) {
            pstmt.setString(1, name);
            pstmt.setString(2, position);
            pstmt.setDouble(3, salary);
            int affectedRows = pstmt.executeUpdate();
            System.out.println(affectedRows + row(s) inserted successfully.");
        } catch (SQLException e) {
            e.printStackTrace();
        }
    }
    // READ Operation
    public static void readAllEmployees() {
        String sql = "SELECT id, name, position, salary FROM employees";
        try (Connection conn = DBUtil.getConnection();
             Statement stmt = conn.createStatement();
             ResultSet rs = stmt.executeQuery(sql)) {
            System.out.println("ID\tName\t\tPosition\tSalary");
            System.out.println("--------------------------------------------");
            while (rs.next()) {
                // Retrieve by column name for clarity and robustness
                int id = rs.getInt("id");
                String name = rs.getString("name");
                String position = rs.getString("position");
                double salary = rs.getDouble("salary");
                System.out.printf("%d\t%-15s\t%-15s\t%.2f%n", id, name, position, salary);
            }
        } catch (SQLException e) {
            e.printStackTrace();
        }
    }
    // UPDATE Operation
    public static void updateEmployeeSalary(int id, double newSalary) {
        String sql = "UPDATE employees SET salary = ? WHERE id = ?";
        try (Connection conn = DBUtil.getConnection();
             PreparedStatement pstmt = conn.prepareStatement(sql)) {
            pstmt.setDouble(1, newSalary);
            pstmt.setInt(2, id);
            int affectedRows = pstmt.executeUpdate();
            System.out.println(affectedRows + " row(s) updated.");
        } catch (SQLException e) {
            e.printStackTrace();
        }
    }
    // DELETE Operation
    public static void deleteEmployee(int id) {
        String sql = "DELETE FROM employees WHERE id = ?";
        try (Connection conn = DBUtil.getConnection();
             PreparedStatement pstmt = conn.prepareStatement(sql)) {
            pstmt.setInt(1, id);
            int affectedRows = pstmt.executeUpdate();
            System.out.println(affectedRows + " row(s) deleted.");
        } catch (SQLException e) {
            e.printStackTrace();
        }
    }
    // Helper method for singular/plural
    private static String row(int count) {
        return count == 1 ? " row" : " rows";
    }
}
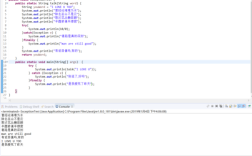
Step 5: Run the Code
- Make sure
MainApp.javais the active file in the editor. - Right-click anywhere in the editor and select
Run As -> Java Application.
You should see output in the console showing the creation, reading, updating, and deleting of records, demonstrating a successful connection and interaction with your MySQL database.
Best Practices & Key Concepts
try-with-resources: Thetry (Connection conn = ...)syntax is crucial. It ensures that yourConnection,Statement, andResultSetobjects are automatically closed when the block is exited, even if an exception occurs. This prevents resource leaks.PreparedStatementvsStatement:PreparedStatement: Always use this for parameterized queries (likeINSERT,UPDATE, or queries withWHEREclauses). It pre-compiles the SQL and uses placeholders (). This is safer (prevents SQL Injection attacks) and often more efficient if you run the same query multiple times.Statement: Use this only for static SQL commands with no user input, likeCREATE TABLEorDROP TABLE.
- SQL Injection: Never concatenate user input directly into an SQL string. This is a major security vulnerability.
PreparedStatementsolves this by treating user input as data, not as executable code. - Exception Handling: Database operations can fail for many reasons (wrong password, network down, table doesn't exist). Always wrap JDBC code in
try-catchblocks to handleSQLExceptiongracefully.