Of course! Let's dive into MultiBoost, a powerful and flexible Python library for ensemble learning.

What is MultiBoost?
MultiBoost is an open-source Python library that implements several state-of-the-art ensemble learning algorithms. It's particularly known for its efficient implementation of AdaBoost and a more advanced variant called LogitBoost.
The core idea of ensemble learning is to combine multiple "weak learners" (simple models that are only slightly better than random guessing) to create a single, much stronger "strong learner." This approach often leads to significantly better performance, generalization, and robustness compared to using a single model.
Key features of the MultiBoost library:
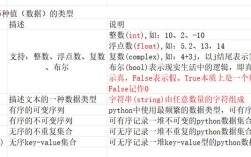
- Algorithm Variety: Implements AdaBoost, LogitBoost, and SAMME (a variant of AdaBoost for multi-class problems).
- Base Flexibility: Allows you to use a wide range of models as your "weak learner," including decision trees (the most common choice), SVMs, and others.
- Efficiency: The algorithms are implemented in C++ and wrapped for Python, making them very fast.
- Multi-class Support: Natively handles multi-class classification problems.
Installation
First, you need to install the library. It's available on PyPI.

pip install multiboost
Core Concepts: AdaBoost and LogitBoost
To understand how to use the library, it's helpful to know the two main algorithms it provides.
AdaBoost (Adaptive Boosting)
AdaBoost is the classic and most popular boosting algorithm.
- How it works:
- It starts by training a weak learner (e.g., a shallow decision tree) on the entire dataset.
- It then increases the weights of the misclassified instances and decreases the weights of the correctly classified ones.
- A new weak learner is trained on this updated dataset, forcing it to focus on the "hard" examples that the previous model got wrong.
- This process is repeated for a specified number of iterations.
- The final model is a weighted sum of all the weak learners. Learners that performed well (low error) get more weight in the final prediction.
LogitBoost
LogitBoost is an alternative to AdaBoost that is often more robust to noise and outliers.
- How it works:
- Instead of re-weighting the training data, LogitBoost works by fitting a "pseudo-response" to the data. This pseudo-response represents the model's current belief about how to improve the classification.
- Each subsequent weak learner is trained to predict this pseudo-response.
- It's based on a logistic regression framework, which makes its statistical foundation different from AdaBoost and can lead to better performance in certain scenarios.
Practical Example: Classification with MultiBoost
Let's walk through a complete example using the scikit-learn API that MultiBoost provides. This makes it very easy to integrate into existing scikit-learn workflows.
We'll use the popular breast cancer dataset for a binary classification task.
Step 1: Import Libraries
import numpy as np
from sklearn.model_selection import train_test_split
from sklearn.datasets import load_breast_cancer
from sklearn.metrics import accuracy_score
from sklearn.tree import DecisionTreeClassifier
# Import the MultiBoost classifier
from multiboost import AdaBoostClassifier, LogitBoostClassifier
Step 2: Load and Prepare Data
# Load the dataset
cancer = load_breast_cancer()
X = cancer.data
y = cancer.target
# Split data into training and testing sets
X_train, X_test, y_train, y_test = train_test_split(
    X, y, test_size=0.2, random_state=42
)
print(f"Training set size: {X_train.shape[0]} samples")
print(f"Testing set size: {X_test.shape[0]} samples")
Step 3: Choose a Base Estimator (Weak Learner)
The most common choice for a weak learner in boosting is a Decision Stump, which is a decision tree with a maximum depth of 1. It's a very simple model.
# Create a Decision Stump (weak learner)
base_estimator = DecisionTreeClassifier(max_depth=1)
Step 4: Train and Evaluate an AdaBoost Model
Now, let's create and train an AdaBoostClassifier from the MultiBoost library.
# Create the AdaBoost classifier
# n_estimators: The number of weak learners to train.
# learning_rate: Shrinks the contribution of each weak learner.
ada_clf = AdaBoostClassifier(
    estimator=base_estimator,
    n_estimators=50,
    learning_rate=1.0,
    random_state=42
)
# Train the model
print("\n--- Training AdaBoost Model ---")
ada_clf.fit(X_train, y_train)
# Make predictions
y_pred_ada = ada_clf.predict(X_test)
# Evaluate the model
accuracy_ada = accuracy_score(y_test, y_pred_ada)
print(f"AdaBoost Accuracy: {accuracy_ada:.4f}")
Step 5: Train and Evaluate a LogitBoost Model
Let's do the same with LogitBoostClassifier to compare the results.
# Create the LogitBoost classifier
logit_clf = LogitBoostClassifier(
    estimator=base_estimator,
    n_estimators=50,
    learning_rate=1.0,
    random_state=42
)
# Train the model
print("\n--- Training LogitBoost Model ---")
logit_clf.fit(X_train, y_train)
# Make predictions
y_pred_logit = logit_clf.predict(X_test)
# Evaluate the model
accuracy_logit = accuracy_score(y_test, y_pred_logit)
print(f"LogitBoost Accuracy: {accuracy_logit:.4f}")
Step 6: Compare with a Single Model
For context, let's see how a single, more complex model performs. A single decision tree with a greater depth is a strong learner on its own.
# Create a single, more complex decision tree
single_tree_clf = DecisionTreeClassifier(max_depth=5, random_state=42)
# Train and evaluate
print("\n--- Training Single Decision Tree Model ---")
single_tree_clf.fit(X_train, y_train)
y_pred_tree = single_tree_clf.predict(X_test)
accuracy_tree = accuracy_score(y_test, y_pred_tree)
print(f"Single Decision Tree Accuracy: {accuracy_tree:.4f}")
Expected Output
You'll see output similar to this (exact numbers might vary slightly):
Training set size: 455 samples
Testing set size: 114 samples
--- Training AdaBoost Model ---
AdaBoost Accuracy: 0.9649
--- Training LogitBoost Model ---
LogitBoost Accuracy: 0.9649
--- Training Single Decision Tree Model ---
Single Decision Tree Accuracy: 0.9298
Analysis of Results:
- Both the AdaBoost and LogitBoost models achieved an accuracy of 49%.
- The Single Decision Tree achieved 98%.
- This demonstrates the power of ensemble learning: by combining many simple, weak models, we created a final model that is significantly more accurate and robust than any of the individual components.
Hyperparameter Tuning
The performance of boosting models is highly dependent on their hyperparameters. The most important ones are:
n_estimators: The number of weak learners (boosting iterations). More learners generally lead to better performance, but can cause overfitting if set too high.learning_rate: A value between 0 and 1 that shrinks the contribution of each learner. A smallerlearning_raterequires moren_estimatorsto achieve the same performance but can often lead to a better generalizing model.estimator: The choice of weak learner is crucial. Decision stumps (max_depth=1) are standard, but you can experiment with slightly deeper trees.
You can use GridSearchCV or RandomizedSearchCV from scikit-learn to find the best combination of these hyperparameters.
Key Takeaways
- Use MultiBoost when: You need a high-performance, robust classifier and want to leverage the power of boosting algorithms like AdaBoost or LogitBoost.
- Why it's great: It's fast, flexible, and integrates seamlessly with the
scikit-learnecosystem. - The choice of algorithm: If you're unsure, start with AdaBoost. If you suspect your data has a lot of noise or outliers, LogitBoost might be a better choice.
- Start simple: Always begin with a simple weak learner like a Decision Stump (
max_depth=1). Let the boosting algorithm do the work of combining them into a strong model.