Of course! Setting up a Java development environment is a fundamental step for any aspiring Java developer. Here’s a comprehensive, step-by-step guide covering everything you need to know.

We'll break it down into two main parts:
- The Basic Setup: What you need to write and run Java code.
- The Professional Setup: The tools professional developers use to build robust applications.
Part 1: The Basic Java Environment
This is the absolute minimum you need to get started. You'll be able to write, compile, and run Java from your command line.
Install the Java Development Kit (JDK)
The JDK is the core of the Java environment. It contains:
- The Java Compiler (
javac): Translates your human-readable.javasource code into Java bytecode (.classfiles). - The Java Virtual Machine (JVM) (
java): Executes the compiled bytecode. - The Java Runtime Environment (JRE): The libraries and components needed to run Java applications.
- Standard Libraries: A vast collection of pre-built code for common tasks (file I/O, networking, data structures, etc.).
Which JDK to choose?

- Oracle JDK: The official reference implementation from Oracle. It's reliable but has a license that might be restrictive for some commercial uses.
- OpenJDK: The open-source reference implementation. It's functionally identical to the Oracle JDK for most users and is the standard in the open-source world. This is the recommended choice for most developers.
Installation Steps:
-
Windows:
- Go to the official OpenJDK downloads page. (e.g., Temurin or Corretto are popular distributions).
- Download the latest LTS (Long-Term Support) version for Windows (e.g., a
.msiinstaller). - Run the installer. It's highly recommended to accept the default installation path, which is typically
C:\Program Files\Java\jdk-<version>. This makes the next step much easier.
-
macOS:
- The easiest way is using a package manager like Homebrew.
- Open your Terminal and run:
brew install openjdk@17(or another LTS version like 11 or 21). - Homebrew will install the JDK and provide instructions on how to set up the environment variables.
-
Linux (Debian/Ubuntu):
 (图片来源网络,侵删)
- Open your terminal.
- Update your package list:
sudo apt update - Install the OpenJDK:
sudo apt install openjdk-17-jdk(oropenjdk-11-jdk, etc.).
Set Environment Variables
This is the most crucial step. You need to tell your operating system where to find the javac and java executables.
JAVA_HOME: Points to the root directory of your JDK installation.PATH: An environment variable that lists directories where executable programs are stored. You must add the JDK'sbindirectory to thePATH.
How to Set Them:
-
Windows:
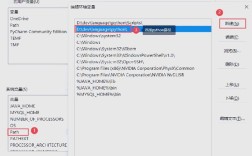
- Search for "Environment Variables" in the Start Menu and open "Edit the system environment variables".
- In the "System variables" section, click "New...".
- Variable name:
JAVA_HOME - Variable value: The path to your JDK (e.g.,
C:\Program Files\Java\jdk-17.0.2). - Click "OK".
- Find the
Pathvariable in the list, select it, and click "Edit...". - Click "New" and add the following entry:
%JAVA_HOME%\bin. - Click "OK" on all windows and restart your Command Prompt or PowerShell for the changes to take effect.
-
macOS / Linux (using bash/zsh):
- Open your
.zshrc(if using Zsh, default on modern macOS) or.bash_profile(if using Bash) file in a text editor.nano ~/.zshrcis a good choice. - Add these lines to the end of the file:
export JAVA_HOME=$(/usr/libexec/java_home -v 17) # For macOS, this command finds the JDK
export PATH="$JAVA_HOME/bin:$PATH"
On Linux,
JAVA_HOMEmight be simpler, like/usr/lib/jvm/java-17-openjdk-amd64. - Save the file and exit the editor.
- Apply the changes to your current terminal session by running:
source ~/.zshrc(orsource ~/.bash_profile).
- Open your
Verify the Installation
Open a new terminal/command prompt and type the following commands. You should see output similar to this.
# Check the Java version
java -version
# Expected Output:
# openjdk version "17.0.2" 2025-01-18
# OpenJDK Runtime Environment Temurin-17.0.2+7 (build 17.0.2+7)
# OpenJDK 64-Bit Server VM Temurin-17.0.2+7 (build 17.0.2+7, mixed mode, sharing)
# Check the compiler version
javac -version
# Expected Output:
# javac 17.0.2
If you see this, your basic Java environment is ready!
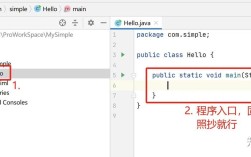
Write and Compile Your First Program
- Create a file named
HelloWorld.java. - Paste this code into it:
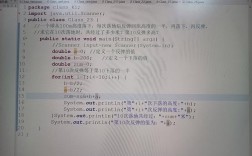
public class HelloWorld { public static void main(String[] args) { System.out.println("Hello, World!"); } } - Open your terminal, navigate to the directory where you saved the file.
- Compile the code:
javac HelloWorld.java- This creates a new file:
HelloWorld.class(the bytecode).
- This creates a new file:
- Run the program:
java HelloWorld- Notice: You do not include the
.classextension when running the program with thejavacommand.
- Notice: You do not include the
Expected Output:
Hello, World!Part 2: The Professional Java Environment (IDE & Build Tools)
While the command line works, professional developers use Integrated Development Environments (IDEs) and build tools to manage complex projects efficiently.
Choose an IDE (Integrated Development Environment)
An IDE provides a code editor, debugger, compiler, and many other tools in one application.
-
IntelliJ IDEA (Recommended):
- Community Edition: Free, open-source, and fantastic for all Java development.
- Ultimate Edition: Paid, with advanced support for web, mobile, and enterprise frameworks.
- Why it's great: The best code intelligence (refactoring, suggestions), debugger, and integration with build tools.
-
Eclipse:
- Free and open-source.
- Has a steeper learning curve but is extremely powerful and customizable with plugins. It was the industry standard for many years.
-
Visual Studio Code (VS Code):
- A lightweight, free code editor from Microsoft.
- Not a full-fledged IDE out-of-the-box, but becomes one with the Extension Pack for Java by Microsoft. Great for beginners and those who prefer a minimal setup.
Recommendation: Start with IntelliJ IDEA Community Edition. It's the modern standard and will make your life much easier.
Learn a Build Tool
For any project with more than one file, you need a build tool. It automates compilation, running tests, packaging your application into a JAR file, and managing dependencies (libraries from the internet).
- Maven: The most established and widely used build tool. It uses a declarative approach (
pom.xmlfile) and a strict project lifecycle. - Gradle: A newer, more flexible tool that combines the best of Maven and Ant. It uses a Groovy or Kotlin-based DSL (Domain-Specific Language) (
build.gradleorbuild.gradle.ktsfile) and is known for its speed and flexibility.
Recommendation: Both are excellent. Maven is easier to learn initially. Gradle is often preferred for its speed and flexibility in modern projects. Most modern IDEs can generate a project structure for you with a single click.
Summary: Your Professional Java Environment
- Install JDK: Install an OpenJDK (e.g., version 17 or 21).
- Set Environment Variables: Configure
JAVA_HOMEandPATH. - Install an IDE: Download and install IntelliJ IDEA Community Edition.
- Create a New Project:
- Open IntelliJ.
- Select "New Project".
- Choose "Maven" or "Gradle" as the build system.
- Select your JDK version.
- IntelliJ will automatically generate the project structure and
pom.xmlorbuild.gradlefile.
You are now ready to develop Java applications like a professional!